CNC PM-728V-T

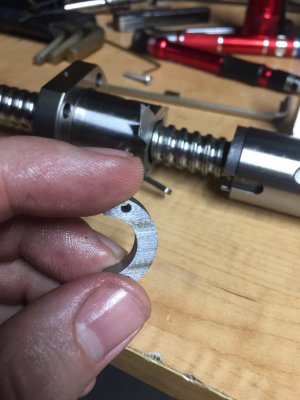
After researching through the night. I realize most double ball nuts have only one screw securing the key. My mistake, I was under the impression they had screws going to both halves

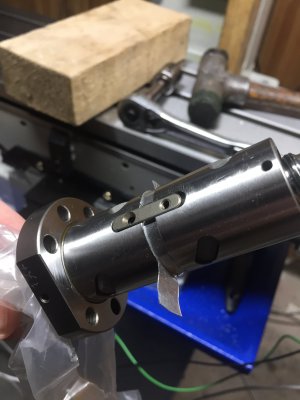
I was hoping I could just tighten up the ball nut to the spacer. I guess theoretically I could if there is clearance on the sides of the key.( don’t know if or how much it’s got)

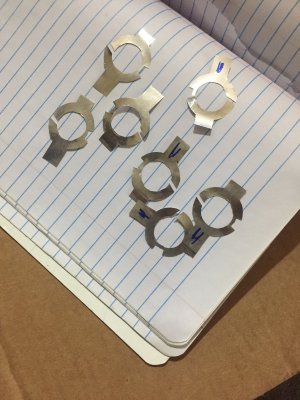
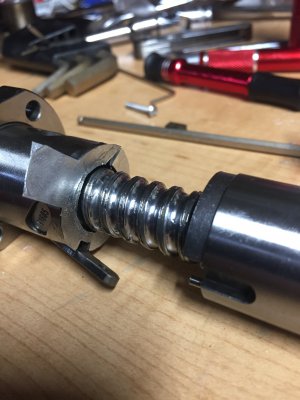
Still don’t know why the ball nuts were not preloaded before being shipped to me. Since the spacer is just floating in there as it is now. I don’t know if one half is crooked to the screw or not so I’m going to try and record all the gaps in each axis before loosening the key and shim it in .0005 increments over what gap I measured, tighten them up and make sure they still turn freely the length of the screw. Maybe work the shim thickness up a few times till it becomes tight on the screw at any point. Then back it off a little and then plan on making new spacers based on what I had to shim each one the get a nice preload.

Assembling and disassembling multiple times is not what I wanted to be doing. Oh well, it seems to be what needs to be done.
 
Last edited:
I'm intrigued... How did you machine the internal D?

EDIT: Forgot you said you had EDM equipment, that is sweet. That would would be a complete headache for me to make with the equipment I have. Maybe on the CNC, but it wouldn't look that sharp.
I don’t have my own EDM machines, but I work in a primarily EDM shop... well I don’t have my own yet. Planning on it once I get some industrial space to lease.
 
Last edited:
Yes tubing would be easier. I was mainly thinking about slicing the thickness and then cutting the ring in half. Just use a rough single pass to make the OD and ID since I have flat stock on hand

I was confused that there is only one screw in the key and it appears the opposite hole that doesn’t have a screw in it, and is threaded? Yet there is no hole or threads on the second half of the ball nut?You can it if you zoom in on the pic with the shim.

That’s why I was hesitant to try and tighten it up onto the spacer... I’ll wait to see what PM says about this. But I feel like I’m going to be pulling X and Y back out too.

Weird.. I started looking online at a lot of the Chinese double nut ballscrews and they only have one screw on the key. All it needs to do is oppose motion of the nuts relative to each other. Shimming or adjusting the spacer thickness should work regardless if the screws are well locked with that key.

1611754488599.png
 
I was busy yesterday morning! PM did get back to me with a response about the ball nuts not being preloaded. They said that their supplier said it wasn’t right and they are contacting the factory. Not sure what that means for me though.

I couldn’t wait anymore since the CNC KIT came 5 months after the initial estimated delivery time I was given. So I pulled the X and Y ballscrews yesterday morning. Shimmed all three and then got them all back in the machine.

I used heavy duty and regular aluminum foil since it could give me increments of .0003. It wasn’t to bad to do. I printed out a quick template to cut the profile for the shims out. Worked out ok. I was able to get .0002 over each gap I measured for each one.

Z was .0027
X was .0042
Y was .0033

All felt smooth after reassembled. No tight spots thru out the length of the screw. Although once back installed Y still felt a little loose. I’ll be getting the CNC hooked back up in the morning and actually see how much backlash decreased.

One tip I can give to anyone who has to do this would be to use just a very little dab of grease to hold all of the shims together. Set the ball nut up in a v block to align the two halves together when putting the key back in.

Overall wasn’t too bad of a job... I won’t regret shimming them if PM says to send them back to be preloaded. I couldn’t wait, I’ve had projects on hold for too long... spacers were a little burned too. Wonder how flat the actually were?
 

Attachments

  • F69929D9-4886-4915-8293-00D938F46EDE.jpeg
    F69929D9-4886-4915-8293-00D938F46EDE.jpeg
    728.8 KB · Views: 178
  • 20F11F50-534A-4B48-9D28-04783F60A5B0.jpeg
    20F11F50-534A-4B48-9D28-04783F60A5B0.jpeg
    1.1 MB · Views: 182
  • 633CD8DB-B584-4C54-9C75-7B901DDE13AE.jpeg
    633CD8DB-B584-4C54-9C75-7B901DDE13AE.jpeg
    742.4 KB · Views: 176
  • D1CB047D-D502-4CBB-BCCB-73C034D8BFC4.jpeg
    D1CB047D-D502-4CBB-BCCB-73C034D8BFC4.jpeg
    815.7 KB · Views: 172
Last edited:
Any update on the results? My backlash is worse than yours I am considering pulling the machine back apart
 
Any update on the results? My backlash is worse than yours I am considering pulling the machine back apart
Yes... sorry I was a little busy the last few days.

I only added .0002-.0003 shim to the gaps measured before taking apart. I now have .0020 backlash on all 3. ( my x actually increased some. The original value of .0009 I stated above was right after install, never actually cutting. Ended up having .0014 on X axis before adding the shim.) My Y axis did decrease some. And didn’t install z before adding shims.

I didn’t have the results I was hoping for, but I’m ok with it being even across XYZ. Now that I have an idea on what thickness the shims need to be. I will eventually make new ones to the required thickness instead of using any kind of shim stock. But for now it is what it is.

I was informed after I used the aluminum foil shim material that it probably won’t hold up under a load.

As for the reply from PM, their response was “Supplier says it actually won't cause any harm, so you're ok as is.”... doesn’t explain why they didn’t come preloaded.

Good luck GB21, I’m curious to hear what size gap there is between your spacers, how much you shim it, and what your results are.

I mean, yeah, it doesn't cause harm, but I'd want them correctly preloaded.
 
I didn't pay a lot of attention as I put mine together, but the ball screws seemed tight. I have the CNC kit installed on my PM728 and the controller mocked together. The cnc kit installed with little trouble. I'll need to put the controller in a box and add plugs, but it's now functional. Will be much easier to install plugs etc. in a controller box with the cnc functioning. It's using steppers with Gecko G201X drivers (Mesa 5i25/7i76 boards with LinuxCNC).

I did a quick check on backlash. Just a quick check so could be off some. But I measured about 0.001" on both X and Y. Z came in about 0.0025". I'm real happy with this for X and Y, and Z is workable. The head has quite an offset weight so the Z ways may be giving noticeable stiction. No tests yet as to speeds I can get, or other tests.

Toolmaker335xi: Some of the backlash could be from the bearings. Hard to get a hold on the ballscrew to tighten the bearing retaining nut. I installed the couplers and holding these by hand I tightened the retaining nuts as I could. Could be as your X was worse after re-assembly?

Thanks.

Hugh
 
Back
Top