Building a small Machinist Vise

kizmit99 said:
I think I need some advice on this one. At first I was thinking I would cut a relief into the bottom edge of each jaw face, then mount this vise in my mill vise and run an end-mill across each face, using very light passes. I'm now second guessing this approach. Does anyone have any suggestions on how to proceed?

Thanks in advance!

It occurs to me that you might want to load the jaws while you do that the way you would while trueing a lathe chuck.
 
It occurs to me that you might want to load the jaws while you do that the way you would while trueing a lathe chuck.

Yeah, that's the problem I think I would run into with the approach I was thinking of... I think the fixed jaw would be fine, but the while I could tighten the movable jaw without it clamping against anything (with the adjusting screw just pulling straight up/down) there's no way to ensure the whole jaw isn't racked just slightly. The fact it has the 'legs' that fit over the base would stop it from getting too far out of whack, but any slop there (and the fact it can slide at all means there has to be some) would just be translated to the face.

I'm kind of thinking now about milling the fixed jaw in place, then setting up the removable jaw using the top (which was just fly-cut) as the "true" edge and fly-cutting the face. Worst thing that can happen is they still aren't true... I actually suspect that most of the "out-of-kilter"ness I'm seeing is in the fixed jaw. Not sure why I think that, but I do...

Do you plan on making any v-grooves for round stock?

I do. One horizontal, one vertical, both in about the center of the movable jaw.
 
Yeah, that's the problem I think I would run into with the approach I was thinking of... I think the fixed jaw would be fine, but the while I could tighten the movable jaw without it clamping against anything (with the adjusting screw just pulling straight up/down) there's no way to ensure the whole jaw isn't racked just slightly.

Drill a hole to take a screw or pin in each end of each jaw. Put blocks big enough to hold the jaws apart a convenient distance between the pins and tighten the vise.

I may do that to my junky vise.
 
Stop.

Do not do anything.

You need to establish a reference surface. You need to first get the fixed jaw square before doing anything. Then you work on the moving jaw.

The real question is what degree of accuracy are you shooting for? You might as well shoot for perfect as you could have bought a cheap chinese vise for less than material costs. :)

I wouldn't feel bad about not having the surface grinder as it really is a starting point to do before lapping and scraping. You can get to the same starting point by a bit of careful file work and sanding. It seems like it would take forever but it really goes pretty quickly once you get started.
 
Great! Now its time to tram the mill to the best it can be. And +1 on the reference surface.
 
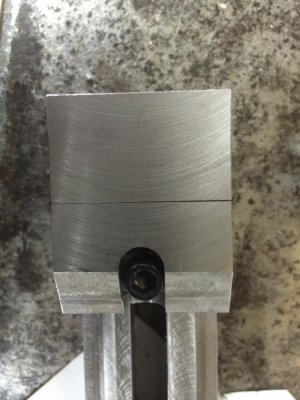
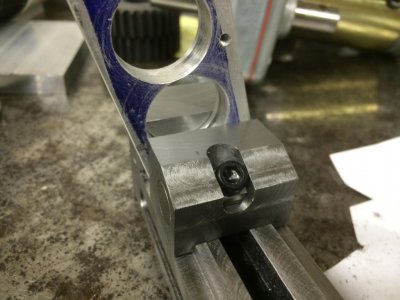
I cut a relief bevel on the fixed jaw, then mounted the vise in my mill vice and took several skim cuts across the face of the fixed jaw with an end mill. That was taking material off exactly where it seemed to need it (starting in the "lower right" (facing the face of the fixed jaw) and working it's way to the "upper left" as material was removed). That helped, but didn't fix the problem completely. After cleaning up the fixed jaw, there was a .003" gap on the the "right" side (again, facing the fixed jaw face) between the jaws. I setup the movable jaw, face up, in my mill vise with the "top" of the jaw against the rear jaw of the mill vise and the "back" of the jaw facing down, sitting on parallels. I then ran the fly-cutter across the jaw face. After retesting, I have the same .003 gap on the "right" side...

7CBF521A-A869-4BE5-8DB9-5D69AD358379_zps5ai9jhho.jpg

I'm going to have to do better than this, because a piece of 3/8 aluminum plate clamped in the jaws can be easily "twisted" out. It ends up just pivoting on the spot that is tight...

F2F2A755-F0B4-4DA9-AFD3-9DA1EB0C9D6B_zps2msbnczh.jpg

So I'm still looking for some way to get the jaw faces square and flat.
Suggestions welcome! Thanks!

PS: I was just wondering if maybe the fit of the movable jaw to the rails it rides on in the base is little too good? Maybe the movable jaw needs a little bit of play in order to properly seat against a piece of flat stock and apply proper clamping force? Am I in left field on this? I can't see testing this theory out, as the current fit is very good and I wouldn't want to make it looser just on a guess...

7CBF521A-A869-4BE5-8DB9-5D69AD358379_zps5ai9jhho.jpg F2F2A755-F0B4-4DA9-AFD3-9DA1EB0C9D6B_zps2msbnczh.jpg
 
It is a chicken or the egg kind of problem. A milled surface from being held in a vise is not a reference surface.

First of all, do you have a surface plate? It makes things a lot easier. If not an actual surface plate, you can start of with something "kinda flat" like a nice thick piece of plate glass. Next best would be a nice polished granite tile.

A precision square and straight edge would help a lot. Also an indicator stand and an indicator that can get to at least 0.0005"

Take a look here at a nice video showing the process. What he is doing is worthless as far as the plane goes (in my opinion) but he shows a great sequence for how to make something flat and square with basic hand tools.

[video=youtube_share;YvZFOyo63Ks]http://youtu.be/YvZFOyo63Ks[/video]

Yes, it is a fairly slow process but accuracy takes time.
 
I have been thinking about your alignment issue for a couple of days. I am going to make a couple of assumptions 1, that the fixed jaw is square with the rails, and 2, that the fixed jaw is vertically square to the top of the rails.

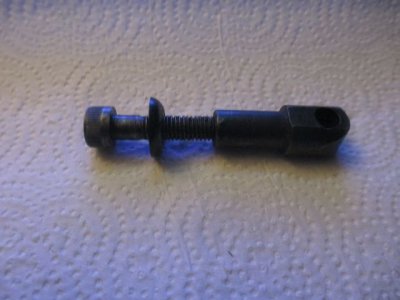
What may be happening is that the screw is pulling the movable jaw out of alignment. There may some miss-alignment between the pins. The fix for this is a conical washer and a mating socket in the top pin. Every precision vice I have seen has this feature.

Here is the screw assembly out of my vice.

IMG_0279.jpg

To check the alignment of the movable jaw, indicate in the fixed jaw, then place the movable jaw on the rail and see where it is, and see how much play it has. Then find the center of the play, and clamp the movable jaw in place with your clamp set, not the screw. Now take a light cut about 1/2 inch down to get an indicating surface. Then put the jaw in the mill vice and indicate on the surface you just cut, and the rail surface to square it up. Then machine the entire face square.

That should get you pretty close. If I didn't make any sense above, I can stage this in my mill and get some pictures of the proposed setup.

IMG_0279.jpg
 
David - thanks for the link to the video. I haven't had a chance to watch it yet, but will. I do have a small surface plate (9x12x2 granite from Grizzly) and some "precision" squares from India... I'll watch the video and see what I can learn.

Jim - your approach makes a lot of sense to me. I don't think tightening the screw is introducing a shift in the movable jaw, but I think with your approach I should be able to identify whether it is or not. I think I'll start by seeing if I can "find" the alignment issue between the two jaw faces...

I'll report back when I know more...

thanks guys!
 
Back
Top