Atlas Pick-O-Matic Drive Gear 10-1213

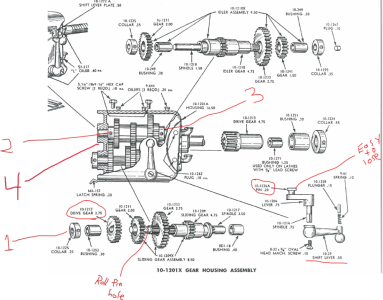
Pick-O-Matic gearbox disassembly.

Start with removal of the lower shaft. Remove collar (1). Gently tap shaft from left to right about an inch. There is a roll pin that goes inside the gear (10-1212). It is not depicted in any official drawings I have ever seen. The hole in the shaft is depicted. Once the roll pin is exposed, drive it out with a small pin punch. Now the shaft will continue out through the gear set. Pay close attention to the shift lever. It has a pin (10-1226A) that can fall off and vanish easily.:distress:

Next is the upper shaft. It has two collars (2) & (3). There is a set screw not depicted in the drawing (4) that holds the shaft. Loosen all three and remove the shaft (either way). Note: This shaft has an oil passage and must be installed with the correct orientation for proper lubrication.

Both gear sets will stay together if handled carefully.

With both shafts/gear sets removed you can access the drive gear and the feed gear stub.

And that’s it! :encourage:

Also, you'll probably find that Pick-O-Matic parts are somewhat rare. So, make a list of what you need/can't find. I'll be glad to loan the ones I have for patterns. Then you can return them when the old Atlas is up and running.
And if you 3D print parts, upload the files to Thingiverse for others to use/access.

Always good to get another Atlas back into operation! :cool:
Mike
 

Attachments

  • Pick-O-Matic Exploded View .png
    Pick-O-Matic Exploded View .png
    497.4 KB · Views: 6
Last edited:
Thanks again! Excellent instructions. I will take that on soon. Unfortunately, this weekend is already booked for other priority stuff. But, the leadscrew is scheduled to arrive on Friday :)

I am indeed finding that Pick-O-Matic parts are rare and unfortunately, one of the 3 previous owners decided they did not need it so much and removed a bunch of things. I am hoping the gearbox assembly is all there on the inside. My guess is that it is because they did not bother to remove anything behind a screwed down cover that would require effort... Thankfully, the tumbler is all there, including the gears (I think). I need to take a picture of the as-is, but had already removed the tumbler to start cleaning. I have a grandiose plan to remove and re-paint the cast pieces. Not sure how great that idea is... How easy is it to remove the main gears? I will need to change the belt anyway, so I am assuming it is a similar process to remove vs. change the belt. Any gotchas in the main gears like the shift lever pin?

Definitely appreciate the detailed help!
~Blue

P.S. I have put off assembly of my 3D printer, but now I have room in the garage and increased incentive to do so. I think I have a Thingiverse account and will certainly upload (if they work). I have already tweaked a few change gear drawings in anticipation of the lathe, but of course have not printed anything just yet.
 
Last edited:
The ease of removing an Atlas spindle is entirely dependent on the type of headstock. If you have a Babbitt bearing headstock it's very easy. Just four bolts and the caps lift right off. If it's a Timken bearing headstock then there is much more involved. First let's determine what yours is. On the right end of your lathe bed should be a serial number tag. Post that number(s) and some pictures of your lathe. With that info we'll start off correctly.

Regarding “re-paint”, I would not start that process until you have the lathe completely functional and are fluent in its assembly/operation. After all your hard work you may like the way it looks. Personally, I like the patina of a used machine. Gives it character. :)

Mike
 
I have an Atlas Model TH48, SN 042356

Here is the headshot:
AtlasLatheHeadGears.png


Also the side of the Pick-O-Matic (i.e. no change gears or in/out gear)
AtlasLatheChangeGears.png


Front of Pick-O-Matic:
AtlasLathePOM1.png


I do not mind patina of old machines, and it definitely gives them character, but I figured to clean this properly, it all needs to come apart anyway. (Look inside the teeth of the headstock gears). A lot of the "ugly" in the photos is years of accumulated dirt and grime. Some of the dull red is already turning bright red with just a little alcohol and elbow grease. But, the peeling paint above the Pick-O-Matic gearbox is leaving bare metal that I would like to better protect for the next 80 years.
 
The letters/number before the serial number mean it's “T’ Timken bearing “H” horizontal countershaft, “48” 48-inch bed overall length.

Here is an excellent video (not mine) with detailed guidance on Timken spindle removal/install.


Note:
At around 15 minutes into the video, the author is unsure of what the Allen screw in the middle of the main pulley is for. It's an oil hole for lubricating the spindle, needed during back gear operation. It's not meant to ever be tightened down. Just turn it in to just below the pulley surface, so oil doesn’t come back out onto the belt during operation.

Mike
 
If you will look in the Sticky area at the top of the Atlas Forum, you will see a warning post pertaining to the subject of the spindle oil plug. Unfortunately, the aluminum cone pulley is soft enough that if you really work at it, you can continue cutting the threads until the oil plug screw eventually bottoms on and locks against the spindle. This doesn't really hurt anything so long as the back gears are not engaged. But if you lock the oil plug screw down and engage back gears, you will either slip the spindle belt or damage the spindle. Or eventually both. To check and insure that this hasn't already happened, slacken the spindle drive belt, snug the oil plug screw down lightly, pull out the 10-256 Direct Drive pin (as you would do prior to engaging Back Gears but do NOT engage them) and confirm that the cone pulley spins freely on the spindle.
 
Last edited:
Thanks Mike - The video is extremely helpful, and it does not look too bad to disassemble and clean up, plus change out the rotted belt.

Also thanks wa5cab - This is very good to know (and it is clear that I should spend a bit more time reading through all of the Atlas stickies!). To test, I took the "opposite" approach since the belt tensioning lever currently refuses to move, and I do not currently want to put too much force on it just yet... I disengaged the Direct Drive pin and turned the bull gear by hand since the drive belt is rather tight. Good news is that the spindle moves freely while the stepped pulley stays put, held in place by the belt. i.e. That setscrew is not bottomed out and is not driven into the shaft.
 
Thanks again to Mike for the measurements of the 10-1213 drive gear! This is my first "draft" print of the drive gear:

PrintedDriveGear-sm.png


Most of the measurements appear to be "close enough" to possibly work, but the I.D. might be a tad small, but it might just fit on the leadscrew. I can check tonight. I have not pulled apart the Pick-O-Matic gearbox just yet, but it might be time :) If this actually fits, I plan to print it in a bit more durable material for actual use. I will also be happy to put the .STL file in the downloads area as well.

Since I am now in the mode of modeling this and the change gears, would you please let me know the dimensions and tooth count of the two in/out gears? I definitely need to make some prints of those two gears as well, and am not at all sure from the exploded diagram how those two gears actually interact and work in the gear train. i.e. how does the gear move in/out with the knob?
 
As expected from the measurements, the ID is undersized enough to not quite fit on to the leadscrew. Not sure if the material used shrunk a bit or that's just how it prints, but I'll need to either mechanically open it up, or tweak and reprint. Likely the latter to help maintain concentricity. Plus, there's a few additional changes is like to make.
 
Last edited:
OK. That is mostly good news!

If you have a set of chucking reamers in the appropriate diameter range, I would probably establish the correct inside .diameter with those first and then adjust the diameter in the file appropriately and reprint for a keeper.
 
Back
Top