Another Clausing 8530 milling machine

outboardguy44

Registered
Registered
Joined
Jan 4, 2014
Messages
37
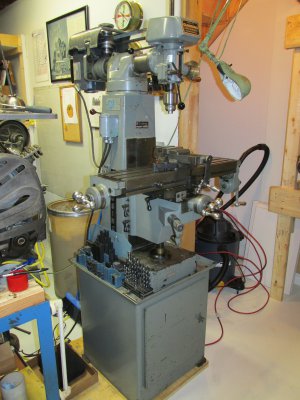
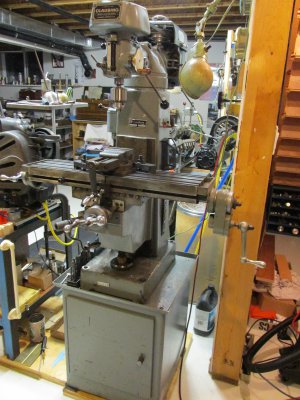
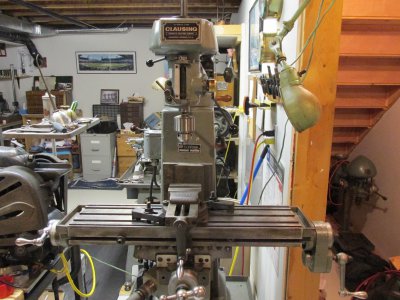
Clausing Mill 013.jpg Good afternoon, just reporting the activation of another veteran Clausing mill. A fellow antique outboard collector/friend of mine has had this for several years and I always told him if he ever decided to sell it, I wanted to know about it. Always thought it would be the perfect mill to fit my hobby, budget, and workspace. When he called me a few weeks back and said he'd let the Clausing go, it didn't take long to decide to go and retrieve it.
Clausing Mill 014.jpg


Other than washing off a healthy layer of grime/protective coating, I didn't do much to it cosmetically. Mechanically, it needed the upper spindle bearing replaced, the fine-feed mechanism needed a gear repaired, and I didn't get a handwheel with the machine (cobbled one up out of brass stock and a handle off an antique Husqvarna sewing machine). For power, I switched the motor over to run on household current instead of 220v until I get around to having a 220v outlet installed down there.

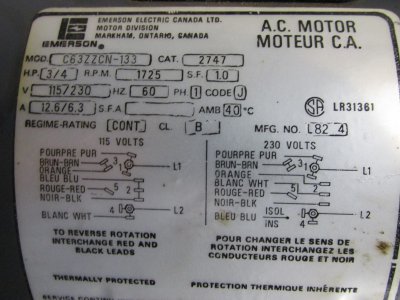
Oh yeah - speaking of wiring, I've run into what seems to be somewhat of a common problem, inasmuch as I can't figure out how to wire this damn thing up to run in reverse. I've looked at wiring diagrams until my eyes were crossed, and nothing quite matches up with the motor I have, which is an Emerson 3/4 hp dual voltage 7-lead thermally protected motor that is reversible. Every diagram I look at lists at least one colour wire that doesn't match what I have, and I hate making assumptions that one can be exchanged for the other.....Just my luck eh. Oh well, I'll get it eventually..... meanwhile, it runs in forward just fine.

As you can see, I'm using the vise off my Atlas shaper until I get a proper milling machine vise... I could have done a better job of clamping the Atlas if I'd taken the base off. One thing I can see with this mill is I'll be limited to a vise of 12-13 inches or less overall length, otherwise I have difficulty seeing/using the dial on the y-axis handle.

Best,
T2
Clausing Mill 015.jpg
 
Last edited:
Nice piece.. good luck with it. Soon you'll be wondering how you ever got along without it! LOL..
 
Sources for a lot of the things you need are listed on this site for the 8520, but same parts I believe. www.wentztech.com
Hard to ell, but from the pictures it looks as if the motor and wiring were replaced at some point.
If you need help with the wiring, post some pictures of the drum switch connections and the motor connections. Should be able to help you out.
 
Hard to ell, but from the pictures it looks as if the motor and wiring were replaced at some point.
If you need help with the wiring, post some pictures of the drum switch connections and the motor connections. Should be able to help you out.

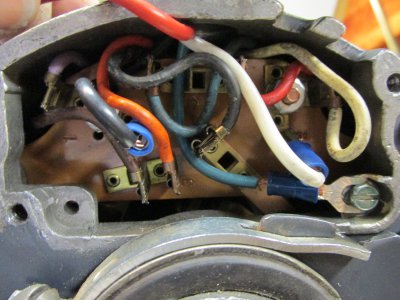
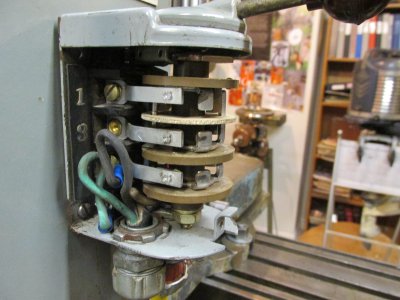
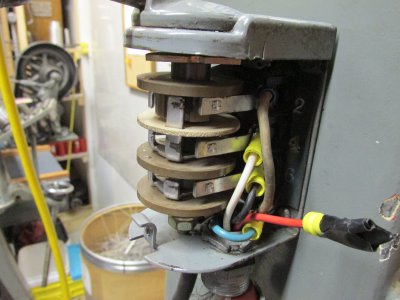
OK, here are some pictures of my electrical stuff. You're correct, the motor has been replaced, the wiring probably not original either. I did replace the lead from the switch to the motor, so I now have 4 wires between motor and switch. I should be able to figure this out on my own, but obviously I'm not educated well enough in electrical work to be able to make the reversing part work. Thanks for any input you can provide.

Best,
T2

Clausing Mill 001.jpg Clausing Mill 004.jpg Clausing Mill 007.jpg Clausing Mill 009.jpg
 
Can you look inside the cover of your drum switch to see if there is a schematic for the drum switch in there? If so, take a pic and post it, as drum switches come in a variety of applications and layouts.
 
The red and black should be the start windings ( from the bit on the motor that says to change direction swap the red and black wires). Also a couple of slots in the switch are unpopulated - you should have 2 wires coming in from the plug and 4 wires going out to the motor (2 for the run windings and 2 for the start windings). In both forward and reverse the hot/ neutral wires and 2 run wires will be connected, but the start wires will be reversed going from one to the other. Typically the first lot are the bottom and top terminals in the switch and the middle two are the start wires.
 
On some switches, you have to install two external jumpers to make that happen (L1 & L2 tied to the reversing contacts). On some, the contacts are built in. It depends somewhat on what service the switch was mainly intended for.
 
true, some switches are way more complicated that the ones I've had experience with and I've only played with 110V motors too.
 
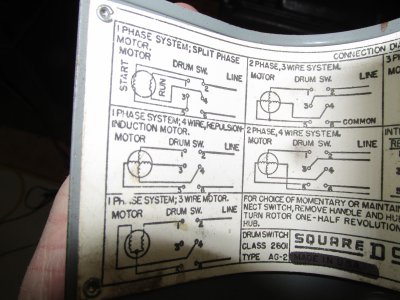
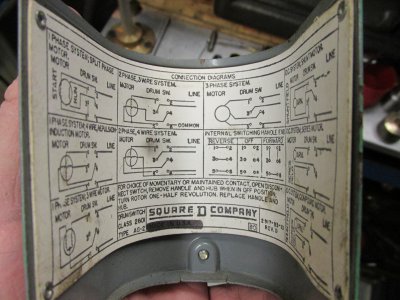
Here's a couple of images of the diagram sheet on the inside of the switch cover.

At the moment, the switch is only wired to run the motor one direction. If I read some of the information I have correctly (a very big "if"), the switch is supposed to work so that when operating the mill, the operator pushes the lever away from him to run it in forward, and pulls the lever back towards the front of the machine to reverse it.

As of right now, the switch only works by pulling the lever toward the front of the machine. I had to switch the black & red wires around on the motor for it to run in forward that way.

Terry for what its worth, I did print out a diagram in colour that you had posted in another thread, thanks for sharing that one. The only problems I had with it are that a) the diagram shows a couple different coloured wires than I have, and b) I'm quite incompetent at this sort of thing.

Edit - about the only thing I *might* have figured out WRT the wiring is that I need to use the diagram in the top left of the inside of the switch cover - 1 phase system, split-phase motor - did I at least get that right?

Best,
T2

Clausing Mill 010.jpg Clausing Mill 012.jpg
 
Last edited:
Back
Top