Annular cutters or drill bits?

I need a little wise counsel. I need to mill a series of holes in 1/4" white acrylic. The holes will be 1", 1 3/16" and 1 3/8".

I'm not sure about 'wise', but I know getting a clean cut in acrylic is often problematic. Could you job it out to someone
with a waterjet cutter?
 
I'm not sure about 'wise', but I know getting a clean cut in acrylic is often problematic. Could you job it out to someone
with a waterjet cutter?
Thanks for answering. As you may have read on this thread, I've already achieved surprisingly (to me) good results on the 1" holes, and there have been some very informative suggestions offered on how to move forward. I'm going to attempt to mill the larger holes using some of the advice that has been offered. We'll see how it turns out.

Regards,
Terry
 
Control cut is the key.

Step drills work well.

Sent from my SAMSUNG-SM-G930A using Tapatalk
 
If your tolerance allows, I'd use hole saws. If tight tolerance then use the Forstner bits, they work good on the white cutting boards I use for fixtures.

I have used forstner bits on white medium density polyethylene with no difficulty to make pockets and thru holes. I would think that acrylic could be successfully "drilled" partially thru and finishing from the opposite side.
 
I have used this type of carbited tipped hole saws very successfully on acrylics and other plastics. Very affordable and able to be had sharpened with a diamond file to a s slightly less aggressive tip for really thin stuff: ebay item #262872765354
 
  • Like
Reactions: tjb
I have used this type of carbited tipped hole saws very successfully on acrylics and other plastics. Very affordable and able to be had sharpened with a diamond file to a s slightly less aggressive tip for really thin stuff: ebay item #262872765354
Thanks for the link.

Can't beat the price. I'm in the process of trying out a couple of other options. If they're not successful, we'll give these a shot.

Regards,
Terry
 
Okay, I've completed the second set of cuts: 21 holes 1 3/16" in diameter. You're gonna love this! They came out great!

Here's the strategy I ended up taking:
My first choice - all other things being equal - would have been annular cutters. However, I decided to use S&D drill bits as a first attempt, my logic being that there have been a handful of times in the past when I could have used drill bits that size but didn't have them. I rationalized that if I got the bits and they didn't work, at least I'd have them available if another occasion arose where one would come in handy. (That decision was made a little easier because of the success I had with the 1" holes.) If the results were horrible, I'd just bite the bullet and get the annular cutters. Like they say, you can't take it with you.

I decided to try something that seemed a little radical to me. I wanted to see what the result would be if I tried the cut in one pass - no pilot hole, no intermediate step-up to finished size. I put a piece of scrap in the vise, and the result was great. Did all 21 holes that way, and I was pleasantly surprised how well they turned out. It seems to me, the key to success hinges on three variables: a SHARP bit, slow RPMs and a slow controlled feed rate. The bit was new, RPM was set at 600, and I power fed the quill at its slowest speed.

Next challenge will be the 1 3/8" holes. I'll post pix after they're all finished. (May be another day or two.)

Thanks to all for your wise counsel and suggestions.

Regards,
Terry
 
FINALLY!!!!

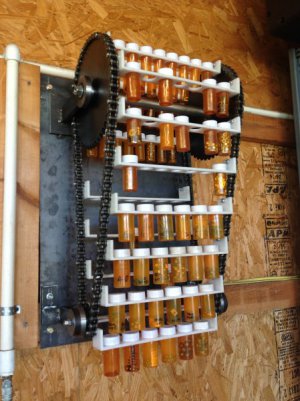
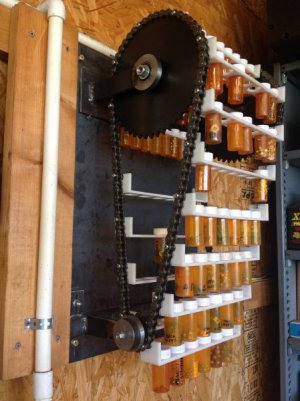
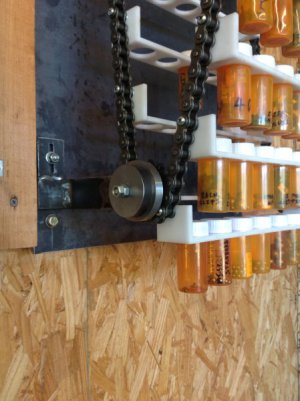
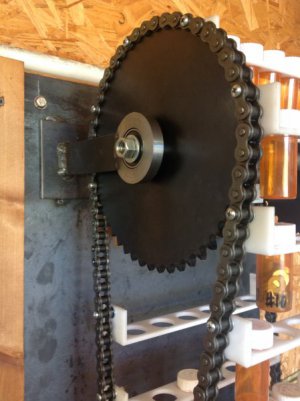
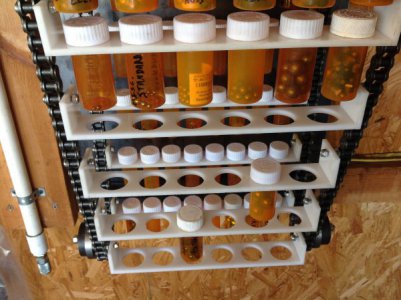
It's been about a month, but I finally got some time to get back in the shop. Nothing tragic (mercifully), but you know how sometimes 'life' gets in the way. It's always struck me as a complete waste to throw away those neat little plastic bottles that prescription drugs come in. They're perfect for small machining parts. After having amassed several from myself, my bride and neighbors, I decided to make a rack to hold them - hence, the need to mill all those holes in cast acrylic. After a lot of trial and error, I finally have assembled what I think is officially known as an 'ultimate-repurposing-small-machining-parts-rotisserie-holder-thing-a-ma-jig'. The mechanism started with No. 50 roller chain and sprockets from an old John Deere round baler. All the metal was scrap I had in the shop. I ended up buying new chain (the old was binding too much) and the larger sprockets (to give me clearance across the top). I had roller bearings laying around in the shop, but I had to make all the races and bushings. You'll notice that there are three different sizes of holes milled in the acrylic to accommodate differing sizes of bottles. (I'm waiting for some of my neighbors to get a little sicker to fill up the remaining available spaces.) On close examination, I did notice a few very small chips but nothing that caused me to trash any of the racks. On another thread, I got some advice on how to motorize this thing. I now have the motor. Need to get what I think is referred to as a 'power supply' to go from 120V AC to 24V DC. Then I need to make a bracket, and the thing-a-ma-jig will be complete. Thanks for all the sage advice.

Regards,
Terry


IMG_1635.JPGIMG_1641.JPGIMG_1642.JPGIMG_1643.JPGIMG_1647.JPG
 
Back
Top