Air pencil engraver mount for CNC mill.

Tips w/ inkscape to GCode - : Update- CNC vid w/ Air pencil engraver mount for CNC mill.

Veeeeery Cool! Thanks. Still reading and researching. But here is some added tips. also the link above did not work for me. But this one did:
LinuxCNC - how to. http://wiki.linuxcnc.org/cgi-bin/wiki.pl?InkscapeHowto

A Youtube Vid: https://www.youtube.com/watch?v=4jYKMAjzK3A

The English main page for the tool noted by Arlo (Kudos again!) http://www.cnc-club.ru/forum/viewtopic.php?f=33&t=35

Wiki Inkscape extension Mgr ; http://wiki.inkscape.org/wiki/index.php/Extension_repository


Wow- I cannot wait to go play w/ this tomorrow ;-)
 
Last edited:
Re: Tips w/ inkscape to GCode - : Update- CNC vid w/ Air pencil engraver mount for CNC mill.

Wow- I cannot wait to go play w/ this tomorrow ;-)

The video you linked shows an aspect of this that slowed me down a little at first. The GCode extension will give error messages and things that sound like error messages. At 1:37 of the video, it says "No paths selected are selected. Trying to work on all available paths." My first few attempts at creating an NGC file resulted in an empty file. So I thought the message was legit. Now that I can relibably create a valid NGC file, I still get the message. One key thing to look for is the spikey markers that appear on your text - in the video you can see them immediately at about 1:38.

Drawing by hand has its limitations and, so, your hand drawing is a little shaky. I hope that using the Gcod extension sharpens your engraving. I'd like to see a picture of your results.
 
Re: Tips w/ inkscape to GCode - : Update- CNC vid w/ Air pencil engraver mount for CNC mill.

Very nifty setup. Inspires me...
 
PART 2 -Tips w/ inkscape to GCode - : Update- CNC vid w/ Air pencil engraver mount for CNC mill.

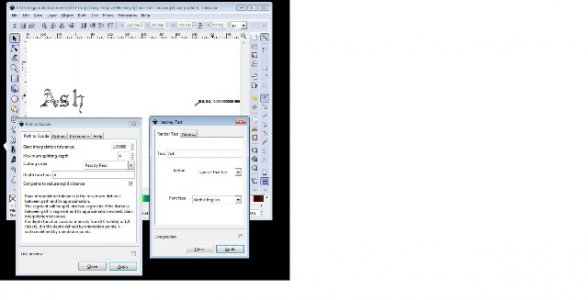
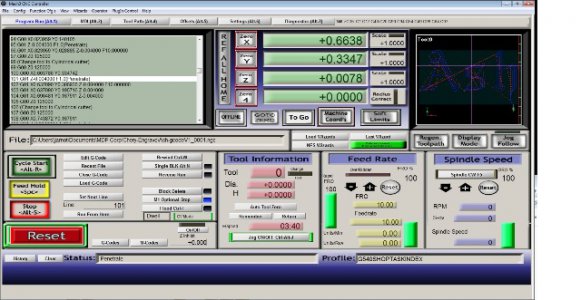
And to inspire some more- What I've done in the images below was install "Hershey text" and gcodetools as noted above. It will take some tinkering but I really am excited to give this a try for some of my engraving setups! To do this in Dolphin CAM with the 30+ contours and setups for each contour (unless there is some other way) would have taken me a solid hour or more. W/ this I was done in 5mins (see Mach 3 below as well).

The Video I used: (plus tinkering as noted w/ gcodetools this is part of wearing the badge).
https://www.youtube.com/watch?v=nXENk0NM0m0

The steps:
Inkscape w/ Hershey text. Pick a font and text.
Follow the video step for step. NOTE- On the step for orientation points, you need to dbl-click on the items you want to set. This is where you setup Z depth (called penetration) and safe height.
In node mode on Inkscape I moved the drawing to your points (I put it on 0,0) for my engraving usually.
Generated the gCode output.
Pulled into Mach3 for a review. Looks good so far.

a comment: I am unsure how to setup for 2 passes as yet in gcodetools? Probably just run it 2x and set the depth to .0025?? There are a lot of options on this. Very cool Setup! And w/ Hershey text- a really nice Combo to make a fellow HM'er something nice.

inkscape-gcode2.jpgfromgCodeTools1.jpg

inkscape-gcode2.jpg fromgCodeTools1.jpg
 
Re: PART 2 -Tips w/ inkscape to GCode - : Update- CNC vid w/ Air pencil engraver mount for CNC mill

The steps:
Inkscape w/ Hershey text. Pick a font and text.
Follow the video step for step. NOTE- On the step for orientation points, you need to dbl-click on the items you want to set. This is where you setup Z depth (called penetration) and safe height.
In node mode on Inkscape I moved the drawing to your points (I put it on 0,0) for my engraving usually.
Generated the gCode output.
Pulled into Mach3 for a review. Looks good so far.

a comment: I am unsure how to setup for 2 passes as yet in gcodetools? Probably just run it 2x and set the depth to .0025?? There are a lot of options on this. Very cool Setup! And w/ Hershey text- a really nice Combo to make a fellow HM'er something nice.

I got the spindle on my machine working yesterday and used Inkscape to set up a test program. I downloaded the Gcode extension from the site but my menus look different than yours (and different than the ones I remember from early this year). I'm using Linux, maybe that's the difference.

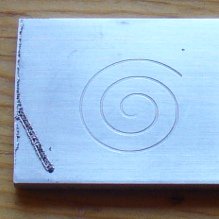
I drew a simple spiral. Like you, I moved it to 0,0 on the Inkscape window. Because I haven't got a good method of holding work pieces on my CNC table, I used the Gcode scaling to make the spiral 0.5" by 0.5", No additional tinkering was required.
P1160456.JPG

I've had some Z axis backlash and it shows in the diagonal line I tried to cut on the left hand side of the piece. My second try was the spiral. It was so perfect that I think X and Y are working well.

For multiple passes, I ran the program once and then reset the Z reference down a couple of thousandths. Unfortunately, the Gcode generates a Z value for every G move so I couldn't just change Z value one place. It would probably be pretty easy to use a word processor to find and replace the Z values. So you'd use your original Gcode output first and then paste the same code with new Z values.

Here's the spiral code, directly from the Gcode extension:
%
(Generated by gcode_tools from inkscape.)
M3
G20 (All units in inches)G00 Z0.500000
G00 X0.551191 Y-0.390858
G01 Z0.001000 F4.000000
G02 X0.557147 Y-0.364605 Z0.001000 I0.013106 J0.010829 F4.000000
G02 X0.580306 Y-0.363016 Z0.001000 I0.013654 J-0.029455
G02 X0.613044 Y-0.402334 Z0.001000 I-0.013678 J-0.044677
G02 X0.602950 Y-0.453502 Z0.001000 I-0.084994 J-0.009814
G02 X0.536278 Y-0.496464 Z0.001000 I-0.073232 J0.040433
G02 X0.463848 Y-0.474383 Z0.001000 I-0.008117 J0.103206
G02 X0.413147 Y-0.373748 Z0.001000 I0.083274 J0.105044
G02 X0.447674 Y-0.265569 Z0.001000 I0.169282 J0.005570
G02 X0.570593 Y-0.203143 Z0.001000 I0.126059 J-0.095986
G02 X0.696763 Y-0.251649 Z0.001000 I0.003550 J-0.179112
G02 X0.766903 Y-0.413129 Z0.001000 I-0.152149 J-0.162059
G02 X0.706468 Y-0.578790 Z0.001000 I-0.255445 J-0.000665
G02 X0.527375 Y-0.661314 Z0.001000 I-0.177928 J0.150543
G02 X0.347391 Y-0.585750 Z0.001000 I0.001275 J0.255170
G02 X0.257510 Y-0.363473 Z0.001000 I0.220474 J0.218462
G02 X0.344156 Y-0.140281 Z0.001000 I0.341598 J-0.004199
G02 X0.579414 Y-0.037471 Z0.001000 I0.229574 J-0.204755
G02 X0.813221 Y-0.140282 Z0.001000 I-0.006121 J-0.331182
G02 X0.922954 Y-0.423345 Z0.001000 I-0.288567 J-0.274668
G02 X0.809986 Y-0.704078 Z0.001000 I-0.427706 J0.009015
G02 X0.518566 Y-0.827255 Z0.001000 I-0.281137 J0.258815
G02 X0.230933 Y-0.697117 Z0.001000 I0.010961 J0.407160
G02 X0.101295 Y-0.353271 Z0.001000 I0.356544 J0.330787
G02 X0.240638 Y-0.014993 Z0.001000 I0.513784 J-0.013800
G00 Z0.500000
M5
G00 X0.0000 Y0.0000
M2
(end)
%


P1160456.JPG
 
Update #3 Air pencil engraver mount for CNC mill.

Hi everyone,
Update on the Engraver mount and my results after a long run on learning the ropes on CNC engraving on Brass plates!

Things like spring/flex -vs- No flex, engraver run SFM, mill precision, material flatness, cutter types and styles, Z axis precision, and 1" x .75" results. - Oh My. This will hopefully be a quick bullet point list of my findings in my situation. YMMV.

HARDWARE:
The springs I used need to a part of my solution and will remain. When used fixed with no vertical give, I kept breaking tips. In the end this was for reasons of:
SFM with DOC when in flex mode -versus- non flex. The brass punched tokens were much thinner on the edge and then fatter in the middle. In short- The spring/flex was great for give and play on materials for quick engraving.
To go fixed- I had to dial in for cut runs of .001 to .0015 and do 3 runs. Learned after breaking two point bits.
yep when in flex config- I could go .002 to 2.5 thou in two passes
Of about 7 to 10 runs - these values remained pretty consistent to my setup and work.
Had to really insure my Z Axis was dialed in w/ Mach3. I could NOT have done this project w/o getting the ball screw 'balls' in these Thomson ball screws replaced. I now have a really nice .0005 resolution on the Jensen Scales, On Mach 3, and best of all, when cutting into the material. Backlash went from .004 to 5 +/- to under .001 consistently.

SOFTWARE:
The Inkscape and gcodetools portion became really nice to learn, BUT- the resulting Ccode and contour cuts result in some really really LONG run times if you take the output from gcodetools for the complex fonts. For the Example above I think it was in the multiple hour range of cuts! So I fell back to my dolphinCAM and learned how to loop it via "go round" and "mill all contours w/ the same group ID".

I admit I had a ton of fun learning the Inkscape to gCode tools and this will work well for future projects. Just need to know where to use it, when to use it. ;-)

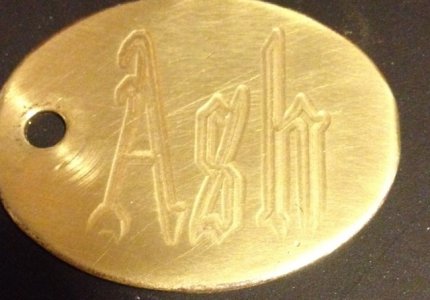
The Cherry image above is only .75" by 1.125" and was before the X,Y,Z ballscrews were replaced. But it came out well enough. On the image below it's .75" x .75" and w/ my last dremel cutter bit. .001 on each of 2 passes in fixed mode.
AshEngrave1.jpg
Off to play w/ 1045 steel again and my BP 815 grinder and such. I'm considering a project to try and play w/ a Sandvik w/ inserts on the steel. Stay tuned. :)


Overall, Happy w/ the rig, learned a TON!

AshEngrave1.jpg
 
It looks like that floating tool trick works great. I'm going to either have to build a holder like it, or figure out how to add a spring to my setup.
 
Last edited:
WOW WOW WOW

Most of the time I cruse the net because its less boring than crappy TV...

Then you come across something like this that you can really USE. Thanks so much for sharing.

Karl
 
You noticed the same thing we did when the quill comes in contact with the work. The tool breaks if the quill lowers too rapidly and hits hard. A spring or an air cylinder with a restiction on the inlet side and a pause prior to the first move after contact makes the tooling last much longer ie less breakage. The pause is required to allow the quill and tool to get down to the required cutting depth as the spring has to be compressed or the air cylinder builds up to the full pressure.
We are looking at converting another one of the mills to use a high speed air spindle. Problems are CFM required and noise.
Pierre
 
Re: Update #3 Air pencil engraver mount for CNC mill.

Hi everyone,
Update on the Engraver mount and my results after a long run on learning the ropes on CNC engraving on Brass plates!

Things like spring/flex -vs- No flex, engraver run SFM, mill precision, material flatness, cutter types and styles, Z axis precision, and 1" x .75" results. - Oh My. This will hopefully be a quick bullet point list of my findings in my situation. YMMV.


SOFTWARE:
The Inkscape and gcodetools portion became really nice to learn, BUT- the resulting Ccode and contour cuts result in some really really LONG run times if you take the output from gcodetools for the complex fonts. For the Example above I think it was in the multiple hour range of cuts! So I fell back to my dolphinCAM and learned how to loop it via "go round" and "mill all contours w/ the same group ID".

I admit I had a ton of fun learning the Inkscape to gCode tools and this will work well for future projects. Just need to know where to use it, when to use it. ;-)

The Cherry image above is only .75" by 1.125" and was before the X,Y,Z ballscrews were replaced. But it came out well enough. On the image below it's .75" x .75" and w/ my last dremel cutter bit. .001 on each of 2 passes in fixed mode.

Off to play w/ 1045 steel again and my BP 815 grinder and such. I'm considering a project to try and play w/ a Sandvik w/ inserts on the steel. Stay tuned. :)


Overall, Happy w/ the rig, learned a TON!


Your engraving looks very good.

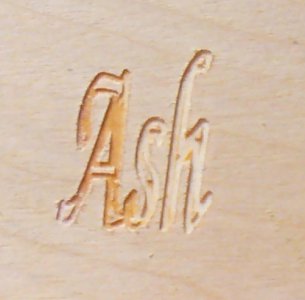
I'm using LinuxCNC and not Mach 3 but your times of "multiple hours" for cutting sounds like there's a problem. I created a .75" by .83" set of three initials. I couldn't find your font so I picked one of the more ornate ones in Inkscape. I cut the three initials in a piece of scrap plywood using the feed rates I've been using for aluminum. I am just geting my hardware working so I haven't figured out the best feedrates. Right now I penetrate at 2 ipm and cut at 4 ipm but I think what I'm using is can be sped up. In any case, my cut time was less than 4 minutes. The result was nice although the picture shows the results of cutting plywood in that the "A" depth is right at the depth of the plywood veneer.

What are your feed rates? Have you tried to address the problem of breaking bits by adjusting the penetrate rate? On my little machine, the G0 rates aren't much faster than the cutting rates so I limit the Z clearance to relatively small values (0.2" or so). Otherwise, it seemed I was spending more time rising and descending than I was cutting.

ash.JPG

ash.JPG
 
Back
Top