2018 POTD Thread Archive

Maybe I'm just blowing smoke here, as I'm NOT an experienced welder. But I own a Millermatic MIG welder and have used for several projects. What's always bothered me was that the blanketing gas (CO2) shuts off as soon as you release the trigger. I've always been paranoid that with the gas shut off, the fresh, hot weld can oxidize. So I devised a circuit that would keep the gas valve open a while (0 to 10 seconds) a the end of the weld.
I am doing this to my millermatic 180 now thank you...
 
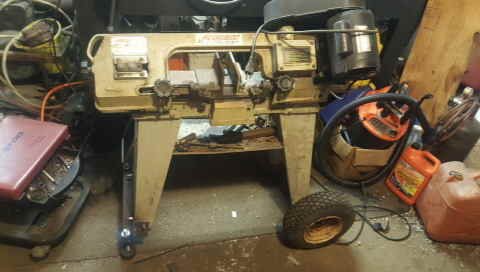
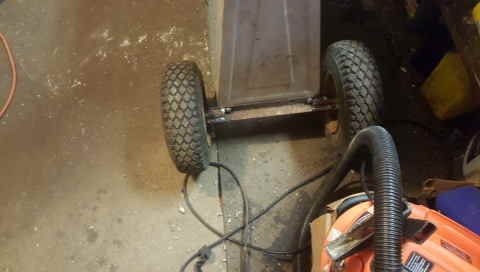
My little MSC band saw has been annoying me for far to long with it's short stature, flimsy legs that let it walk all over my garage whenever I ask it to do something for me. And, when I do want it to move somewhere if effectively resists with its sharp sheet metal leg bottoms.
So, this is what it got.

Treadmill feet on the end with the handle.
1544733044156.jpg
And snow blower tires for the motor end.
1544733225312.jpg
It is a huge improvement!
 
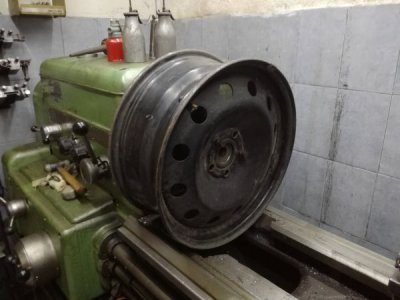
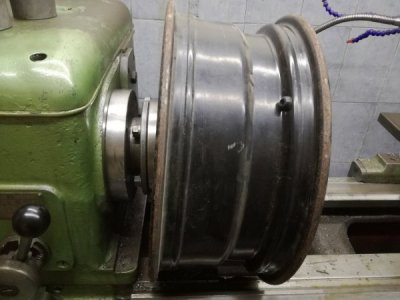
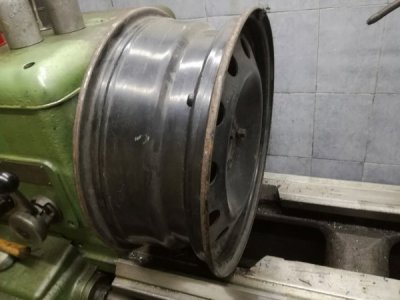
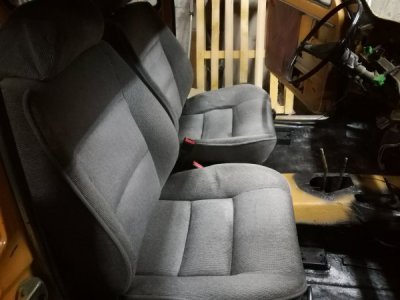
Today i started on mounting the seats in the Little Lada, the seats are from a Peugeot 605 which is a 4 door and much bigger and wider than the little Niva, i was able to find manually adjustable seats but they don't tilt forwards, so i'm modifying the sliders using the parts i machined to make them tilt and lock, I only managed to modify and mount only passenger seat on the front side the french who made the seats know how to make a good seat, also wanted to see how big of a rim i can turn in my lathe, 17" won't fit, the relieved part clears but the inside edge doesn't clears.
IMG_20181212_172816.jpgIMG_20181213_164855.jpgIMG_20181213_164923_1.jpgIMG_20181213_164927.jpg
 
I've always been paranoid that with the gas shut off, the fresh, hot weld can oxidize.

If it were mine to do, I'd award you the prize of the week, (or whatever) for identifying the problem, mentally solving it and then physically building the needed hardware to solve the problem.

The manufacturer didn't think enough of his product to include this fix, he should buy your solution, reimburse you for devising it (reimburse heavily), and put your name on the fix.
 
Thanks! Mine is pretty much the cheapest MIG unit that Miller sells (Millermatic 135, 115V wire feed welder). Don't know if they have this feature in their better units. But even if they did, I'd not expect it in the "bottom of the line" one I got.

As for Miler paying for the idea ... would certainly be nice, but just a dream. But by posting it here, I've put it in the public domain. So they'd have no legal obligation to pay for or acknowledge it if they used it. Ah, well ... I'm retired, and OK with the nest egg I have.

And as with Rick Sparber ( https://rick.sparber.org ) and many, many others (including all those who post here and on other forums, send articles to the various machinists' magazines, or make those great Youtube videos) my goal is to help others to succeed. Same with the articles I submit to Home Shop Machinist/Machinist's Workshop. I enjoy the kudos from my peers, and the occasional "like."
 
Here is the thing I made.
Its purpose is to position a 3-D camera so it can rotate 360º around the subject's outstretched arm to document upper arm flab.
The client is a skin product testing lab. It is of my design. They told me what it needed to do and I figured out how to do it.

The base is made of Baltic Birch plywood and painted with spray pickumup truck bed coating. That stuff is great. It covers well, needs no priming and is tough as nails.

View attachment 282124

the original idea was to weld the joints, but I wasn't up to it. It is 16 ga. aluminum square tube. I practiced for hours but couldn't manage two successful welds in a row. I think the problem was the thin edge end of one tube butting against the side of another. The corner made that piece thicker and more of a heat sink. I couldn't get past the difference in thickness. Try as I might, I couldn't make the puddle go down the seams. Hot enough to puddle the side melted the end away.

So, I resorted to plan B, attatch the tubes with joints and hardware. A detail of the noodley elbow joint. This took a long time to make.
All those holes at all those positions and angles were difficult to clamp tight and square, and drill. Clamping and drilling it under the head of the mill was complicated and tedious.

View attachment 282125

The hub and counter weights so the arm would balance with the weight of the 3-D camera. It has a disk break and clamp to hold position attached by a T-bushing of delrin-like plastic.

The USB cable from the camera passes through the axle shaft so it won't wrap around the axle.

The hub was equally tedious to make with a flange, section of square tube and two .25 x 2" straps. Welding would have been so much easier and faster. The weights are mounted on an oak angle attached with a 5/8" bolt, fender washers, and 1 inch bushings

View attachment 282126

This is a detail of the camera mount. A couple of arka clamp mounts so the camera can adjust forward and back, and a Panoramic swivel so it can swivel. It focuses with two laser dots that converge. Upper arms aren't cylindrical or symetrical, so the camera has to move in and out and rotate to compensate and keep the dots in the center of the upper people arms. Each image requires at least 4 images from 4 angles. That's why the 3D camera has to travel around the arms.

The raw camera images are fed into a computer which assembles them to make a virtual arm that can be twisted and turned and viewed from all angles.

View attachment 282127

This project took a week to concept, make plan drawings and complete. I vastly under bid the job and had to live with my estimate.
Nice Work
 
Removing broken grade 8 bolts out of hardened extrusion dies . No pics can be provide . :grin:
 
made a little stand out of stainless for a wood carving Ulmadoc did for me, sanded the wood and stained it. I think it came out really nice and a big props to Mike for the carving, thanks!
attachment.php


also went to the scrapyard to get rid of some alu scrap/ chips and some dead Christmas tree lights. Came home with some alu sheet 3/32 x 2x3.5ft), pipe, plate, some stainless rod, a cute little copper cake tin and this chunk of stainless (16lb alone!). 6lb alu and 17lb of stainless for $10 after taking off the $2.65 I got for my crap.
attachment.php


shortly I'll be making a mortar and pestle for the wife's Christmas present out of some 3" stainless round and some 1" stainless rod, also from the same scrapyard. I have to ration myself or I would have space to move in the garage.
 
Back
Top