-
Welcome back Guest! Did you know you can mentor other members here at H-M? If not, please check out our Relaunch of Hobby Machinist Mentoring Program!
You are using an out of date browser. It may not display this or other websites correctly.
You should upgrade or use an alternative browser.
You should upgrade or use an alternative browser.
10" Atlas rebuild
- Thread starter iron man
- Start date
- Joined
- Feb 7, 2013
- Messages
- 792
My sister is an artist I was going to send them to her for her to do them for me. After she told me she could have done that when she was 10 I thought I should give it a go so she would not make me look as bad as I felt. So I got a bottle of testors Red & Black enamal and a pin point brush at hobby lobby and with a jewels glass I set into doing it. I figured if I screwed it up she could fix it but it worked out ok. Ray
- Joined
- Feb 7, 2013
- Messages
- 792
The motor is great plenty of power It was found in a dumpster brand new UPS had dropped it bending the shaft. I cut it off where it was bent machined it to a point and with a heat sink I welded on a new stub shaft and then machined it to size.
There are a lot of these tread mill motors out there that have a high HP rating but are a very small motor they do not seem to have the torque of a larger diameter motor like this one I wish I had a couple more of this or similar brand motors. thanks Ray
There are a lot of these tread mill motors out there that have a high HP rating but are a very small motor they do not seem to have the torque of a larger diameter motor like this one I wish I had a couple more of this or similar brand motors. thanks Ray
- Joined
- Feb 7, 2013
- Messages
- 792
The motor was a commercial treadmill motor about 5 or 6 inches in dia. the control board came from a similar treadmill a friend of mine use to repair them and had an extra one laying around. I had to do some creative things though to get it to work off a rotary pot I had to use two control boards to get it to work one sends the PWM signal the other one is the motor controller that does all the work it works fine a little too complicated though. I may change it out for a single PWM board as soon as I can find one that will handle the amp load. Having said that the amp load is not anywhere near what it says on the motor..Ray
Last edited:
- Joined
- Feb 7, 2013
- Messages
- 792
UPDATE:: the paint has dried for almost a month now and I had a project ot turn so after the tailstock mods and the bed re-scrape and othe modifications to the carriage I was anxious to try it out. I recalabrated the tails stock adjusted all the gibs and started in working on my next project.
To my surprise the lathe performed better than anticipated no-chatter and before no matter how you adjusted the gibs when you took a cut one direction if you did not pull the tool back and reverse the feed it would cock the carriage just enough it would cut some more off... Not anymore! it is just like running a new brand new lathe I wish now I would not have waited this long to do the work and the modifications. I would put this machine up to any lathe of equal size, the carriage glides up and down the full length of the bed with no loose or tight spots I can recommend all the mods with no reservations.. Ray
To my surprise the lathe performed better than anticipated no-chatter and before no matter how you adjusted the gibs when you took a cut one direction if you did not pull the tool back and reverse the feed it would cock the carriage just enough it would cut some more off... Not anymore! it is just like running a new brand new lathe I wish now I would not have waited this long to do the work and the modifications. I would put this machine up to any lathe of equal size, the carriage glides up and down the full length of the bed with no loose or tight spots I can recommend all the mods with no reservations.. Ray
- Joined
- Feb 7, 2013
- Messages
- 792

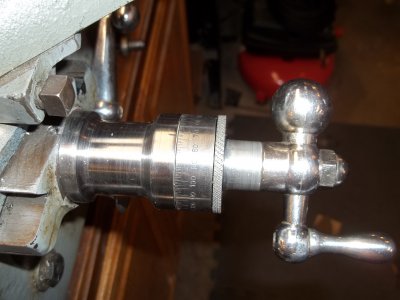
Another big help was to get a bigger dial with 200 space dial so I get a direct read if I need 5 thousands off I dont have to turn the dial 2.5 thousands. Having to cut everything in half is time consuming and confusing at times. I also have ball bearings in this unit that gives a nice thrust surface as well. Ray

Wow, what a beautiful job you've done on your lathe iron man! Very nice work, bet it's a hoot to use now. Your last pic of the large dial setup... don't suppose you have any pics of the locking mechanism/nut on the end and the bearings you mentioned. Did you make the extension tube and dial or what did the dial come off of something bigger?


