.030 taper while using a boring bar (?) you get what you pay for, the HF dial indicator stand makes a better frisbee than it does a tool, etc.

Here's a picture of a typical boring bar (purple) inside a bore.
This boring bar has the top ground with some rake, and left side with some relief.
Note that the contact point is not the cutting edge. It is the bottom edge which is dull. So it rubs.
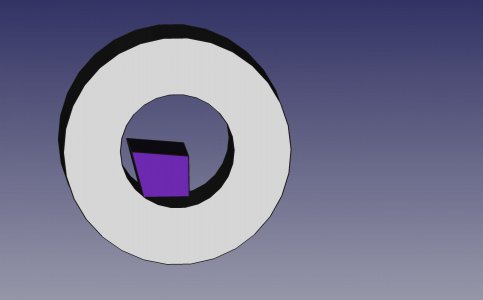
boring tool.jpg

To get the top cutting edge to be the contact edge, there are several approaches.
1) Move the boring bar up in the hole.
2) Turn the boring bar counter clockwise slightly to give more effective clearance.
Both accomplish the same thing (its rotationally symmetric). You decrease the rake angle to increase the clearance angle.
3) regrind the bottom edge of the cutting tool to round it out so it clears.

If you're so inclined (given STEM in the username), you can play with the trig to put numbers around this. Even small deviations from centerline/angle make a significant difference. Think about the cutting forces inducing a .005 downward deflection in the boring bar for example.
 
Last edited:
Here's a picture of a typical boring bar (purple) inside a bore.
This boring bar has the top ground with some rake, and left side with some relief.
Note that the contact point is not the cutting edge. It is the bottom edge which is dull. So it rubs.
View attachment 442090

To get the top cutting edge to be the contact edge, there are several approaches.
1) Move the boring bar up in the hole.
2) Turn the boring bar counter clockwise slightly to give more effective clearance.
Both accomplish the same thing (its rotationally symmetric). You decrease the rake angle to increase the clearance angle.
3) regrind the bottom edge of the cutting tool to round it out so it clears.

If you're so inclined (given STEM in the username), you can play with the trig to put numbers around this. Even small deviations from centerline/angle make a significant difference. Think about the cutting forces inducing a .005 downward deflection in the boring bar for example.
A great explanation! I couldn't have done it better myself.
 
Here's a picture of a typical boring bar (purple) inside a bore.
This boring bar has the top ground with some rake, and left side with some relief.
Note that the contact point is not the cutting edge. It is the bottom edge which is dull. So it rubs.
View attachment 442090

To get the top cutting edge to be the contact edge, there are several approaches.
1) Move the boring bar up in the hole.
2) Turn the boring bar counter clockwise slightly to give more effective clearance.
Both accomplish the same thing (its rotationally symmetric). You decrease the rake angle to increase the clearance angle.
3) regrind the bottom edge of the cutting tool to round it out so it clears.

If you're so inclined (given STEM in the username), you can play with the trig to put numbers around this. Even small deviations from centerline/angle make a significant difference. Think about the cutting forces inducing a .005 downward deflection in the boring bar for example.

I would add that the reason twisting (clocking) the boring bar is preferred, is that your cross slide moves horizontally. Therefore, if you're boring a significant change in ID, raising the tool up means that your cutting angles and geometry change with the bore diameter in subsequent passes. That can result in a change in finish quality and cutting forces. If you keep to the horizontal axis for cutting, your finish quality is less effected (depth of cut and SFPM still factor in). By staying on the horizontal axis you can tweak the setup early in multiple boring passes for best cut, and better expect to get similar cuts as you progress.

Another interesting thought exercise is to think about which way the tool deflects under cutting forces. Rake and clearance angles matter in this. If cutting forces deflect the tool into the workpiece, then those force increase, which leads to more deflection, which often leads to a broken part or cutting tool. Or chatter. If cutting forces deflect the tool away from the work then cutting force and deflection will tend to be stable. Less likely to break. Less likely to chatter. But this often means a decrease in rake angle, which increases the cutting force (and needed HP) for a DOC and can reduce finish quality.
 
Last edited:
Well said above. In reviewing the pic of your boring bar, what is the length of the working end between the tip and the square shank? It looks to be less than 1.5" So if your boring bar was truly parallel to the ways/spindle axis, the shank would definitely interfere with the workpiece. If you have sufficient clearance on the cutting tip, then simply changing the angle of the boring bar (counter clockwise rotation as viewed from above) might fix the problem. The boring bar does not have to be parallel to the ways.
 
- What is the best way to clamp acetate or other plastics that will keep them secure?

- What, other than a bent/deflecting boring bar will cause a taper to be cut? Does acetate deflect that much internally?
Holding Delrin in a 3 jaw, especially a small chuck that fits a Unimat or Sherline, can be difficult because the jaws are shallow and there isn't much holding surface. Any force that is exerted towards the tailstock end of the work piece can cause the piece to work loose from the jaws. The work slips in the jaws or between the jaws. This is also true for full sized chucks, which is why 6 jaw chucks are popular for turning plastics.

I am going to guess that the reason for your tapered bore is because the work piece is working loose in the chuck as you bore. The bar is cutting a taper because the work piece is no longer on axis as this occurs. I've seen this before with Delrin.

So, what to do?
  • I would put small pieces of fine sandpaper between the jaws and the work. Something like 400 grit would work. This can make a huge difference.
  • Sharpen your boring bar. If the tip is dull, it takes more force for it to cut and that can/probably is contributing to your taper. Use a diamond stone and flatten the flats on the bar.
  • When you set the bar up on the lathe, the tip of the bar should be about 0.005-0.010" ABOVE centerline to accommodate tangential cutting forces. This is especially important for you since you are waaay overextended by trying to bore 1.5" deep with a 1/4" bar that is already necked down to form the bar. In fact, overextension may be a significant contributor to your taper.
  • I would not suggest angling the bar for this bore. Doing so works well in harder materials but may contribute to pulling the work piece loose. I would get the bar parallel to the ways. I would also keep the top of the bar's tip horizontal for the same reason.
  • Delrin normally likes lower speeds and higher feeds. Good thing to know.
Hope this gives you some food for thought.
 
I suggest checking the gib. A little loose on your slide can cause the slide to fish tail and with a boring bar a little fish tail will be magnified by the length of the bar
 
Holding Delrin in a 3 jaw, especially a small chuck that fits a Unimat or Sherline, can be difficult because the jaws are shallow and there isn't much holding surface. Any force that is exerted towards the tailstock end of the work piece can cause the piece to work loose from the jaws. The work slips in the jaws or between the jaws. This is also true for full sized chucks, which is why 6 jaw chucks are popular for turning plastics.

I am going to guess that the reason for your tapered bore is because the work piece is working loose in the chuck as you bore. The bar is cutting a taper because the work piece is no longer on axis as this occurs. I've seen this before with Delrin.

So, what to do?
  • I would put small pieces of fine sandpaper between the jaws and the work. Something like 400 grit would work. This can make a huge difference.
  • Sharpen your boring bar. If the tip is dull, it takes more force for it to cut and that can/probably is contributing to your taper. Use a diamond stone and flatten the flats on the bar.
  • When you set the bar up on the lathe, the tip of the bar should be about 0.005-0.010" ABOVE centerline to accommodate tangential cutting forces. This is especially important for you since you are waaay overextended by trying to bore 1.5" deep with a 1/4" bar that is already necked down to form the bar. In fact, overextension may be a significant contributor to your taper.
  • I would not suggest angling the bar for this bore. Doing so works well in harder materials but may contribute to pulling the work piece loose. I would get the bar parallel to the ways. I would also keep the top of the bar's tip horizontal for the same reason.
  • Delrin normally likes lower speeds and higher feeds. Good thing to know.
Hope this gives you some food for thought.
This is great information, thanks!

I consulted the Unimat "book" and the feed speed it recommended for "plastics" was 1100 rpm, which in hindsight may have been too fast.
 
Here's a picture of a typical boring bar (purple) inside a bore.
This boring bar has the top ground with some rake, and left side with some relief.
Note that the contact point is not the cutting edge. It is the bottom edge which is dull. So it rubs.
View attachment 442090

To get the top cutting edge to be the contact edge, there are several approaches.
1) Move the boring bar up in the hole.
2) Turn the boring bar counter clockwise slightly to give more effective clearance.
Both accomplish the same thing (its rotationally symmetric). You decrease the rake angle to increase the clearance angle.
3) regrind the bottom edge of the cutting tool to round it out so it clears.

If you're so inclined (given STEM in the username), you can play with the trig to put numbers around this. Even small deviations from centerline/angle make a significant difference. Think about the cutting forces inducing a .005 downward deflection in the boring bar for example.
Thanks for the great explanation, it's very helpful.

But I guess my question then is: how do you "clock" a square boring bar? My lathe doesn't have any ability to use round boring bars, not on my QCTP, or the lantern tool post. So my boring bars are all square on the shanks.

I plan to make a boring bar sabot so I can use round boring bars, but that's down the road.
 
A 3/8" 2 flute end mill clamped in your toolholder would make a good boring bar for a 1/2 inch hole... clamp the end mill in the holder with the end cutting faces level and rotate the tool post counterclockwise a couple of degrees for clearance.

I do this occasionally for boring smaller holes.

-Bear
 
Back
Top