-
Welcome back Guest! Did you know you can mentor other members here at H-M? If not, please check out our Relaunch of Hobby Machinist Mentoring Program!
You are using an out of date browser. It may not display this or other websites correctly.
You should upgrade or use an alternative browser.
You should upgrade or use an alternative browser.
Woodworking Tools
- Thread starter JohnG
- Start date
I built this little overarm router using a Stanley industrial router motor and a base salvaged from a scrap factory machine.

I made the cross and longitudinal dovetailed slides from 3/4" cold rolled steel bar stock, milled and ground. The cross slide is adjusted with a lead screw, but the vertical and longitudinal feeds use racks and pinion gears suited to the higher feed rates needed in wood cutting. There's also a pneumatic feed for the vertical slide, but I haven't used it much. I made the machine to do very accurate, small joinery cuts.
This tapered dovetail and miter joint is used in Ming chairs and tables. It's well illustrated in Chinese Domestic Furniture by Gustav Ecke. It wasn't high on my list of things to try. Then I was told we could not possibly expect a Christmas visit from our granddaughter unless there was a new and very sturdy railing on the stairway to the guest room so she could be safely carried up and down. I thought of this as a way to attach the railing to the wood brackets that would hold it off the wall.

I cut a plywood shim tapered 1/16" per inch and used it to rout the jig for the tapered notches in the back of the railing.

After a couple of table saw and shaper cuts to make 2 shoulders on each bracket, I cut the dovetail on the long side of the miter. This cut is parallel to the edge. It's an up milling cut, so there's some tear out. I precut a bit of the end shoulder with a chisel.

Then I made a preliminary cut on the tapered side using the same shim to set the taper. This is a climb cut, so it is very clean at the end; but I was worried at first about kick back. The rack and pinion feed gave me really firm control of the feed rate, and this went very well.

The test fit has only partial engagement, so the end of the taper cut doesn't need to be cleaned up yet. Knowing the taper makes it easy to measure the gap to the shoulder and calculate the cross feed adjustment of the table for a tight fit.

Here's the finished bracket and railing. The tapered dovetail is glued and reinforced with a blind screw through the bracket into the railing. I like that the grain of the railing face is free of screw holes.

Here's the original staircase. The end of the new railing joins the old in the upper right corner. When we put on the addition with the guest room on the second floor, splitting the stairs so it went 2 ways saved the space a hallway would have taken up.

Hope you found this enjoyable and best holiday wishes to all.

I made the cross and longitudinal dovetailed slides from 3/4" cold rolled steel bar stock, milled and ground. The cross slide is adjusted with a lead screw, but the vertical and longitudinal feeds use racks and pinion gears suited to the higher feed rates needed in wood cutting. There's also a pneumatic feed for the vertical slide, but I haven't used it much. I made the machine to do very accurate, small joinery cuts.
This tapered dovetail and miter joint is used in Ming chairs and tables. It's well illustrated in Chinese Domestic Furniture by Gustav Ecke. It wasn't high on my list of things to try. Then I was told we could not possibly expect a Christmas visit from our granddaughter unless there was a new and very sturdy railing on the stairway to the guest room so she could be safely carried up and down. I thought of this as a way to attach the railing to the wood brackets that would hold it off the wall.

I cut a plywood shim tapered 1/16" per inch and used it to rout the jig for the tapered notches in the back of the railing.

After a couple of table saw and shaper cuts to make 2 shoulders on each bracket, I cut the dovetail on the long side of the miter. This cut is parallel to the edge. It's an up milling cut, so there's some tear out. I precut a bit of the end shoulder with a chisel.

Then I made a preliminary cut on the tapered side using the same shim to set the taper. This is a climb cut, so it is very clean at the end; but I was worried at first about kick back. The rack and pinion feed gave me really firm control of the feed rate, and this went very well.

The test fit has only partial engagement, so the end of the taper cut doesn't need to be cleaned up yet. Knowing the taper makes it easy to measure the gap to the shoulder and calculate the cross feed adjustment of the table for a tight fit.

Here's the finished bracket and railing. The tapered dovetail is glued and reinforced with a blind screw through the bracket into the railing. I like that the grain of the railing face is free of screw holes.

Here's the original staircase. The end of the new railing joins the old in the upper right corner. When we put on the addition with the guest room on the second floor, splitting the stairs so it went 2 ways saved the space a hallway would have taken up.

Hope you found this enjoyable and best holiday wishes to all.
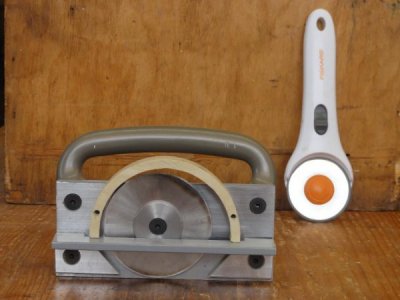
When I started working with wood veneer, I bought the little Fiskars rotary razor at a fabric store. It makes perfectly clean cross cuts; but it wobbles a bit, so the cuts are not perfectly straight, joinery quality. I thought a sturdier version might work better.

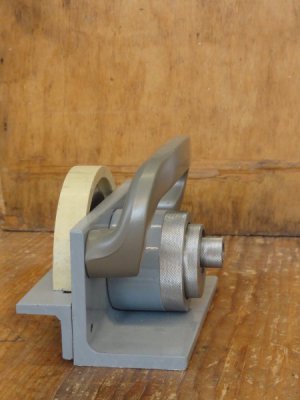
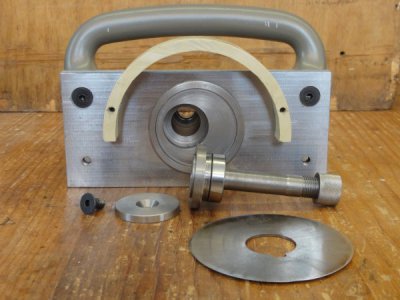
I made this heavier tool to follow a straight edge with the guides on either side of the razor wheel. There's about 0.005" clearance so the wheel spins freely. The axle and height adjustment are in the cylinder on the back side. There's 3 sets of fine threads to hold it all together with knurled surfaces to adjust everything finger tight. The handle came off a sliding patio door.

The height adjustment is a much smaller version of the mechanism used in old double arbor table saws. The arbor is mounted in an off center bore in a larger round shaft that sits in the outer bore. Rotating the outer shaft raises and lowers the height of the cutting wheel so it just kisses the table under the veneer. I was taking a chance here, but the friction in the bore fit will hold the height adjustment with just finger tightening the knurled retaining ring.

I ground the rotary razor out of a worn out small slitting saw. I like having tools I can sharpen myself.

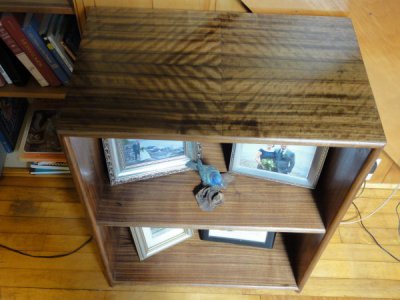
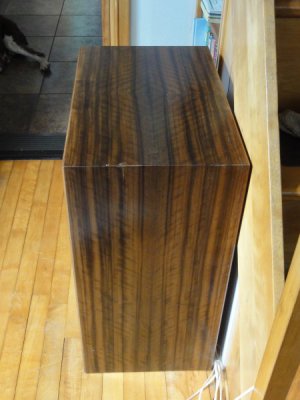
This little walnut shelf is the first piece I made using this tool. It is veneered with a 4 way diamond match centered on the top. That center line front to back is what this tool does. The effect works best with obliquely figured veneer that wants to tear out like crazy when you cut across it.

The woodgrain is continuous over the mitered top corners and down the sides. I really like the balance and symmetry in this piece, and I'll be using this technique more. Thanks for looking.


I made this heavier tool to follow a straight edge with the guides on either side of the razor wheel. There's about 0.005" clearance so the wheel spins freely. The axle and height adjustment are in the cylinder on the back side. There's 3 sets of fine threads to hold it all together with knurled surfaces to adjust everything finger tight. The handle came off a sliding patio door.

The height adjustment is a much smaller version of the mechanism used in old double arbor table saws. The arbor is mounted in an off center bore in a larger round shaft that sits in the outer bore. Rotating the outer shaft raises and lowers the height of the cutting wheel so it just kisses the table under the veneer. I was taking a chance here, but the friction in the bore fit will hold the height adjustment with just finger tightening the knurled retaining ring.

I ground the rotary razor out of a worn out small slitting saw. I like having tools I can sharpen myself.

This little walnut shelf is the first piece I made using this tool. It is veneered with a 4 way diamond match centered on the top. That center line front to back is what this tool does. The effect works best with obliquely figured veneer that wants to tear out like crazy when you cut across it.

The woodgrain is continuous over the mitered top corners and down the sides. I really like the balance and symmetry in this piece, and I'll be using this technique more. Thanks for looking.

Attachments
I had some time for a small project. I bolted the frog from one of my woodworking hand planes to the sine table on the surface grinder. I trammed it side to side and then end to end, truing it with a shim and adjustable parallel. Then I took off about 0.005" to get it flat and smooth. This is the surface that the blade seats against. With the surface precisely ground, I find I can seat the blade very tight against the frog and still make fine adjustments to its position.

This was the last step in restoring this #7 Bedrock jointer plane. I've surface ground the sole flat, stripped and repainted it, put in a Hock blade and cap iron, and made the closed handle out of birch. I modeled the handle on a Norris smooth plane that fits my hand very well, but I made the grip more vertical so my forearm rests right down on the base of the plane and pushes straight forward. I just use this plane on edges, and I thought this grip would help keep it vertical without tipping side to side. I think someone who has shaped a rifle stock might see what I'm trying to do here.

I do have a power jointer, which does a great job, so this hand tool only takes a few passes to improve the surface quality of the glue joint--a subject on which I admit to obsessive- compulsive disorder. I like invisible glue joints with a fit so tight that the line of glue is too thin to be seen. It's a difference of a few thousands of an inch which no one but me may notice, but I am compelled to try.
Hope you found something useful or amusing here.

This was the last step in restoring this #7 Bedrock jointer plane. I've surface ground the sole flat, stripped and repainted it, put in a Hock blade and cap iron, and made the closed handle out of birch. I modeled the handle on a Norris smooth plane that fits my hand very well, but I made the grip more vertical so my forearm rests right down on the base of the plane and pushes straight forward. I just use this plane on edges, and I thought this grip would help keep it vertical without tipping side to side. I think someone who has shaped a rifle stock might see what I'm trying to do here.

I do have a power jointer, which does a great job, so this hand tool only takes a few passes to improve the surface quality of the glue joint--a subject on which I admit to obsessive- compulsive disorder. I like invisible glue joints with a fit so tight that the line of glue is too thin to be seen. It's a difference of a few thousands of an inch which no one but me may notice, but I am compelled to try.
Hope you found something useful or amusing here.
- Joined
- Jun 22, 2012
- Messages
- 1,552
I built a left/right pair of these guards for my double spindle shaper starting with some reclaimed steel U channel. I milled out a curved edge in the bottoms so the sides could project to straddle the cutterheads. The curved rim is laminated white oak veneer. It pivots freely on the back axle and is spring loaded at the front to press the workpiece against the machine table.

The machine is used to make curved and profiled wood parts. The part is clamped to a jig which rides against a bearing on the spindle. A stack of profiled cutters machines the edge. With deep profiled cuts in hard wood, very firm pressure against both the spindle bearing and machine table is needed for accurate registration of the profile details, smooth surface finish, and protection against kickback. This door rail is being made with an old set of hss tipped cutters. They don’t hold an edge like carbide or stellite, but they cut very clean when they’re sharp.

The cutting tools are a matched left/right set so they can always work downgrain with the wood fibers rather than against them. Convex curves are worked from the center towards the ends, and concave curves are worked from the ends toward the center.

The convex edge of this rail is done, and the concave edge is half worked. Most problems occur in the middle where the cuts overlap.

Joinery against curved rails requires curved end grain cuts that match the curve of the rail, made with a counter profile or cope.

Raised panel edges require heavier spindles and large diameter cutters. Left- and right-hand cutters will both be set to the same diameter on this spindle, and then one will be transferred to the other.

The raised panel jigs work upside down. The profile is cut on the underside of the panel, so most of the cutterhead is under the table. This is potentially a dangerous cut when the cutterhead is engaged before the jig makes contact with the spindle guide bearing. The slightest retrograde motion will cause it to grab and kick back very powerfully. It’s important that there be no lateral play in the guards. The end grain cuts are always made first so the corner details will be crisp.

The end product is this entry door made of yellow birch. It's a replacement for a door I built years ago which suffered from exposure to weather before I added the porch overhang and storm door. Birch complements a design that has the right balance between flat surfaces and molded edges, straight line and curves. The wavy grain takes a beautiful polish when it is worked smooth. This gives the curved and molded lines a rich look as they catch the light.


Hope you found something of interest.

The machine is used to make curved and profiled wood parts. The part is clamped to a jig which rides against a bearing on the spindle. A stack of profiled cutters machines the edge. With deep profiled cuts in hard wood, very firm pressure against both the spindle bearing and machine table is needed for accurate registration of the profile details, smooth surface finish, and protection against kickback. This door rail is being made with an old set of hss tipped cutters. They don’t hold an edge like carbide or stellite, but they cut very clean when they’re sharp.

The cutting tools are a matched left/right set so they can always work downgrain with the wood fibers rather than against them. Convex curves are worked from the center towards the ends, and concave curves are worked from the ends toward the center.

The convex edge of this rail is done, and the concave edge is half worked. Most problems occur in the middle where the cuts overlap.

Joinery against curved rails requires curved end grain cuts that match the curve of the rail, made with a counter profile or cope.

Raised panel edges require heavier spindles and large diameter cutters. Left- and right-hand cutters will both be set to the same diameter on this spindle, and then one will be transferred to the other.

The raised panel jigs work upside down. The profile is cut on the underside of the panel, so most of the cutterhead is under the table. This is potentially a dangerous cut when the cutterhead is engaged before the jig makes contact with the spindle guide bearing. The slightest retrograde motion will cause it to grab and kick back very powerfully. It’s important that there be no lateral play in the guards. The end grain cuts are always made first so the corner details will be crisp.

The end product is this entry door made of yellow birch. It's a replacement for a door I built years ago which suffered from exposure to weather before I added the porch overhang and storm door. Birch complements a design that has the right balance between flat surfaces and molded edges, straight line and curves. The wavy grain takes a beautiful polish when it is worked smooth. This gives the curved and molded lines a rich look as they catch the light.


Hope you found something of interest.
Most of my metalworking is building tools I use for woodworking, but I’ve been thinking about making special hardware for my furniture. This is a concealed hinge for a fall flap desk. It’s simply made from cold rolled rod. It could be made with a drill press, but a vertical mill does a nicer job on the counterbores where the ends of the 2 cross pins sit tight against the long rod.

The long rod turns in a full-length hole in the flap which starts with a groove cut by a convex grooving cutter and then back filled to fit snugly around the bar. The slots for the pivot pins allow 90-degree rotation. The pins slide into holes bored in the front edge of a shelf and are cross pinned to hold them in place.

The lower doors and flap have concealed hardware.

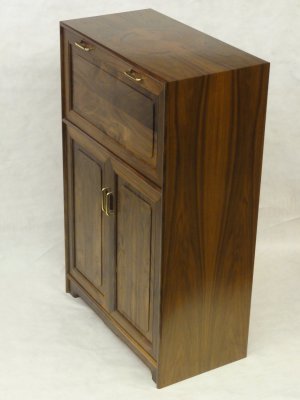
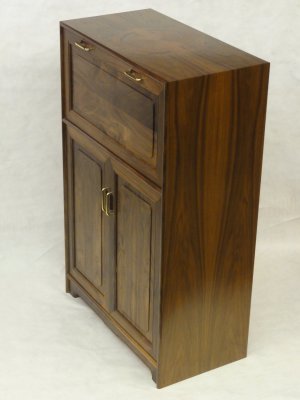
Without exposed hinges, the mitered bead details on the case edges and doors give a very clean look. I cut the inlay in the top with the small air router I made. This is the first time I’ve tried this and I thought if I screwed it up it would be less noticeable on the top. The case is walnut, and the contrasting inlay is African makore.

The desk surface opens to a flat work surface with a flush joint and small gap between the shelf and flap. The only signs of the hardware are the 2 small cutouts at the pivot pins.
The desk will go in our guest room. It’s intended to hold a laptop computer such as our children and their spouses bring with them when they visit. It will be such a convenient place to set one up that they won’t be left lying all over the house. I wanted this piece to look like a really big iPhone—sleek, self-contained, very simple lines, minimal neat details.

The long rod turns in a full-length hole in the flap which starts with a groove cut by a convex grooving cutter and then back filled to fit snugly around the bar. The slots for the pivot pins allow 90-degree rotation. The pins slide into holes bored in the front edge of a shelf and are cross pinned to hold them in place.

The lower doors and flap have concealed hardware.

Without exposed hinges, the mitered bead details on the case edges and doors give a very clean look. I cut the inlay in the top with the small air router I made. This is the first time I’ve tried this and I thought if I screwed it up it would be less noticeable on the top. The case is walnut, and the contrasting inlay is African makore.

The desk surface opens to a flat work surface with a flush joint and small gap between the shelf and flap. The only signs of the hardware are the 2 small cutouts at the pivot pins.

The desk will go in our guest room. It’s intended to hold a laptop computer such as our children and their spouses bring with them when they visit. It will be such a convenient place to set one up that they won’t be left lying all over the house. I wanted this piece to look like a really big iPhone—sleek, self-contained, very simple lines, minimal neat details.

