Which parting blade thickness should I go with?

@ttabbal thanks for posting a close up pic. That's an interesting design- simple too just a 2x2 block of aluminum with a single hole at the top that threads into the T-nut at the bottom?

Pretty much. There is a through hole for the t-nut, I just used a piece of threaded rod with a nut and washer on the top to hold it to the carriage. There are two smaller holes toward the blade that are threaded under the slot and clearance above to tighten the blade. I believe I used 1/4-20, mostly because I already had a tap and bolts that size.
 
If thin blades shatter, don't you want to use a thicker one like a 1/8th?

Yes hence the 3/32" over the 5/64" but up to a limit of what your lathe and workholding can handle. Pushing a thick blade into the workpiece can knock it out of the chuck if the workholding isn't optimal.
 
If thin blades shatter, don't you want to use a thicker one like a 1/8th?

In my opinion, a slightly thinner blade is useful when parting from the front IF the lathe is tight and the blade is held rigidly, perpendicular to the work and is dead on center height. I prefer a P1 (1/16" thick) on my Emco Super 11 and it cuts well from the front on that lathe. Thinner blades cut with lower cutting forces. I have parting blades from P1-N to P3 and inserted carbide blade at 1/8" wide. I've used them all to see what they're like and thinner blades are better if your lathe can handle them.

When parting from the rear, thinner blades are definitely better. I use a P1-N for all work on my Sherline and it cuts anything that I can fit on that lathe with no issues (up to 2" OD). The tool holder design holds the blade rigidly, vertically and does not allow it to turn. This allows the girder design of a P-type blade to excel, even when extended far beyond the length needed for a cut.

So, I suggest using the thinnest blade you can get away with.
 
Pretty much. There is a through hole for the t-nut, I just used a piece of threaded rod with a nut and washer on the top to hold it to the carriage. There are two smaller holes toward the blade that are threaded under the slot and clearance above to tighten the blade. I believe I used 1/4-20, mostly because I already had a tap and bolts that size.

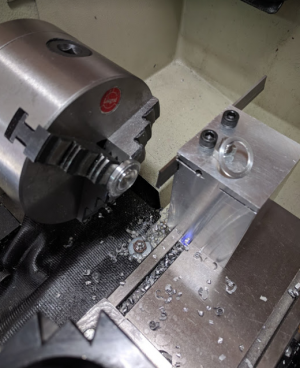
I copied your design right down to the step on the left side, thanks for the pics and info :) The only issue I had was I couldn't clamp down the blade because the two bolts just didn't have the leverage with just the saw kerf to bend the top of the post. So I lopped off the top from being 1/2" thick to a 1/4" thick. That didn't do anything. Then I ran the saw from the opposite side like you did but that didn't help either. I finally decided to drill the end of the saw kerf and that made the top just springy enough to get a good clamping force going with the two 1/4-20 bolts.

As far as how well it cuts it's hard to say because I didn't really have time to play with it but it cut the aluminum washer ok in my test (shown in the pic) but it had a lot of squealing even with WD40. The cutting edge is exactly in the center of the workpiece and everthing is clamped down tight. I'll try to sharpen the bladen and see what happens.

1571692306583.png
 
Looks like you're on the way! I'm glad my posts were helpful. Hopefully your parting is improved as mine is.
 
I use a 1/8" blade on my 12x36 and wouldn't go any larger. Smaller blade equals less forces and a better cutting experience. You don't need a rear mounted tool post to get good results although many produce evidence that they work very well. If you can part using power cross feed, I find the results to be very consistent.

Get a good tapping oil to use while parting off. It makes a difference over coolant or cutting dry.

Just my personal thoughts, thousand ways to skin a cat.
 
Back
Top