[Newbie] When Is It Good/safe To Engage The Power Feed Lever

IMG_0502.jpg

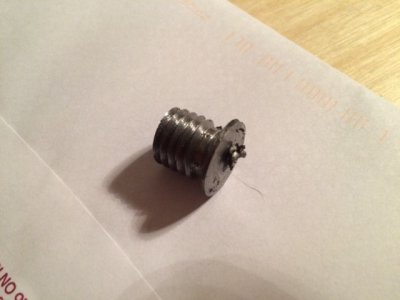
So, using a 5/8 rod, turned down to .495", with a 1/2-13 thread, using a HSS tool instead of a carbide tipped cutter, and running at about 175 RPM, it went better [so the speed is faster due to both a larger work piece and higher spindle RPM], the leading edge looks much cleaner, top of the threads are all there [earlier one a bunch of tips looked like they tore off].

It's still not great, as when I got close to the end and was trying to do a spring pass, instead it did a really good cut, so the thread is sharp to the touch, when it should have flat tops. Given that I only was manually adjusting the compound slide in and out, and using the motor to move the saddle back and forth, I think that maybe running the tool bit into the main bar a little may have shifted it slightly [I did put a relief cut at the end of the thread, but the tip of the HSS cutting doing the thread was in the middle, so the relief cut wasn't wide enough for the thread bit to not dig into the bar on the other side of the relief cut.

But, things learned:
-don't repurpose a cheap plastic bike water bottle as a coolant dispenser...you may not think about it and try to use it as a water bottle...just about took a good load it in my mouth before remembering I don't have a water bottle
-HSS cutting tools work better at lower speeds than carbide tipped tools, particularly if they have really pointy ends
-the parting tool takes much less effort than a hacksaw. I guess the steel rod is still relatively weak [vs other types of steel], as the part breaks off with a 3/16 nub instead of getting right to the center.
-got better at using the foot brake to stop the saddle from going to far in either direction
-did a little turning down of the diameter of the rod, which is pretty straightforward, particularly using the power feed. still looks like tiny little threads...
 
The metal they sale at Home Depot and other big box stores Are gummy and you won't get a good finish. I always thread with carbide 50 to 60 rpm with no issues.
 
Yeah, now I'll stay away from that stuff and get my supplies from a local scrapyard [they also sell 'new' metal] and/or The Metal Supermarket [not particularly cheap, but good selection].
 
For turning a nice finish put a radius on the tool tip. Great progress! Congrats on your persistence and success!


Steve Shannon
 
It's a start. A nut will go onto these threads OK, but I'll still do another couple test threads until they are right [not sharp, and measure right with thread measuring wires].
 
Frequently the tops of the threads are flattened with a file.


Steve Shannon
 
Yeah, except I'm pretty sure I botched getting the toolpost back to it's correct position for making another pass through the threads after moving it further away to measure how far was left to go. I had measured with the thread measuring wires and had about .05" to go, went to do a spring pass [as in, with the same depth on the compound slide] and instead it took a big cut from all the threads, as if it had offset a bit from the previous setup. Up to this point, the top of the threads were as I expected and they looked really good, just needed to be a smidge deeper. Tomorrow when I do it again, I expect it'll turn out right.
 
Yeah, that really depends on how you move the bit out of the way. I always make sure the tip of the bit fully fits into the thread after taking up all backlash before resuming. I only back out with the cross-slide, never the compound, then I return using the cross-slide. If you move the cross-slide lengthwise you either have to use the thread dial or fiddle around with the compound getting the tip back into the thread.


Steve Shannon, P.E.
 
Well, it turns out that it doesn't really matter how carefully I go back and forth with the various controls. There is a shear pin on the thread screw and it has sheared, and from oil marks on the shaft itself, it looks like the shaft has moved laterally about 1/4" since I last cleaned it, and I can't see through the shear pin.... There is still quite a bit of friction so it still drives the saddle back and forth, but it must still rotate and/or shift a little as I start/stop the motor and go back and forth.

Now I have to figure out how to line it up again so I can drive the old one out and put in a new one.

I knew I was an expert at doing this and the machine was screwing up...:rolleyes:

Now, hopefully, it's supposed to have a steel shear pin, as other lathes use brass ones or steel ones, I have no manual for the lathe, and if it happened before with my dad, he was a "well, this is what I've got, I'll use this instead" guy. I'm more of a "use this temporarily until I can find the right part" guy.
 
Hi Dave. Set your Compound Rest 29.5 Deg. to the right looking from the operators position for right hand threads. Opposite for left hand threads.
Set your cutting tool height on center and square to the center line of the work.
Its best to use HSS cutting tool that's ground with 60 Deg. point and positive rake on top. The positive rake will give it clearance opposite the cutting edge.
Touch the tool off the work and set the dial on the Cross slide to Zero, and return Cross slide to that mark with each successive cut.
The tool gets fed into the work with the Compound so the tool should cut on the left side only.

As for the Thread Dial its purpose is so you can start the cut the same spot every time. Even Number of threads, odd number of threads, Etc.
You have no numbers on the dial so a good trick to pull is to mark Dial and housing with black marker and engage half nut on mark so then it will be engage same spot on work piece each time.
Soft Brass is a good material to learn on. 1" - 8, or 3/4" - 10, Use about .005" depth of cut. Slow speed won't affect finish. Mild steel likes to tear. It don't want to cut at slow speed.
If you put layout dye on the work after each cut you'll be able to see exactly what's happin.

There's good info on YouTube.

Good Luck
 
Back
Top