Trouble turning brass

Topsy, I would like to make a few suggestions for when you grind a tool or have one made.

Brass tends to grab, as you've noticed. To get past that, a zero rake tool works best. Your current tool is a positive rake tool (the tip is higher than the back of the tool) and that will grab unless your lathe is very rigid, which a Unimat is not. Likewise, a negative rake tool creates very high cutting forces and requires a rigid lathe to cut well; again, your Unimat is not that rigid and will tend to chatter with a negative rake tool. Sooo, a zero rake tool is what you need for brass. This is just a tool with the shape you need and relief angles on the sides; the top of the tool is left flat and un-ground. As long as the tip of the tool is on center height, it will not grab.

Relief angles for brass need to be fairly large, on the order of 12 - 15 degrees. This creates a narrower included angle at the cutting edge that reduces cutting forces (good for a small lathe) and greatly improves the finish the tool creates.

Brass likes nose radii on the larger side, about 1/32" works well. This improves your finishes and makes up for the lack of back rake.

Hone your tools for brass and keep them sharp. With the right tool, brass cuts like butter.

Hope this helps.
 
Hi Topsy- I have a Unimat DB200 and it is quite worn. I usually tighten the carriage clamping bolts until it barely moves when I cut brass. Steel is quite difficult due to the lack of rigidity, but small parts are possible with very light cuts. The SL is a bit less rigid than the older iron DB series but the same principles apply.
A Unimat will develop your patience, or exhaust it! :D
Mark S.
 
When I made a spinning water sprinkler using brass components I ran into problems, all due to brass' tendency to dig in. Normal drills would pull into the hole as I worked my way up in ID, so that's when I learned the usefulness of so-called "dubbed" drills -- the cutting edge is flattened out to present an effective neutral rake. Without that, the brass would literally pull the drill+chuck right out of my lathe tailstock! Not good. My carbide insert tools were close to a negative rake so few problem w/regard to dig-in, but I had to use inserts with a large tip radius to get a decent finish.
 
Topsy, I would like to make a few suggestions for when you grind a tool or have one made.

Brass tends to grab, as you've noticed. To get past that, a zero rake tool works best. Your current tool is a positive rake tool (the tip is higher than the back of the tool) and that will grab unless your lathe is very rigid, which a Unimat is not. Likewise, a negative rake tool creates very high cutting forces and requires a rigid lathe to cut well; again, your Unimat is not that rigid and will tend to chatter with a negative rake tool. Sooo, a zero rake tool is what you need for brass. This is just a tool with the shape you need and relief angles on the sides; the top of the tool is left flat and un-ground. As long as the tip of the tool is on center height, it will not grab.

Relief angles for brass need to be fairly large, on the order of 12 - 15 degrees. This creates a narrower included angle at the cutting edge that reduces cutting forces (good for a small lathe) and greatly improves the finish the tool creates.

Brass likes nose radii on the larger side, about 1/32" works well. This improves your finishes and makes up for the lack of back rake.

Hone your tools for brass and keep them sharp. With the right tool, brass cuts like butter.

Hope this helps.

Thanks for this detailed explanation!

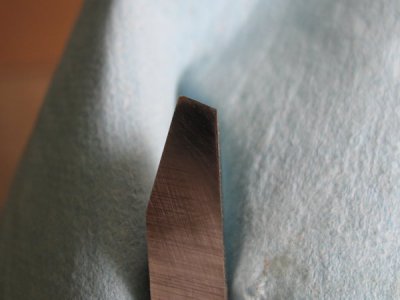
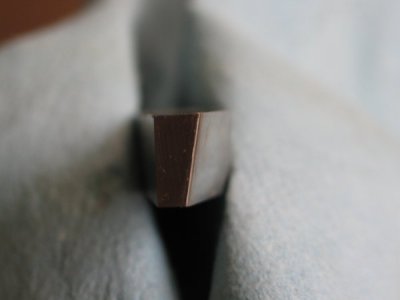
I must say, I thought I understood everything of it until I started grinding. Followed through with it anyways though but feel like I ended up with something that looks pretty blunt (but isn't). Not sure I measured the angles from the right side though?

After about 35minutes at this*:
aACSXMTm.jpg

I got this:
oX0s7Q4l.jpg

Which appears to be really out of focus.. But does that look roughly right?


Surface finish seems better to what I got with the dull negative rake tool I used a few months ago.

rwRpPVJl.jpg


*never again! Or if, then with a new and appropriate grindstone..


Steel is quite difficult due to the lack of rigidity

The exact reason why I don't plan on doing anything with steel on the unimat, I have lots of time but not that much!

A Unimat will develop your patience, or exhaust it! :D

Quote of the week haha, so true! I assume I've been developing my patience in preperation to use that.. lovely.. hand powered grinder! :rolleyes:
 
Maybe this will help. This is my general purpose brass turning tool. As you can see, it has a flat top on it and this is called Zero Rake. This tool will face, turn and cut to a shoulder and produces a mirror finish, even when roughing. Yes, it's dirty and should have been honed for the pic but I wanted to just quickly show you this tool.

IMG_5539.JPG

On the right side of the tool in this pic, you can see an angle; this is called the side relief angle. The angle is 15 degrees inward from a vertical line. Note that the cutting edge is formed by the intersection of this side angle and the top.

IMG_5541.JPG

At the very tip of the tool you can see a 1/32" nose radius. It is a consistent rounded edge, from top to bottom.

On the left side of the tip is the end cutting face and the angle of that face is also 15 degrees.

Note that the 15 degree angles are set with your tool rest. Set the rest to 15 degrees from the horizontal so that the edge of the rest closest to you is lower than the edge closest to the wheel. Make that slope 15 degrees and it will give you the relief angles you need - the side and end relief angles. Grind the shape however you wish but the one in the pic will do most things you need when cutting from the tailstock to the headstock.

Once you grind the tool, hone it with a stone so that each face is dead flat; this includes the top. When each face is honed, the tool will be very sharp. Then form the nose radius by creating a tiny flat at the tip and then round it to blend into the side and end faces. Follow up with a light honing of all three faces and you're ready to cut.

Let me know if this is at all unclear.

Mike
 
Thanks a lot for your help Mike!
I'll try and be able to use a 'normal' grinder soon to get it done properly. :)
 
Thanks a lot for your help Mike!
I'll try and be able to use a 'normal' grinder soon to get it done properly. :)

You got this, Topsy. For your lathe, a 1/4" tool bit would be good. Please get back to us with pics and your impressions for the benefit of those who follow you. Tools for brass are the easiest of all lathe tools to grind and I'm sure you'll do just fine.

Mike
 
Back
Top