Tool Offsets and Mach 3

TomS

Active User
H-M Supporter Gold Member
Joined
May 20, 2013
Messages
1,906
I've come to the point in my very short CNC career where setting up a tool table is starting to make sense. Since I began CNC'ing I resorted to touching off each tool and resetting Z zero. This works OK but now it's time to move forward. Before crashing and ruining a cutter I thought I'd run my setup past the resident guru's on this site.

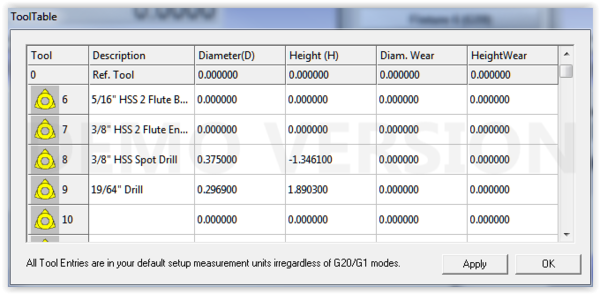
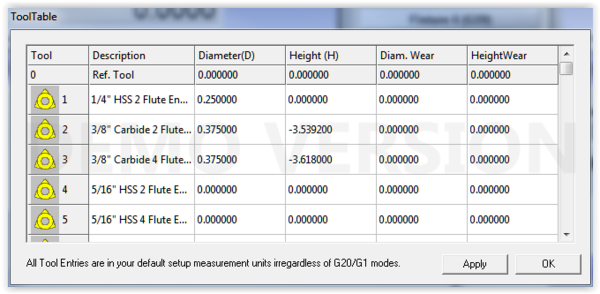
Tools include four cutting tools and a Tool Zero as the reference. I lowered the Tool Zero and touched off on the top of the part and zeroed the Z axis DRO. Loaded Tool 2, touched off on the top of the part and noted the Z axis DRO reading. In this case it was -3.5392. I entered this number in the Tool Table. Followed the same procedure for Tool 3, Tool 8, and Tool 9 and confirmed that the tool offsets were saved (see attached screen shots).

Then I opened the Fusion 360 generated gcode file and changed the "T" number and "H" number to the corresponding tool number in my tool table (sample gcode file attached).

If I'm understanding this process correctly I will touch off Tool Zero and set the Z axis DRO to zero then run the gcode and change the tool as indicated at the M6 command. Am I doing this right? As I said I'd rather ask first before crashing a $40 end mill.

BTW - When I click on the "Help - Tool Offsets" button why does the Z axis move in the "-" direction? Thought it was a help information button and ran the 19/64" drill into the top of the part.

Tom S.
Screen Shot 05-26-17 at 03.54 PM 001.PNG Screen Shot 05-26-17 at 03.56 PM.PNG
 

Attachments

  • Left Front Bracket.txt
    89.7 KB · Views: 11
Well I went ahead and cut "air" using the tool height offsets I entered into the Mach3 tool table. Visually the tool offsets seem to be correct so I guess I did it right. Tomorrow will be the true test when I cut some steel brackets.

Tom S.
 
Well that didn't work. Something changed, probably me, and again I ran a drill into the part and ruined it. This is becoming very frustrating.

This is what I did before starting the machining run today. Keep in mind I ran an air cut yesterday and visually the machining paths looked good. I homed the mill and set my part X and Y reference to zero. Set my Tool Zero to top of the part and zeroed the Z axis DRO. Double checked my tool offsets against Tool Zero and they were close. See the attached Tool Table screen shots. Started a program run and Tool 8 did it's thing OK. Loaded Tool 9 and it jammed into the top of the part. Double checked my tool offsets and Tool Zero was off more than 3". Reset Z zero and ran an air cut and Tool 8 (spot drill) comes down and stops about 1-3/8" above top of part. My DOC is .05" so I'm no where near the correct Z height. At this point I'm not sure where to go with this.

A little background on the CAM side of things. I didn't like some of the speeds and feeds so I set up my own tool table in Fusion 360. I ignored putting length and diameter offsets into the tool table because my understanding is Mach3 uses offsets from it's own tool table. Is my thinking correct? I also elected not to include a G28 command. Didn't seem logical for the machine to go to the home position at each tool change. No other changes from yesterday.

Fusion 360 is a very good program but the myriad of selections can be a bit daunting, especially for a new user like me. I've attached my gcode text file for reference. Let me know what you think and how I can get this program to produce usable parts instead of broken cutters.

Thanks,


Tom S.

Tool Table 01.PNG Tool Table 02.PNG


Edit: Tried inputing length and diameter offsets into Fusion 360. The defaults are the tool number. Wouldn't save my entries.
 

Attachments

  • Left Front Bracket - Upper Layer.txt
    85.7 KB · Views: 6
Last edited:
Hi Tom,

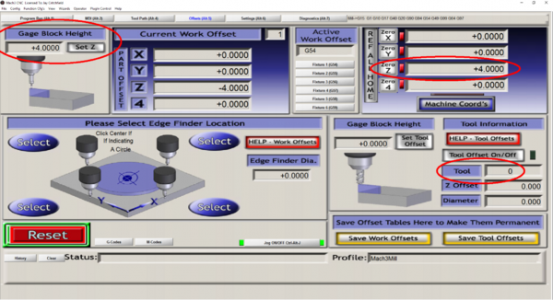
All of my tools including tool Zero (ref tool) are set to the spindle nose since I use the TTS system. Lets say tool zero (ref tool) is 4" from the tool holder shoulder that contacts the spindle nose to the tool tip. I measure this with a height gauge and a small granite block with a hole in it that allows the tool holder shoulder to rest against the granite block. When I zero the tip of the reference tool, tool zero, on the part, in the Mach 3 Offsets page I have the "Guage Block Height" box set to +4.0000". I then make sure the "Tool" is set to "0" and then hit "Set Z". Mach3 now knows that the reference offset to the spindle nose is +4.0000" above the part. All other tools in the Mach 3 tool table are offset according tho the tool table settings.

In the image below the "Gage Block Height" is set to my reference tool height of +4.0000", The "Tool" is set to tool "0" and I have pressed "Set Z". The machine Coordinates read +4.0000" but the "Current Work Offset" is -4.0000" or 4" below the spindle nose.

Mach3 Offsets.png

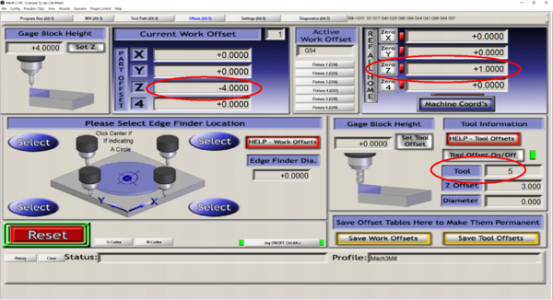
Now in this image I have called up tool 5 which has a height from the tool holder shoulder (spindle face contact) to the tool tip of 3.000". Below the "Tool 5" box, the "Z Offset" is shown as 3.000" (tool height). I have not moved the Z axis so the "Current Work Offset" is still -4.0000" but the machine Coordinates is now +1.0000". Mach 3 has subtracted the +3.000" (height of tool) from the +4.0000" (distance between the spindle nose and part) and now knows the tool tip is +1.000" above the part.

Mach3 Tool 5 Offset.png

My CAM Program in Solidworks is HSM Works. I believe Fusion 360 uses HSM Express the 2.5D verion. In the HSM tool library I setup all the tool parameters for the purpose of doing tool path simulations. HSM outputs in the G-Code the tool number, cutter offset, spindle speed, feed rate and coolant/mist toggles. The tool height in Mach 3 is pulled up from the Mach 3 Tool Table. In my Mach 3 tool table I only fill in the tool name and height. everything else is left at zero.

If you ever have to reset the part Z zero with the reference tool during a run where a cutting tool has been called up you must change the "Tool" number on the "Offsets" page back to to tool "0" before resetting. If you reset the zero with a cutting tool number that has a height value in the tool table you are resetting the Z zero to that tools offset which is different from the Reference tool offset. I have made this mistake more than once so I have a habit of keeping my finger near the stop button when doing a run for the fist time.

I hope this makes sense.
 
Hi Tom,

All of my tools including tool Zero (ref tool) are set to the spindle nose since I use the TTS system. Lets say tool zero (ref tool) is 4" from the tool holder shoulder that contacts the spindle nose to the tool tip. I measure this with a height gauge and a small granite block with a hole in it that allows the tool holder shoulder to rest against the granite block. When I zero the tip of the reference tool, tool zero, on the part, in the Mach 3 Offsets page I have the "Guage Block Height" box set to +4.0000". I then make sure the "Tool" is set to "0" and then hit "Set Z". Mach3 now knows that the reference offset to the spindle nose is +4.0000" above the part. All other tools in the Mach 3 tool table are offset according tho the tool table settings.

In the image below the "Gage Block Height" is set to my reference tool height of +4.0000", The "Tool" is set to tool "0" and I have pressed "Set Z". The machine Coordinates read +4.0000" but the "Current Work Offset" is -4.0000" or 4" below the spindle nose.

View attachment 234399

Now in this image I have called up tool 5 which has a height from the tool holder shoulder (spindle face contact) to the tool tip of 3.000". Below the "Tool 5" box, the "Z Offset" is shown as 3.000" (tool height). I have not moved the Z axis so the "Current Work Offset" is still -4.0000" but the machine Coordinates is now +1.0000". Mach 3 has subtracted the +3.000" (height of tool) from the +4.0000" (distance between the spindle nose and part) and now knows the tool tip is +1.000" above the part.

View attachment 234400

My CAM Program in Solidworks is HSM Works. I believe Fusion 360 uses HSM Express the 2.5D verion. In the HSM tool library I setup all the tool parameters for the purpose of doing tool path simulations. HSM outputs in the G-Code the tool number, cutter offset, spindle speed, feed rate and coolant/mist toggles. The tool height in Mach 3 is pulled up from the Mach 3 Tool Table. In my Mach 3 tool table I only fill in the tool name and height. everything else is left at zero.

If you ever have to reset the part Z zero with the reference tool during a run where a cutting tool has been called up you must change the "Tool" number on the "Offsets" page back to to tool "0" before resetting. If you reset the zero with a cutting tool number that has a height value in the tool table you are resetting the Z zero to that tools offset which is different from the Reference tool offset. I have made this mistake more than once so I have a habit of keeping my finger near the stop button when doing a run for the fist time.

I hope this makes sense.

Jay - thanks for responding. Yes, your explanation makes sense. In my situation I am setting the gage block DRO to .000" (no gage block used) and referencing the cutting tools to tool zero which I touch off to the top of the part then set the Z DRO to "0". Subsequent tools are touched off to the top of the part and and the corresponding Z DRO reading is recorded in the Mach3 tool table. Up to this point I think we are doing essentially the same thing.

Where it's confusing to me is when generating gcode for a Setup Fusion is generating a T8 and H0 setting but when I generate gcode for a single operation, e.g. spot drill, Fusion spits out T2 and H2. Should the H setting reference Tool 0 (H0) or the tool number (H8)?

I hope I'm making sense.

Tom S.
 
In the G-code the H & T should be the same number for the tool used i.e. T2 & H2.
 
In the code you posted it looks correct. Each tool has the same T & H number. If this is not working then you have an issue with how you are entering the data into the tool table.

Because you are using the tip of the master tool as your zero the offset of each subsequent tool will be the difference in height plus or minus. Say tool 2 is 1.000" longer than tool 0. You would enter +1.000 in the tool table for tool 2. When you zero the master tool on the part and then pull up tool 2 (without moving the Z) the Part Offset will read zero (z has not moved) and the Machine Coordinate will read -1.000". The tip of tool 2 in now 1.000" below the top of the part because it is longer than tool 0.
 
Also make sure the tool offset toggle is on (green light below the Help - Tool Offsets button)
 
In the G-code the H & T should be the same number for the tool used i.e. T2 & H2.

That's what I have in the gcode text file I attached above. When I ran an air cut earlier today, after setting Tool 0 to top of part and setting Z axis DRO to .000", the tool went well below top of the part. Had to hit Stop or it would have crashed.

I haven't found a way to input tool length offsets into Fusion. When gcode is generated I get a H0 code. If I manually change the H code to the corresponding tool number I still get a crash. I'm thinking the post processor is looking at the Fusion tool table and not the Mach3 tool table for tool offsets.

Tom S.
 
What CAM program does fusion have?
 
Back
Top