-
Welcome back Guest! Did you know you can mentor other members here at H-M? If not, please check out our Relaunch of Hobby Machinist Mentoring Program!
- Forums
- GENERAL TYPES OF METALWORKING MACHINES
- ANTIQUE & VINTAGE MACHINERY
- MISC ANTIQUE & VINTAGE MACHINERY
You are using an out of date browser. It may not display this or other websites correctly.
You should upgrade or use an alternative browser.
You should upgrade or use an alternative browser.
This Followed Me Home
- Thread starter ThunderDog
- Start date
- Joined
- Dec 12, 2014
- Messages
- 261
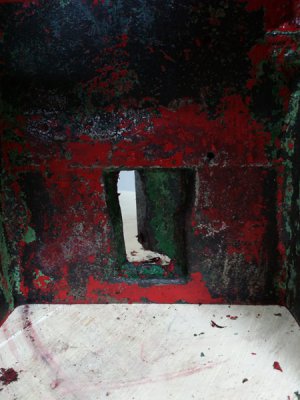
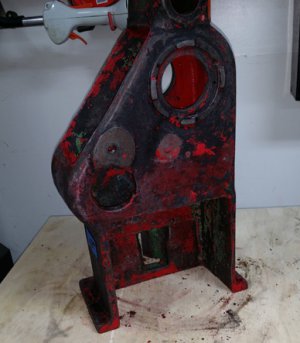
Well, let me start by saying the following. Covering up minor imperfections is one thing, covering up major flaws is extremely dishonest. So, now let's take a look at what I'm talking about. As I began a complete strip down of this mill I started noticing little things. The first was the use of small metal pieces shoved underneath the set screws because the set screws were too short. No problem, I stopped at the home center and picked up the proper sizes. Then I discovered what looked like a perfect indentation on one of the sides of the column. I scratched at it with a small pick to remove the red paint and discovered they used putty to fill the hole. I didn't think too much of it as this probably was their way of making it look "pretty". But once I began using the aircraft stripper that is when the real terror set in. A huge hole in the casting right beside the way. Filled completely with JB Weld. I poked it with a small pick and it proceeded to crumble with that distinct JB Weld smell. Needless to say I had some very descriptive words sounding off in my garage. I believe this hole has been there for a long time because there is original green paint on the hole.(see pics) My question for the experienced, should I have the hole filled? If so, how? I would be concerned with twist due to heat.
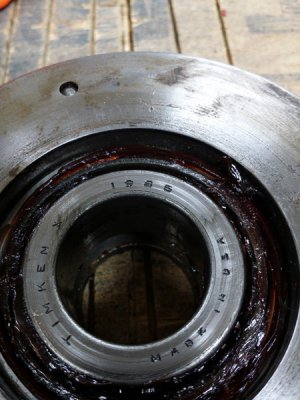
On a positive note, I found one other clue that may help me identify this mill. The rear bearing is a Timken and the date is stamped 1985. Of course, with all of the shady cover-ups I can't completely trust that is the original bearing.
Pics for your enjoyment and my pain.
Quick, find the 3 holes that have been filled.
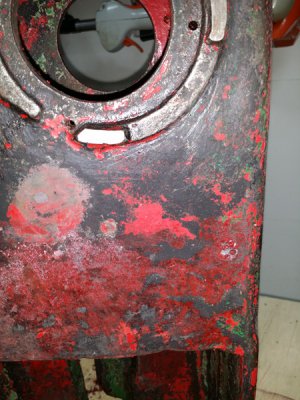
Front view
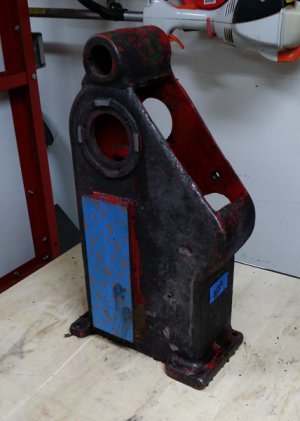
Front view hole
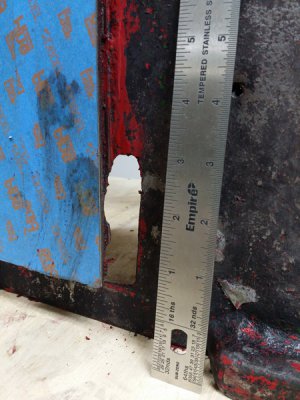
Back view hole (Just think, that was completely filled with JB Weld)
On a positive note, I found one other clue that may help me identify this mill. The rear bearing is a Timken and the date is stamped 1985. Of course, with all of the shady cover-ups I can't completely trust that is the original bearing.
Pics for your enjoyment and my pain.

Quick, find the 3 holes that have been filled.

Front view

Front view hole

Back view hole (Just think, that was completely filled with JB Weld)


- Joined
- Jan 2, 2016
- Messages
- 1,953
I think you will find out the 1985, is the bearing number.
Small plugs - usually made from bronze or brass - were common under set screws. The idea is that they don't rotate when the set screw gets tightened and there for don't (or lessen) the marking of whatever they hold tight. Clean them, dab some grease or antiseize on and put them back with the shorter set screws.
Filling no longer required holes (threaded or not) with filler/putty/epoxy is normal restoration or even maintenance technique. What else would you do? Put in a metal plug then cover it with primer and paint? I don't see the point. Leaving them open makes them swarf catchers.
Lastly, were the hole next to the casting appears to be a deliberate rectangular opening or a casting 'fault'. Your options are very limited to shutting that. I would not even consider brazing or welding it in the position that it's in. You would almost certainly distort the knee way. My solution would be to srew on a solid cover plate behind it to regain whatever rigidity might be lost by the casting hole (since you can get at the back, fix the plate with blind threaded holes to leave no new holes in the front. Fill whatever annoys you in the fault with JB weld or better from the front.
You own it, it is a very nice mill, you are the envy of hundreds if not thousands of people for finding it - and the warranty has run out (if you find the manufacturer)
Make it straight and accurate and then make it pretty.
If you are using a DC motor which may be shorter than the motor fitted on that unfortunate looking 'extension foot', you may be able to arrange it with pulleys both ends and put half of it in the base of the body and have the other end out for the 'direct drive'/high speed pulley - which doesn't look original to me and may well be redundant with the DC motor anyway.
Red isn't a bad colour as such for machines. Why this looks 'amateurish' is that EVERTHING was painted red. If the handwheels and handle had their rims polished, ist would look VERY different. If you paint it grey, see if you can introduce a secondary colour for say handwheels, inside the T-slots, bearing housings - that sort of thing, red, silver, black even... and polish some highlights (maybe even get them nickel plated to prevent rust).
What makes machines REALLY good looking is to cover all flat surfaces in putty and sand them REALLY flat and smooth. Think Deckel, Monarch et al. Have a look how they are finished. You should see undistorted reflections on the surfaces.
It will look brilliant!
The other thing I would do is make a hinged (at the top) cover for the reduction 'gear' belts box. Make it look 'factory option'. You may need to file or fill the opening's top edge a bit, maybe give it a very slight epoxy out-turned flange that looks like 'cast'. That way the cover will sit on something flat. Dopping a tool in there while it's running will not be pretty.
What a bloody great find! Congratulations! I know I'd LOVE it.....
Looking forward to following your resto thread.
Cheers,
Joe
Last edited:
B
Bill Gruby
Forum Guest
Register Today
Yes, as stated, 1985 is the Timken Bearing number.
"Bill"
"Bill"
- Joined
- Dec 12, 2014
- Messages
- 261
Joe in Oz, at first it seemed like you were bashing but you actually talked some sense into me. Seriously, thanks for the input. After sleeping on my "discoveries" I think I will take your idea of a support plate in the back. Like you say the unused holes could be filled, but I may leave them open for the EXTREMELY unlikely event that I find what went to them. That's why I like this forum so much, so people can talk sense into others.
I'll post up some more progress in the next day or two.
I'll post up some more progress in the next day or two.
4
4GSR
Forum Guest
Register Today
That big opening I'm sure was intentional in the beginning. I don't believe that was a casting defect. I will say some of the surfaces there are vary rough for a casting.
- Joined
- Jan 14, 2013
- Messages
- 290
Hi
After enlarging the photo of the hole, it is clear that it was cast into it for some reason. What reason I don't know, but as a small child my dad had a small foundry and I would watch and help (OK, I would hinder the pattern makers as they rammed their patterns). I am not sure but I believe that it possibly had something to do with the way the pattern halves went together. I see no reason to be alarmed and no reason why it would affect the function of the mill. If it was mine I would restore it and use it as is.
Tomh
After enlarging the photo of the hole, it is clear that it was cast into it for some reason. What reason I don't know, but as a small child my dad had a small foundry and I would watch and help (OK, I would hinder the pattern makers as they rammed their patterns). I am not sure but I believe that it possibly had something to do with the way the pattern halves went together. I see no reason to be alarmed and no reason why it would affect the function of the mill. If it was mine I would restore it and use it as is.

Tomh
- Joined
- Dec 12, 2014
- Messages
- 261
Update:
Watch Part 1
Watch Part 1
