The Chinese precision level teardown

graham-xrf

H-M Supporter - Gold Member
H-M Supporter Gold Member
Joined
May 27, 2016
Messages
3,479
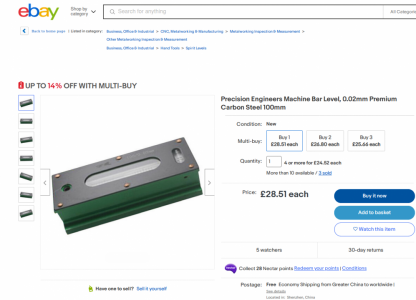
100mm (4") Wanyou 0.02mm/m from eBay UK
Here we have a take-apart of probably one of the cheapest levels available via eBay.
I have two of them, and I only wanted them as a source of sensitive level vials I could fix onto (my version) homebrew Kingway tool.
I thought that things might go easier if one could have them with the vials already mounted into something that could easily clamp/fix onto a Kingway crossbar.
WanyouLevel.png

They have an "adjustment screw", so we at least have a little try-out. It did not go well!
The self-calibration recipe(s) are well known. Start with you assume the level is wrong, and also, your level surface isn't (level). Throw in that it needs to be flat (enough) and stiff (enough). Done on a 3/8" thick plate glass on the green cutting mat, on the desk, it can see a deflection from a smartphone being placed on the desk to the side. The 0.02mm/m choice is probably too sensitive. That is 4.1 arc-seconds, equivalent to 0.0002" /10". They take a long time to settle.

The term "precision" here is a bit relative, not synonymous with "sensitivity", or "resolution". I am also thinking "quality".
We also have the 200mm Stiefelmayer Prazision here as a reference. It is a beautiful thing, and can be trusted.
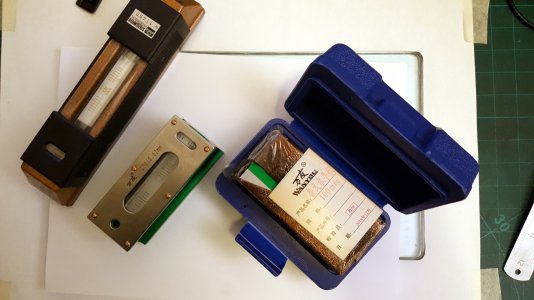

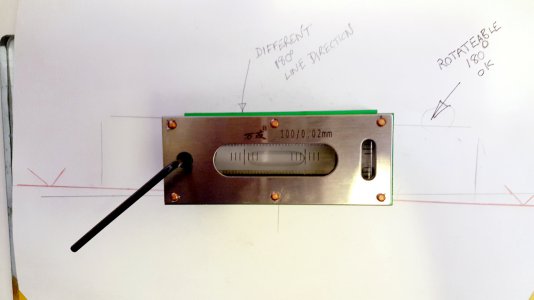
Level1.jpg

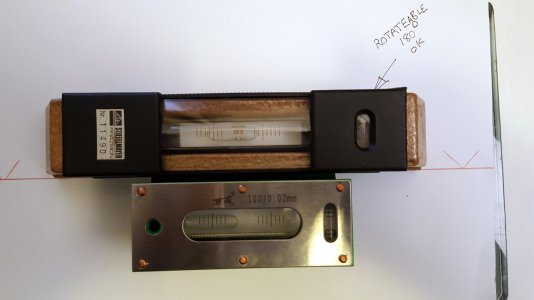
On any flat surface, there is a line somewhere that is level, found by rotating the level on the surface. Of course, if the level itself is also out of adjustment, then rotating it 180° onto the same line does not work. It finds a new line. A line bisecting those is nearer the truth, so put it there, adjust the vial, and try again. You can converge on it in later stages by adjusting to move the bubble to split the difference when rotating 180, then trying again to find the line.

I took the short-cut, first using the Stiefelmayer to discover where was level. It would return to level when rotated 180°. The problem was, no amount of adjustment would let the Chinese level repeat the trick.

Wanyou #1 finds a different line nearby. Given it's shorter this could be some tiny thing in the paper thickness under it. I get it one should do this on the hard surface.
Wanyou #2 could not repeat the 180°trick. Why??
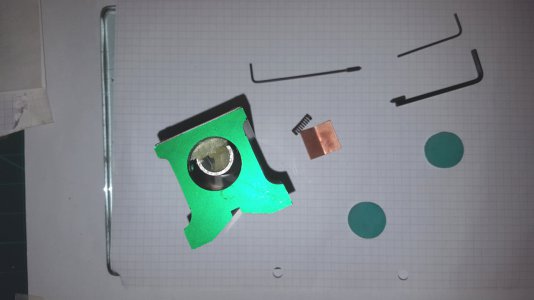
It was as if the adjust move also shifted or twisted something else inside, but 180°would not happen anywhere. It was time to take it apart!
Also, in passing the little cross level was always at the limit, whereas the Stiefelmayer was near middle, but getting that sorted is another issue.
Level2.jpg - Level3.jpg

It's Aluminum!
Yeah! At that price, don't expect anything else. If you want a practical working level ,choose precision ground hardened cast iron. So, given the total non-functionality of Wanyou #2, I started the strip-down, beginning by digging out the blue rubber bungs on the ends.
Level4.jpg

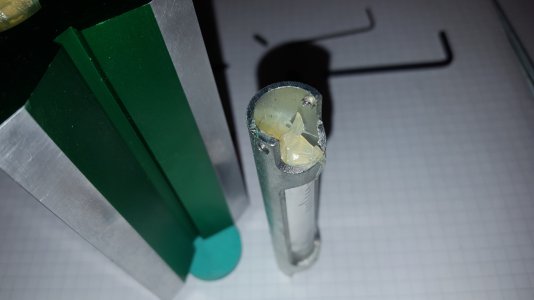
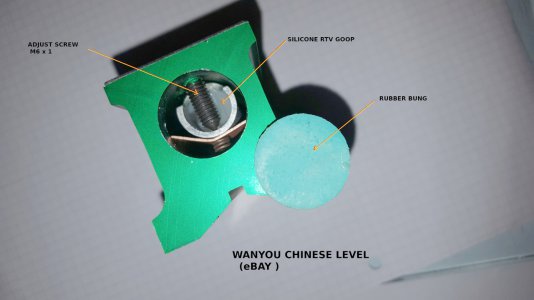
One end is (kind of) hinged.
From each side is a little black hex set-screw, with a pointed end that finds it's corresponding hole in the aluminum tube that holds the vial glass. The glass is set into the tube by silicone RTV. The same goop holds the tiny cross-level vial in place. The RTV had met such that the tube hung there, even after I took the screws out. This is supposed to be a metric thing, but the only allen wrenches I that fitted measured as 1/16" AF
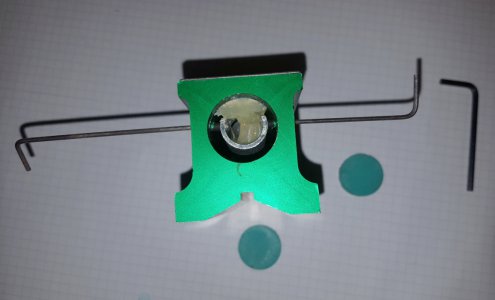
Level5.jpg _ Level6.jpgLevel12.jpg

Is it OK for me?
I suppose I could hang it back together with some "improvements", and use as a part for the Kingway. For use as a level to directly measure the ups and downs along a straight edge, or machine way - not really! I am cheapskate enough to try, but I do have the Stiefelmayer.

Just notice the big burr where the drill for the pivots went through. The fat burr probably better suits the screw point anyway. I suppose, Chinese style, if it's in a place nobody can see, then don't make it pretty.
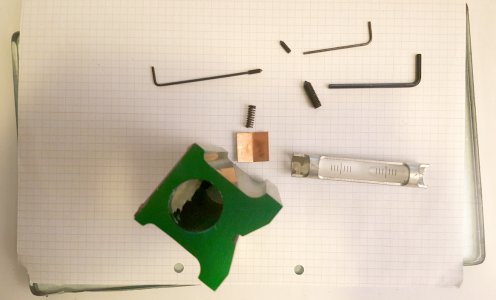
Level10.jpg

So there you have it!
A Starret, or Stiefelmayer, or similar is freaky expensive for a level. You can refurbish a good used Starret, make sure there are no dings where it matters, and do a self-calibration. For the price, something like this I can find useful in my way, as a project part source. I know what it is, and what it does. Even so, the goopy bits and internals would be nothing to write home about!
 
Last edited:
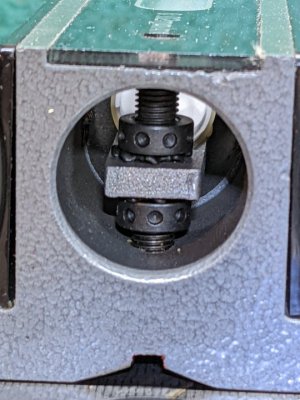
Interesting mechanism. Thanks for doing the tear down. Quite interesting to see the mechanism. Mine seems to be a 150 mm cast iron body and uses a different adjusting mechanism. Instead of a screw point and spring, my cheap level uses a pair of opposing pin spanner nuts and what are called spherical washers that sandwich the bubble arm. Haven't taken it apart yet, but looks more like star washers. I had to find and watch a video in Mandarin that showed someone adjusting the level since the instruction sheet was incomprehensible. Thank goodness for subtitles.
PXL_20220114_150439974.jpg
My level was a handful to calibrate. Unlike you, I didn't have a known good level to find a level enough spot to do the calibration. I had a 25 cent bubble (with no lines) that I roughly used to level my toolmaker's flat. It was a vial that was encased in acrylic that I had to turn 4 times to find the side that seemed to be closest to "level". I made a cheap 3 legged adjustable stand for my flat and adjusted the flat so at least the cheap level seemed to be centered in both axes. I made the legs with some fine pitch thread so I could coax the flat to be level. Even with that

My desk and workbench were nowhere level enough to find the magic level line. By that I mean there was a line, but it was almost impossible to find. Once I had leveled my flat a bit, it was far easier to find that magic spot, or at least somewhere near that spot. Once near the magic line, then it was a lot easier to proceed. A that point, at least there was some sort of indication in which way to adjust the mechanism!

When you examine things in the 0.02mm/M domain, not many things are solid or stable. (Kind of like measuring vise jaw lift!) My floor influenced the levelness of my stand. This is understandable, since it was a wooden floor. Had to place myself perpendicular to the magic line to avoid the influence of me sagging the floor, which was translated to the countertop where the adjustable stand was. My steel frame, 2" thick wooden top bench (which is sturdy and seemingly rigid to the touch) was just as bad.
 
What exactly was wrong with it? The aluminum, the burrs, or the goop? By that, I mean, what caused the calibration to fail.
 
Unlike you, I didn't have a known good level to find a level enough spot to do the calibration.
You do not need a calibrated level or a perfectly leveled surface to calibrate a precision level. This is because they are "self proving".

All you need is a flat surface plate and some sort of heavy metal block (2-4-6 block or similar). You really need something like a precision granite surface plate though. A flat plate, even if not leveled, has one line that is parallel to the ground plane (gravity). You can rotate the level until you find a spot where you think it is reading level. Place the heavy block along the side of the tool such that you can repeatedly lift and replace the level and end up on the same line.

Now flip the level 180 degrees. If the bubble position changed, rotate the entire setup slightly to minimize this difference. You are shooting for equal readings on both sides of the level, not necessarily the bubble to be in the middle of the level. Continue to iterate on this procedure until your level reads identical readings when flipped end for end. Say the level reads +1 tick, then when flipped, it must read -1.

Once this is complete, you have positioned the level exactly on the line which is parallel to the ground plane (gravity). The 2-4-6 block keeps the level in the proper position as you lift and replace it. At this point, you can adjust the screws on the level to center the bubble. Once centered, flip it end for end and verify the bubble remains centered. If this is complete, your precision level is calibrated.

Honestly you should do this every time you plan to use the level.
 
What exactly was wrong with it? The aluminum, the burrs, or the goop? By that, I mean, what caused the calibration to fail.
I am still trying to find why only one level shows signs of being possible to calibrate, and I will have to look inside the "good" one to find the differences, but it looks like it may have to do with the little pivot screws at the other side. They have to be both pretty firmly properly screwed into where they are supposed to provide the "pivot" from each side. I don't think they were properly in place. When I took it apart, the little screws came out, but the tube in the middle was still secured there with a lump of RTV unrelated to fixing the vial into the tube, but was hanging down from the RTV that was used to fix the tiny cross-level vial. I had to cut it through to let the main vial assembly come out.

It looks like, with the pivot side somewhat disconnected from it's screws, and waving about on the end of an "RTV flexible suspension", then proper adjusting attempts from the main adjuster were hopeless, and undefined.

I plan to put it together again, my way, and try all again.
 
It isn't necessary to find a perfectly level surface to calibrate (adjust) a level, only that it be close enough that the bubble is within range. It is more important that the surface be perfectly flat. An 8" level with a sensitivity of .0002"/10" will give a false reading with a less than .0002" surface imperfection. Similarly, a .0002" imperfection in the surface of the level can cause a false reading, the main reason why a Starrett level is superior to the Chinese import.

When I adjust my level, I place my surface plate on the mill table and use shims at three points to bring it close to level. Then I place a astraight edge and an end stop so that I can place the level in exactly the same position each time. I place the level on the plate and note the position of the bubble. Then I reverse the level and note the new bubble position.
Case 1; the plate is not level but the level adjustment is correct. No adjustment needed.
Case 2; the plate is level but the bubble is out of adjustment. Reversing the level will reverse the direction of the bubble. Adjust the level to center the level.
Case 3; the level is out of adjustment and the plate is not level. Reversing the level will shift the bubble to a new position. Adjust level so that the bubble position remains unchanged when the level is reversed.

There is one other consideration. The precision level normally has a second level vial at right angles to the primary vial. The reason for this is that for proper operation of the level, the level should be close to level in all directions. Small imperfections in the vial can cause the a shift in the bubble position even though the level is on a level line. The scenario it this. You have selected a flat surface and determined a line on that surface that is perfectly level. However the surface is out of level in the orthogonal direction. You adjust the level so the bubble is centered and all is good... or is it. You now check the level on another surface which is tilted at a different angle in the orthogonal direction and the damn level is calibrated.

This is another possible distinction between a Starrett level and a Chinese level.
 
All you need is a flat surface plate and some sort of heavy metal block (2-4-6 block or similar). A flat plate, even if not leveled, has one line that is parallel to the ground plane (gravity). You can rotate the level until you find a spot where you think it is reading level. Place the heavy block along the side of the tool such that you can repeatedly lift and replace the level and end up on the same line.
Finding that spot with a totally unleveled flat and a totally whacked out and far off calibrated level is difficult. If you over-rotate the level past the magic line, you'll never see it. (If your level was calibrated, yes, that would work.) Furthermore, I had the level say both ends were off, so I had no feedback which way to turn. Eventually figured out that actually meant was that I hadn't actually found that level line, it meant the line that I thought was level was not within the correctable range of the level I had.

When you have a 0.02mm/M level, you have to be within say 9 divisions of true level to start to calibrate. That magic line is hard to find initially. So I had to find that level within 0.18mm/M so I could even get non-off scale readings. It's an iterative process, to be sure, but it's non-trivial when the initial setting of the level is far off, and you have no idea where that magic level line or orientation is.

With a 0.2mm/M level, (or a 0.005"/10" level,) it's 10 times easier to do, than with a 0.02mm/M (0.0005"/10") level. Your experience may differ, but the first time through it was hard, primarily since nothing I had was close to being true. I expect following times to nowhere near as hard.
 
It isn't necessary to find a perfectly level surface to calibrate (adjust) a level, only that it be close enough that the bubble is within range.
That is what I was trying to say! The bubble has to be within range. The higher the sensitivity of the level, the tougher it is to get within range. Once in range, it is rather straightforward. As an inexperienced machinist, I bought a sensitive level, not understanding this.
 
You do not need a calibrated level or a perfectly leveled surface to calibrate a precision level. This is because they are "self proving".

All you need is a flat surface plate and some sort of heavy metal block (2-4-6 block or similar). You really need something like a precision granite surface plate though. A flat plate, even if not leveled, has one line that is parallel to the ground plane (gravity). You can rotate the level until you find a spot where you think it is reading level. Place the heavy block along the side of the tool such that you can repeatedly lift and replace the level and end up on the same line.

Now flip the level 180 degrees. If the bubble position changed, rotate the entire setup slightly to minimize this difference. You are shooting for equal readings on both sides of the level, not necessarily the bubble to be in the middle of the level. Continue to iterate on this procedure until your level reads identical readings when flipped end for end. Say the level reads +1 tick, then when flipped, it must read -1.

Once this is complete, you have positioned the level exactly on the line which is parallel to the ground plane (gravity). The 2-4-6 block keeps the level in the proper position as you lift and replace it. At this point, you can adjust the screws on the level to center the bubble. Once centered, flip it end for end and verify the bubble remains centered. If this is complete, your precision level is calibrated.

Honestly you should do this every time you plan to use the level.
Yes indeed - and within the text, this was made clear.

If a level is out, and needing adjusting, and you put down on a perfectly level surface, it will read the same, , no matter which way you orient it, and one adjustment to calibrate succeeds. Then sure enough, it stays reading level, no matter how you rotate it.

When the surface under the level is not (level), but the level is perfectly accurate, we can find the line on the surface which is level, it being the one where a 180 degree rotation will also read level.

When both the surface AND the level being looked at are not level, nor indication correctly, It finds two lines.
There are now several converge strategies. Bisecting the lines gets real close.

Looking at the partly adjusted level, set to the new line, one can see it hang to the same side of the surface under, but of course, the bubble will be on the local opposite end of the level. If the amount it shows it is wrong is the same, even when turned through 180° , then you have the correct line that is level on the surface, and only the calibrtation needs a tweak. One adjust, and you are done.

If, as is more likely, the error amounts are not the same, you have not yet found the line that is level through the surface yet. Again, there are two ways to get at it, but once I find the place where the (error) amount is the same when I turn through 180°, the next (single) adjustment to put the bubble in the middle, is the last move you need make.

Using a separate level first is just a fast way to get near the right place.
 
Back
Top