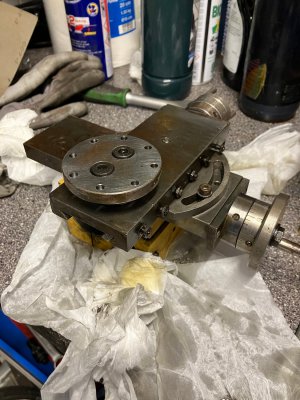
Story of my life ... err lathe :)

The reason your chuck does not match the instructions is this was arguably and upgraded chuck, a Bison.

The factory chuck on most that Ive seen was an AMA, and were quite good, though you also have the more desirable cast aluminum base the earlier machines had, so your machine may have come with the bison before they went to AMA?

My chuck.

From what I've been able to find out the 1981 ones all came with this Polish made PUTm chuck. Here's a picture of it before cleaning. Apart from the dirt and stains, it is actually in decent condition.

54046238768_9e216131ba_o.jpg

I didn't take it fully apart, only took the jaws out and oiled everything, but you're right, I should.

As to the pin you mentioned, check the fit on both sides of the collar as I believe mine was a taper pin.
The manual I downloaded says it's a split pin. The end parts that enters the collar are broken off and one was missing, but I still have the remains. It doesn't seem to have been a taper pin, but there is some kind of split in it. I'll keep an eye on it, for now the 3mm steel rod I inserted seems to stay put.


The Rohm drill chucks are very nice In my opinion. Mine also came with one but of a slightly different (Cheaper?) build.
Even with all the rust, after oiling it's smooth like knife-in-butter :)

The handwheels are quite spartan in stock form, so on mine I remade the spindles with reduced shanks in order to fit brass revolving handles to them.

That's a nice modification, you've made there! Thanks for inspiration :)
 
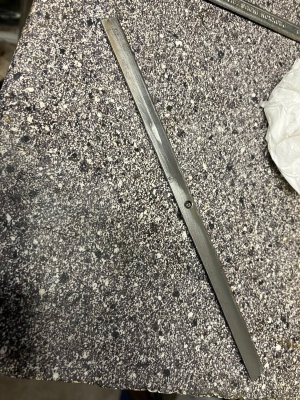
A short post about my work on the slides. As I mentioned above, I needed to do some work to free up the handwheels, and especially the rotating scales, but in the end it turned out very well. But the important part, of course, was the slides themselves. As can be seen, one of the dove tail guideways did have some scratches, and perhaps one day I should fix that one day, but for now I just cleaned it up carefully with liberal amounts of petroleum and paper, oiled it, assembled it and left it unadjusted for a while attending to other things.

The adjustment of the slides takes time, or maybe I just do not have the technique. Is there a procedure described somewhere for that? I haven't seen one. What I did was to screw in the little screws so that they pressed lightly and the slide felt like it could move easily. I then moved the slide back and forth with the handwheel noting if it ran evenly without play. Of course it didn't at furst, and this is where the job became difficult: Figuring out which screw(s) was/were over or under tightened was almost total guesswork. End the end I think I've reached a good point, though with no play and a good feeling everywhere when turning, so I'm satisfied with the result :cool:
 

Attachments

  • 54048745076_a54cabc83c_o.jpg
    54048745076_a54cabc83c_o.jpg
    348.5 KB · Views: 12
  • 54048998438_fd7451eaf8_o.jpg
    54048998438_fd7451eaf8_o.jpg
    745 KB · Views: 12
A short post about my work on the slides. As I mentioned above, I needed to do some work to free up the handwheels, and especially the rotating scales, but in the end it turned out very well. But the important part, of course, was the slides themselves. As can be seen, one of the dove tail guideways did have some scratches, and perhaps one day I should fix that one day, but for now I just cleaned it up carefully with liberal amounts of petroleum and paper, oiled it, assembled it and left it unadjusted for a while attending to other things.

The adjustment of the slides takes time, or maybe I just do not have the technique. Is there a procedure described somewhere for that? I haven't seen one. What I did was to screw in the little screws so that they pressed lightly and the slide felt like it could move easily. I then moved the slide back and forth with the handwheel noting if it ran evenly without play. Of course it didn't at furst, and this is where the job became difficult: Figuring out which screw(s) was/were over or under tightened was almost total guesswork. End the end I think I've reached a good point, though with no play and a good feeling everywhere when turning, so I'm satisfied with the result :cool:


One of the nicest features of these lathes in the amount of gib screws that used, it gives you total adjustability.

One of the most frustrating aspects of this is you have to dial in all that adjustability.

Heres what I do.

I center the axis in question and start with the center most screw. While adjusting this I move that axis with the handwheel until I feel a slight resistance and then lock that screw down. I then repeat this process moving the axis so the screw I'm adjusting is in the center of that way.

Doing this will take some trial and error along with testing it in use as the overall tightness of the way for each axis becomes tighter and stiffer to move as you proceed.

I personally like the compound to be deliberately tight and have it take some slight effort to move, with the cross slide being just slightly looser. This will take play out of the compound gibs while making the cross slide easier to move.

If the cross slide becomes difficult to move you have it too tight. If you get chatter when taking reasonable cuts, say .030-.040 on the Z and .020 on the X, for this machine you have it too loose.

It may take a bit of trial and error, but once set on these machines, it stays adjusted much better than some other machines.
 
The edit function is still borken, but I wanted to add that your compound as pictured is extended much too far.

You want the end of the ways on the top of the compound to be even with the end of the ways on the bottom of the compound.

Using it as shown will guarantee excessive chatter and wear.
 
The edit function is still borken, but I wanted to add that your compound as pictured is extended much too far.
You're right. (Edit works for me though...)

You want the end of the ways on the top of the compound to be even with the end of the ways on the bottom of the compound.

Using it as shown will guarantee excessive chatter and wear.

I noted when working on the lathe this weekend that when a tool is tightened down in the inverted-top-hat holder, the compound slide becomes tighter at the end. It makes sense as the twin bolts through the tool holder into the compound are pulled upwards a little. I got nervous that my slide had cracked, but it's fine when I inspected it, so it's just the tight tolerances and the adjustment should be made with a tool in the holder.

Thanks a lot for the idea of a procedure, I'll definetely try it. It sounds a bit like torquing down a cylinder head starting in the middle, going in circles until all are done. Except, this involves some iterations of course.
 
Last edited:
You're right. (Edit works for me though...)


I noted when working on the lathe this weekend that when a tool is tightened down in the inverted-top-hat holder, the compound slide becomes tighter at the end. It makes sense as the twin bolts through the tool holder into the compound are pulled upwards a little. I got nervous that my slide had cracked, but it's fine when I inspected it, so it's just the tight tolerances and the adjustment should be made with a tool in the holder.

Thanks a lot for the idea of a procedure, I'll definetely try it. It sounds a bit like torquing down a cylinder head starting in the middle, going in circles until all are done. Except, this involves some iterations of course.


My advise is get rid of the factory tool post asap. Many people have pulled the bolts right through the topslide trying to get that last “ummph” on the fixing screw.

An OXA from the chineses worked well for my and their cheap.
 
My advise is get rid of the factory tool post asap. Many people have pulled the bolts right through the topslide trying to get that last “ummph” on the fixing screw.

An OXA from the chineses worked well for my and their cheap.
I will go down that route soon, but I don't get why people ummph those bolts. The twin 8mm bolts can pull a lot (!), and the slide is cast iron, it's brittle. This lathe is not a big machine, and the tools stay put IME by just finger tightening the 5mm bolts using a normal hex key.
 
Back
Top