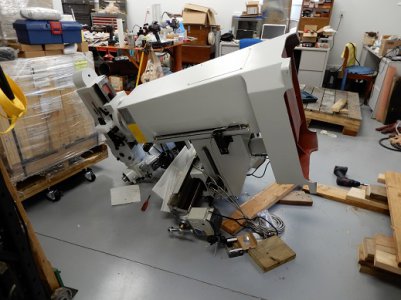
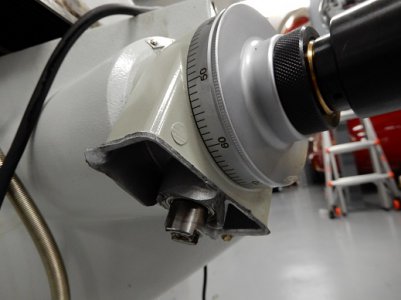
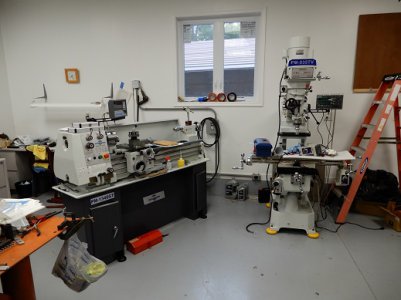
Thanks for letting me join! I'm a retired PE, redesigned machines for industrial uses, have always loved watching milling and lathe-work (and surface grinding), my friend let me use his Le Blonde lathe, then I bought a cheapie Chinese tabletop lathe, had it in my kitchen for a while. Finally decided to build a dream garage, bought a very used Clausing 12" and very used Bridgeport (both 60's) classic mill. Decided early this year to spoil myself with brand spanking new PM-1340GT lathe and PM-935TV mill. Unfortunately when I was removing the mill from its' pallet, it fell over and smashed onto the concrete floor :-( AL-500P(z) motor housing busted off, bent the adapter shaft (bought new one, works great), and the front of the spindle housing hit the floor. Extending the spindle is stiff, temporarily easier with exercising it, but still too stiff. That Precision Matthews mill is one tough machine, in that I haven't found any more damage! The spindle tube is hard chrome plated and ground, the housing I guess is the meehanite cast iron, much softer than the chrome plating. Question: Without disassembling the head of the mill, anyone know if/what 'soft' abrasive (I'm thinking tooth paste) can be sparingly used to sort of lap the front/inside of the cylindrical surface of the housing? Please see photo of mishap, and detail of front of spindle housing, head still tilted over for the transport. I've since had the mill professionally uprighted, lathe assembled, both now powered up, leveled, mill trammed in.

-
Welcome back Guest! Did you know you can mentor other members here at H-M? If not, please check out our Relaunch of Hobby Machinist Mentoring Program!
You are using an out of date browser. It may not display this or other websites correctly.
You should upgrade or use an alternative browser.
You should upgrade or use an alternative browser.
Stiffness of Spindle Extending on PM-935TV
- Thread starter MensaPE
- Start date
You need to remove the spindle. Any abrasive will need to be thoroughly cleaned off after use. The problem is that anything that is abrasive enough to do what you want in a reasonable amount of time will abrade entirely more than you want in not much more time.
Removing the spindle is probably not as bad as you might think.
GsT
Removing the spindle is probably not as bad as you might think.
GsT
- Joined
- Apr 4, 2016
- Messages
- 930
There are various lapping compounds available that may produce the result you want. But, I agree with GeneT45, you need to be able to thoroughly clean the assembly when you've finished the lapping process.
Here's some lapping compounds: https://www.mcmaster.com/products/lapping-compounds/
Ted
By the way, that first photo just hurts my stomach.
Here's some lapping compounds: https://www.mcmaster.com/products/lapping-compounds/
Ted
By the way, that first photo just hurts my stomach.
- Joined
- Apr 30, 2015
- Messages
- 11,888
Yowwuuch! Glad you weren't hurt
Thanks for the advice. I have a few projects I need to do soon, and can live with the stiffness for now.You need to remove the spindle. Any abrasive will need to be thoroughly cleaned off after use. The problem is that anything that is abrasive enough to do what you want in a reasonable amount of time will abrade entirely more than you want in not much more time.
Removing the spindle is probably not as bad as you might think.
GsT
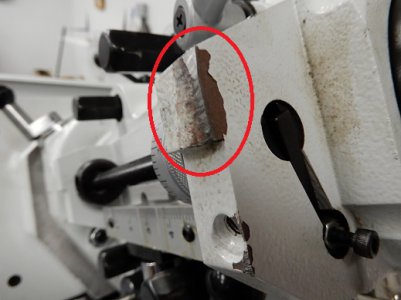
Update on quill extension stiffness....I've been thinking about it, when lowering the quill, stiff for 2", then smoother than I could have wished for the remainder of the 5". So, I thought the quill housing, which was bashed on the bottom lip was distorted, BUT most of the travel is OK. So, measured quill @ 4 heights, Just at bottom, dia avg is 3.3754", 1/4 way up 3.3751", half way up 3.3750", and at the top 3.3750". Perhaps the impact on photo 72_LR only elastically stressed the cast iron, but permanently (and I can't imaging how, as it's not egg shaped) belled out the bottom of the quill.
Dreaming out loud, maybe an aluminum ring lap, with ID of 3.3750, and a mild heater on it for size adjustment, micron or so size grit diamond lapping oil, all grit can be removed. Thoughts?
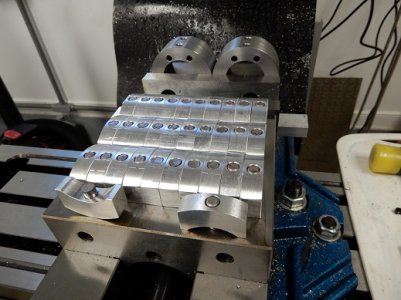
I did use both lathe and mill to make my first 'production run' of parts, 32 aluminum spacers and 2 steel end clamp blocks for a t-slotted shaft.
Dreaming out loud, maybe an aluminum ring lap, with ID of 3.3750, and a mild heater on it for size adjustment, micron or so size grit diamond lapping oil, all grit can be removed. Thoughts?
I did use both lathe and mill to make my first 'production run' of parts, 32 aluminum spacers and 2 steel end clamp blocks for a t-slotted shaft.
Attachments
I've decided to go with a 1" thick by 5" dia 110 copper disc, will bore inside to 3.3750", charge inside of lap with 2 micron diamond (ball bearing on a shaft to force compound into copper)install 2 tempco cartridge heaters, use a Variac to control temp. Calculated +35F to expand enough to get over the flared end of the quill, then lower over flared end, gradually cool until I get reasonable friction, manually rotate, spend countless hours to get it good. If absolutely too slow, will use 4 micron compound. I can't imagine the diamond getting imbedded in the chrome plated quill, when done, scrub and rinse with brake cleaner. Ideas, comments? Thanks.
Instead of using heat, leave some room to drill and tap for 2 bolts. Split the lap between the holes and use 1 to expand the diameter and 1 to tighten it.I've decided to go with a 1" thick by 5" dia 110 copper disc, will bore inside to 3.3750", charge inside of lap with 2 micron diamond (ball bearing on a shaft to force compound into copper)install 2 tempco cartridge heaters, use a Variac to control temp. Calculated +35F to expand enough to get over the flared end of the quill, then lower over flared end, gradually cool until I get reasonable friction, manually rotate, spend countless hours to get it good. If absolutely too slow, will use 4 micron compound. I can't imagine the diamond getting imbedded in the chrome plated quill, when done, scrub and rinse with brake cleaner. Ideas, comments? Thanks.
Firstram, ooooooh! good idea! Sorry about the rushed out-of-focus, but do you prefer the top, or bottom view? One puller, one pusher. Really cuts down the 1 tenth required for the thermal method! And, when charging it with a ball bearing (smashing the diamonds into the copper), I was worried about stretching the ID too much! Using a .032 slitting saw, I should be able to have an ID range of .010".
Attachments

You know how it is, the field guys always looking for shortcuts!!Firstram, ooooooh! good idea! Sorry about the rushed out-of-focus, but do you prefer the top, or bottom view? One puller, one pusher. Really cuts down the 1 tenth required for the thermal method! And, when charging it with a ball bearing (smashing the diamonds into the copper), I was worried about stretching the ID too much! Using a .032 slitting saw, I should be able to have an ID range of .010".