Squareness/Perpendicularity Checker

EmilioG

Active User
H-M Supporter Gold Member
Joined
Jul 20, 2014
Messages
1,386
How are most home hobbyists checking squareness/perpendicularity when building something?
I'd like to make or modify a stand that holds an indicator for checking squareness.
Can a bearing ball be used with a surface gage? I have vintage Starrett and B&S surface gages and they all have a V notch.

What is this V notch for? I've seen some nice checker stands with radius-ed metal "bumper" for checking squareness. Or, can this radius be machined and added to
an existing stand?

A cylindrical square would be nice, but the Murkens is rare and the Suburban tools is pricey and no magnet.
A Murkens or Hermann Schmitt stand can probably be modified but again, very pricey.

One of these tools can be made but the stand itself must have a very square shaft to the base. How do you check how square your part is?
Attached are images for OxTools home made stand. Tom Lipton. Very sturdy looking. (of course, Tom has every tool in the book to make these things.)
What is good enough for a home shop machinist?
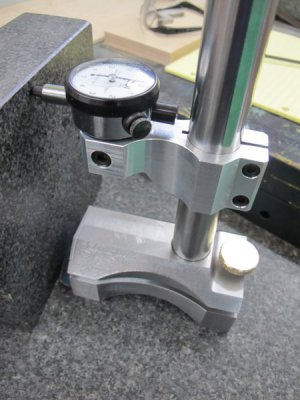
IMG_3535.JPG

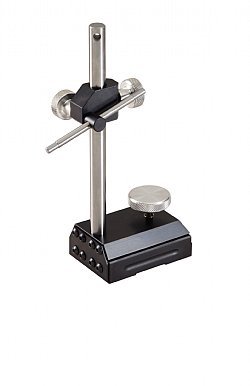
Surface gage Hermann Schmidt.jpg
 
Here is what I did for checking squareness. http://hobby-machinist.com/threads/verifying-an-angle-plate.36384/#post-310490
The catch 22 is you need a known good square to calibrate it but I believe that was true for Tom Lipton as well.
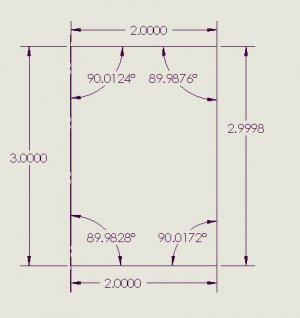
A good 1-2-3 block or better yet, a 2-4-6 block could be used. While the blocks aren't necessarily ip the precision square standards, they can be self calibrating. First, you would verify that the sides of the block were indeed straight. If that is true, then the sum of the four angle must equal 360º. Furthermore, if the sides are parallel to each other, the diagonally opposite angles must be equal. By measuring all four angle, it is possible to actually determine the individual angles using the method described in the linked thread.

Here is what I found for one of my import blocks.
1-2-3 Block.JPG
 
I've seen a video where someone (can't remember who) used a polished steel ball in the notch you describe, bit I've never tried it. Tom Lipton also has a good video showing how to verify squareness using the comparator above and a known parallel. Seems easier to me than the angle method and cheaper than buying a reference square, but maybe I'm missing something.
 
I tried my starrett surface gage with a bearing in the Vee worked but not Ideal. Didn't Tom take a pretty square/parallel plate and check it from one side and the other and set the indicator mid way from the difference of both sides.
 
How close to do you need to verify? .001"/6 inches? .0001"/6? what?

I use a ground engineers square and feeler gages for a lot of things.

You can make your own cylindrical squares if you have a lathe and can turn between centers.

A chunk 2-3 inches in diameter and 6 inches long will work great.
If you can turn the OD to a variation of .0006 over the length, you will have a square that is good to 0.0003in/6 inches. Pretty darn good.
 
I tried my starrett surface gage with a bearing in the Vee worked but not Ideal. Didn't Tom take a pretty square/parallel plate and check it from one side and the other and set the indicator mid way from the difference of both sides.
That is basically what I did with the 1-2-3- block.
 
When I worked in the die shop we always checked a parallel block side to side and set the indicator mid point. Everything after that is direct reading. I built 2 stands similar to above with a radius across the one side, the stem (thompson shafting) is about 18" high, base about 3 x 5 x 2.5 high, so it has some heft, and no adjustment screw needed. It always worked well for me then, and I use it at home now. Highly recommended.
 
A gage stand like the Murkens or Schmitt has an array of screws in front. Is this to calibrate it to the main column?
I don't need my work to be aerospace accurate but would like to be able to check my work. I suppose a simple radius on a surface gage should suffice. Along with an Interapid or Compac. :)
 
I suppose a simple radius on a surface gage should suffice.
Most of the ones you see have been modified from a standard surface gage. It is not too difficult to make a horizontal slot in one end of the surface gage to fit a radiused plate which is then pressed in, glued in, or whatever. The radius is not critical, but should have a smooth curve. Tom Lipton shows how to calibrate it, as s_vanhoveln pointed out above.
 
I would have to buy a new stand or surface gage to modify. I won't drill or mill my vintage, hardened steel Starrett or B&S surface gages.
I see them on Ebay all the time, un hardened B&S surface gage. Stefan came up with a simple design w/o a knob.

http://gtwr.de/projects/pro_squareness/index.html
 
Back
Top