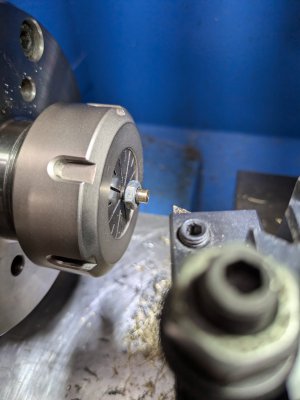
Spider for my G0602/0752Z 10 x 22

Design Attempt #2. 1/4" thick steel. Total length about 11" now. Handle is 18mm rather than 15. Printing a prototype while I'm typing, just as another sanity check.
spider_wrench_V2.jpg
I'm going to see what the sendcutsend price is as well as oshcut. I'll make a pair of them, or how ever many of them for the minimum buy.
 
I checked the fit of the new design on the lathe and the other nut. Fits both the spider and the other nut just fine.

Bit the bullet and got two wrenches made of 1/4" thick 4130 from Sendcutsend. They were cheaper by quite a bit compared to Oshcut. $29.58 including shipping. Already in the production queue. Should be built on August 1. No fancy stuff, just the wrenches. I'll have to finish the edges, if required. Not sure when I will get these, maybe the week of August 5th?

Oh yeah, back to those brass tipped screws. Where did I put the brass stock again?
 
Had to go back to my mini-lathe spider thread to find out how I made the brass tipped screws, forgot a couple of the details! I forgot the drill size and what diameter the target size was for the brass. So the brass that is captured is 4mm in diameter, and I need to drill using a #23 drill which comes out to 3.91mm, which is good enough for an interference fit. The brass section is 3mm long for the 4mm diameter section and 3mm long for the "full diameter 1/4" section. Made a little drawing to help visualize it. Hope it is useful.
 

Attachments

  • Brass_Tip_Screw.pdf
    370.7 KB · Views: 1
Had to stop for a bit. But this is what I have done so far. Spot drill the faced off screw bottoms.
PXL_20240728_193639923.jpg
Then drill to a depth of about 4.5 mm using a #23 drill.
PXL_20240728_194242713.jpg
Here's all four of them.
PXL_20240728_204251574.jpg
Here's one of the unfinished brass tips. The parting nubbin will be useful in the next step, as I'll use it to hold the piece in the tail stock drill chuck. Ordinarily the nubs are in the way, but this "thingy" will prove to be handy.
PXL_20240728_204206994.jpg
I have three more of these little pieces to make. Overall length is 6 mm without the nubbin. I need to pause on this a bit. I'll get back to it as soon as I can. The reduced diameter of the brass is 4.01 mm. I wanted 4 mm. But the brass will be shaved off during the insertion process, since the hole diameter is around 3.91 mm - or at least I'm hoping so! I did this with the mini-lathe screws, so I'm hoping my beginner's luck holds up.
 
Sendcutsend has produced the wrenches and they were being packed for shipping today. Not bad for having sent the file yesterday. Hopefully I will get them pretty soon. Pretty neat actually. I could have made the wrenches, but it would have taken me a while, and would have been tough for me to machine the tooth.

This was more of an exercise just to try sendcutsend, I've never used a service like this before. Tomorrow will be another machining day, and hope to finish up the screws.

Edit: The wrenches are done. They are waiting for FedEx to pick them up! Might have them by Thursday.
 
Last edited:
Just did the brass tips for the screws, at least the main part of it. As I alluded to, I used the parting tit to center and hold the brass tip in the tail stock chuck. Then push into place with the tail stock screw. You can see the little piece protruding from the part sitting on the ER40 chuck nut. The tail stock chuck jaws are butted up against the flat face of the part.
PXL_20240730_144256410.jpgPXL_20240730_144306712.jpg
Then the part is rammed home and the tit is faced off.
PXL_20240730_144547373.jpgPXL_20240730_144859069.jpg
I made the mistake of checking clearances with this random junky M6 nut. Turns out it was large and I had to rechuck the screw. Second time around I looked up the minor diameter of an M6 and subtracted off 0.2mm. That fit through the tapped holes in the spider. Then I tapered the tip a little so I can hold onto a smaller diameter part. I expect to have to revisit that after I look at all four screws in the spider.
PXL_20240730_150340235.jpg
Finally I screwed the brass tipped screw into the spider. Still need to do the other three, but made some progress. I should be able to bang out the others in not too much time. Thanks for following along. I hadn't seen a full photo set on making these on HM so thought it would be worthwhile to add the photo sequence.
PXL_20240730_151151406.jpg
As for Sendcutsend, they created a tracking number yesterday, but FedEx has yet to pick it up, a day later. So waiting on that. I would have thought that would have happened by now, but who knows these days...
 

Attachments

  • PXL_20240730_145541484.jpg
    PXL_20240730_145541484.jpg
    171.3 KB · Views: 3
Screws are done, so the spider is complete. Waiting on the wrenches, which shipped yesterday. Wrenches should arrive tomorrow or Friday.
With or without the locking nuts, it will close down to 1/8", which is about as good as I hoped. The mating of the screw tips is better on this one, compared to the spider I made for my mini-lathe, so some improvement. Pretty pleased overall with it.
PXL_20240731_145219925.jpg
 
Wrenches came today. Save for the tip length they came out great. I left the hook slightly longer figuring I'd file or grind it to fit. It's under a mm too long, which is great. In chrome molly they don't offer deburring or powder coating, beats me why. I need to ease the edges, which shouldn't take too much effort.
PXL_20240801_194045712.jpgPXL_20240801_194017038.jpg
Also came with a sticker and a sour patch candy. I'd use them again.
 
The laser cut edges had a sharp bur that I had to clean off. It was slightly hardened. My file really didn't want to cut some of it. So I used my belt sander to ease the bulk of the edges. Next time, I'll change the belt to 100 grit. I had an 80 grit zirconia ceramic belt on it and it was a slightly more eager than I wanted. Then used a round stone to do the curve. It could use a little more work, but the sharp stuff is gone. If the weather cools off, maybe I'll bead blast it to remove the minor surface crud on it. Sand blaster is in the unconditioned garage, it's no fun when it's so hot.

I'd say this project is complete, save for a picture of the spider on the lathe. Suppose I should go do that. BRB.
 
Why not? Now I can say it is finished and works.
PXL_20240801_214909548.jpgPXL_20240801_214928941.jpgPXL_20240801_215008086.jpgPXL_20240801_215022653.jpg
Sometimes the little things, which aren't much in the scheme of the universe, give a sense of satisfaction. This is one of them.

It was fun to do, didn't take all that long really, and improved compared to a similar part I made for my mini-lathe.
 
Back
Top