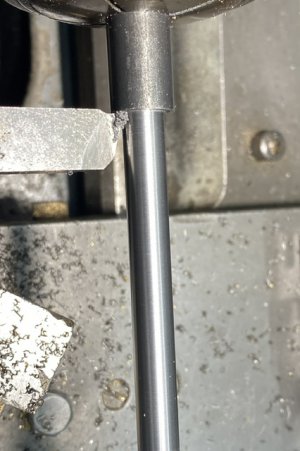
Rough Finish on 1" Hot Rolled Steel

The point of my exercise was not to polish 1018. It was to machine to tolerance with an acceptable finish for the intended purpose. In the past I've done all of the fixes for smoothing 1018 and until now my specially ground HSS bits did a decent job. I was trying to get a 12L14-like finish with the 1018. Since the fit between the saw blade, the cap and the body of the arbor were critical dimensions they all had to be machined and not hand finished.

Just to clarify, this was an EXPERIMENT to see what I could accomplish with 1018. I'm not a beginner. I wasn't asking how to do this; just trying to contribute what I did to the discussion and how it turned out when done to a set of parameters that I had set for the experiment. Those parameters included no hand finishing for the critical parts fits. Yes, I could have used a different material. That would not have been an experiment. Had I chosen to use 12L14 there would have been nothing learned. The bearing surface between the cap and the body is only about .800" long (1.000" diameter) and any taper or irregularities introduced by hand finishing would have likely made the parts unusable. If the results had been unacceptable I would have made another from 12L14 which I had on hand.
With those parameters a very small tip radius will work better than a larger one.
Use slower spindle speed to protect the small mass at the cutting tip + a lubricant / coolant.
A large top rake will also help to shear the chip.
Not ideal for a production environment but ok for an experiment.
 
  • Like
Reactions: JRT
Nice work on the arbor and thanks for the drawing! It's going in my machining folder of projects to make. -John
 
Parlo, Could you define "slower spindle speed? The speeds and feeds calculator recommended 2400 rpm and I ran it at 1200 using a TCMT carbide insert with a radius of .016". The tool holder has a neutral rake. It's all I have in carbide at the moment. The next lower speed on my lathe is 720 rpm and the finish at that speed was more like semi-roughing. This is only a 1hp machine with a 1/2" capacity AXA toolpost so big top rakes are problematic, as is the cost of really good tool holders.

I tried my HSS tool that shears more than cuts at appropriate rpm and it didn't produce the quality of finish I wanted for this project. It will make a relatively smooth finish in 1018 but not a slick finish.
 
MKSJ, thanks for sharing the drawing. The wrench flats are a nice addition.
 
Parlo, Could you define "slower spindle speed? The speeds and feeds calculator recommended 2400 rpm and I ran it at 1200 using a TCMT carbide insert with a radius of .016". The tool holder has a neutral rake. It's all I have in carbide at the moment. The next lower speed on my lathe is 720 rpm and the finish at that speed was more like semi-roughing. This is only a 1hp machine with a 1/2" capacity AXA toolpost so big top rakes are problematic, as is the cost of really good tool holders.

I tried my HSS tool that shears more than cuts at appropriate rpm and it didn't produce the quality of finish I wanted for this project. It will make a relatively smooth finish in 1018 but not a slick finish.
There are 3 variables to consider. Speed + feed + tool geometry. I suggested high shear + low speed + small tip radius then perhaps adjusting the feed. If you can use a high shear - sharp point tool at 720 rpm and not go straight for the finest feed. Then go from there.
Rigidity is usually the key to good finished & often achieved by loading the tool to remove any play. In your case this route is not ideal so I would try to reduce the load on the tool with high shear & reduced tip contact. The lower speed can help with chatter.
 
Just for comparison’s sake, to get the kind of finish I think you are talking about, in my shop if I started with my Heavy 10 and a TCMT positive insert with a 1/64 radius, .005 to .010 depth of cut, and a feed of .006 with all the speed I could muster on this machine, the finish would be good but not truly smooth.

I could improve it by switching to high-speed steel with a little cobalt to help preserve the cutting edge of the tool. I would use a more conventional grind but increase the sheer and lead angle with a little larger radius than that above and a honed cutting edge. Additionally I would use a little more depth of cut and would lower the speed being careful not to blue the chips. I’d also add cutting oil. The finish would improve a little bit more. At this point I would be reaching the limit of this machine.

To improve beyond this in my shop I would switch to the Toolmex which is a fairly high-quality European machine with a maximum RPM of 2,500 and which most of the gears are in the base and isolated from the spindle. I would use the original settings with carbide but with more speed. The finish would again improve.

But to get to smooth, I would use the Monarch 10EE. It has a drive and apron smooth enough with enough machine mass to isolate vibration and enough speed to get there. I would use all the original parameters at the beginning of this post with the only changes being to use around 3,000 RPM and perhaps slow the feed a little. This would produce a truly smooth finish.

It's funny - all these machines will cut steel, and all will do it accurately, but there is a world of difference from the Heavy 10 to the 10EE. I just thought this was an interesting comparison. Maybe sometime I’ll actually do this and post some pictures. If so, hopefully the pictures would be good enough to show the difference.

Hopefully this didn’t stray too far from the original question.
 
If you are using carbide inserts, try to run the recommended RPM. On mild steel that probably is something about 120 m/min or 1500 RPM (1").
Place the stock in the chuck and let it stick out twice the diameter (2D)
Let the tool stick out as less as possible.
Take a cut at the lowest speed your lathe can run and use a cutting depth of 1/4 of the insert tool nose radius. You should get a nice finish. If not, try an insert made for finishing like a CCMT060204 VP15TF.

I often turn hot rolled steel using CCMT060204 VP15TF inserts at 120 m/min, 0.1 mm/rev and 0.25 mm cutting depth (finish pass). That gives a nice shiny finish.
If the stick out of the bar increases, the flexibility will increase and at the same turning conditions, the finish will be poor. The same if you turn a thin (3 mm) shaft. For these setups, I reduce the feed to 0.05 mm/min and the cutting depth to 0.05 mm (finish passes) and the finish is still good enough for a close (0.01 mm) tolerance.
I take the first cut on hot rolled steel at at least 0.5 mm cutting depth so the hard top layer is cut at the cutting edge that is not used when I do finishing tasks.
If you use HSS tools, keep the speed at about 30 m/min to prevent fast tool wear. To get a small (0.4 mm) tool nose radius on a HSS tool, just one grinding pass using very, very, very light tool pressure is needed. Check your self grinded tool nose radius using a magnifier or cheap USB microscope.
A large tool nose radius can increase finish but only if the whole setup (lathe, tool post, tool, stock stick out,etc) is rigid. On my bench top hobby lathes a 0.4 mm tool nose radius is the max and large enough for a good finish.
Large size inserts are made for heavy cuts at the recommended feed and speed. The don't perform well when using light cuts. My preferred insert size is CCMT06, DCMT07, TCMT11.
 
here’s an example.

9/16” stock to 0.375“ diameter 1144 stressproof. Hand ground MoMax bit dead on center
0.050” diameter roughing passes at 0.006” per rev at 750 rpm. Finish pass of 0.005” at 0.0015 per rev at 1000 rpm.
no abrasive polishing. Monarch 10 EE.

12L14 gives even better finish on small parts like this.

IMG_5570.jpeg
 
Something less obvoius that has helped with cutting and finish was a change in lubricants away from the usual oil based fluids. I have almost a full gallon of Kool Mist concentrate but don't like to use the misting system so I had been using Rapid Tap as a cutting fluid. Just for giggles I tried some Kool Mist at its recommended 1:32 dilution but in a spray bottle instead of using the misting system. It worked amazingly well on 1018. I need to make some more shafts for the Naval guns on the battleship project and will see how Kool Mist and carbide tools work on 12L14.
 
1:32 dilution but in a spray bottle instead of using the misting system.
I've got a mister setup on the mill using Kool mist BUT have adjusted it to be more of a spatter system instead of mist. Bigger droplets don't get in the air nearly as bad. The disadvantage is needing to have the compressor on. But then I get to use the air to blow things off, so not all bad.
 
Back
Top