Question about threading on a lathe

PHPaul

Registered
Registered
Joined
Dec 5, 2017
Messages
470
I have watched a few videos and believe I understand the basics of threading on a lathe.

My Grizzly mini-lathe has a threading dial and change gears so I'm pretty sure I'm ready to try to actually cut some threads on it. I understand the difference between watching a video and actually making chips and I fully expect to deal with a learning curve.

My question, however, is about my Seneca Star 30 lathe. It has a threading chart on an embossed plate and what appears to be a full set of change gears and I get how all that works. What has me scratching my head is the fact that there is no threading dial on the apron. This leaves me with three questions. I suspect I know the answers as unhappy as that makes me:

1. Is there a way to cut threads without a threading dial? (I suspect not.)

2. Is it likely that the lathe came with a threading dial and it has been removed at some point? (I suspect so.)

3. If I'm correct about Number 2, what are the chances that I can find a threading dial that will work on my lathe? (Slim and none would be my suspicion.)
 
1.) Please post some picts, that'll give those of us who don't know a Seneca Star 30 from our Logan 210 a chance to help.
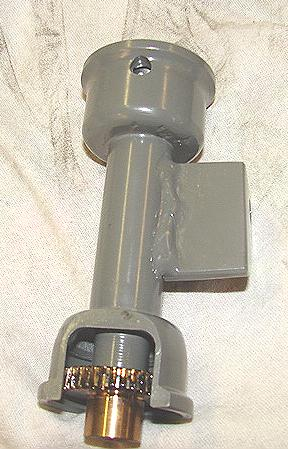
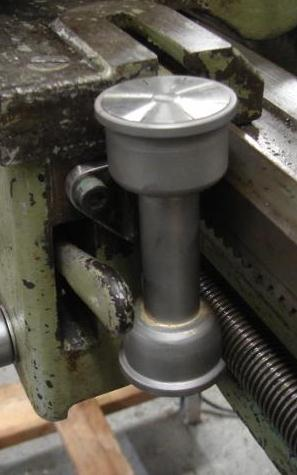
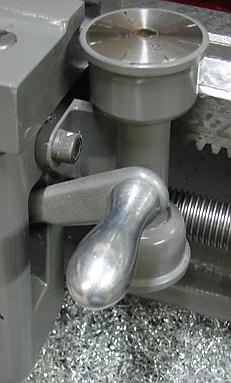
2.) I have spotted folks doing up the body, shaft, and the dial face via 3D Printing.
3.) Then all we need to do is figure out the Spur gear.
4.) Perhaps someone here has one that we can reference.
5.) and we need to find out what they look like. Shouldn't be too hard to come up with a replacement for you. (famous last words.)
6.) May need to start another thread with a title something like "Threading Dial for Seneca Star 30". . .
 
1. Is there a way to cut threads without a threading dial?

10. Position your tool for the start of the first cut.
20. With the lathe running (slowly), engage the half nut.
30. when you've threaded far enough, turn off the lathe
40. Back the tool out.
50. Reverse the lathe, let the tool run back beyond the start.
60.Turn off the lathe
65, engage forward.
70. Run the tool in just a bit more.
80. goto 20
Repeat until you've reached depth of cut.

I haven't written code for 18 years. it feels good.
The implication of line 80 is that the half nut has been disengaged. Once the threading has been started , the half nut should not be disengaged until the thread is complete. Basically, the procedure is that followed for metric threading on an Imperial lathe or vice versa.
 
The only thing that a threading dial does is gear the spindle to the lead screw, absent a thread dial just retract the tool and run the tool back with the lead screw engaged. This is slow and tedious but you are a hobbyist not a production shop correct?

If indeed you require speed skip the whole half nut manual thing and buy a NC lathe that threads, it is way faster and easier to use.
 
Thanks for replies!

I'd seen that restoration but had forgotten that he built a thread dial for it. At the moment (and for the foreseeable future) 3D printing and gear hobbing is beyond my skill set and equipment availability.

I will get pictures of the overall lathe, apron and lead screw later this morning.

How does one tell if the lead screw is Imperial or metric? I assume it's Imperial, but you know how that works. I don't have an Acme pitch gauge if such a thing even exists.
 
If you can get some STL files, I would print parts for you. I suspect that you still need to know the leadscrew specs though. What machine is it?
 
You can tell from the number of threads per inch. An Imperial lead screw will have a nice round number of threads per inch; 8, 12, or 16. If it's metricthere will be a number of threads plus a fraction in an inch. Not having used a metric lathe, I don't know what the common pitches for their lead screws are but most likely some multiple of .5mm.
 
How does one tell if the lead screw is Imperial or metric? I assume it's Imperial, but you know how that works. I don't have an Acme pitch gauge if such a thing even exists.
You measure the lead which may be done with a dial indicator.
The distance the thread travels per revolution is the lead, as an example a thread that advances .050" per revolution is 1"/.050 = 20 TPI. Inch thread systems are often specified in Threads Per Inch rather then lead.

Metric thread systems are often specified by lead, as an example M12 1.5 has a lead of 1.5MM per revolution and a nominal major diameter of 12MM.
This is a far more intuitive method of describing a thread feature, Major Diameter and Lead.

A 1/2"-13 TPI single start thread has a lead of 1/13 or .07692".
A 1.5MM single start thread has a lead of 1.5MM
Which of the above numbers is easier to understand?

Also do not confuse TPI and lead, every thread has a lead but the TPI is a different animal.
I turned ball screw ends this week, they were 1"-4 TPI threads with 4 starts giving them a lead of .250" X 4 for a total lead of 1.000" or 1 TPI/4
Like so

As you can see it has 4 starts.
 
Last edited:
Back
Top