Purchased a Vevor WM210V-L and the saga begins

Divinscuba

Registered
Registered
Joined
Sep 1, 2024
Messages
9
Recently purchased a new Vevor WM210V-L lathe from Amazon. I've been looking at several models over the past year and decided to purchase this one because of the much larger spindle bore size as compared to the other Asian mini lathes in the market. My initial want for the lathe, other than just cool to make things on it, was to be able to center drill and tap 3/4" rod. I have a fabrication project I've been wanting to do and the ability to center drill and tap round stock has lathe written all over it. I had the money set aside for about a year and finally bit the bullet.

Initial reactions to the lathe have been pretty good. I've read many threads on "don't buy Vevor lathes, they're crap". I've watched dozens of youtube vids on peoples' experiences with them and what issues they've had from the get go. Initially looking at headstock/tailstock alignment looks pretty good. That was my worst fear. People talking about shiming, grinding,etc to align the tailstock. I put the MT5 center in the spindle and a dead center in the tailstock and pushed them together. Looks pretty close. I haven't done any cutting and measuring tests yet to see if I need to twist the bed yet but I've ordered a machinist's level and plan on doing so. I'm thinking about a frame to mount on my work bench that I can use to level and the twist the ways when I get there. I'll basically make a rectangular frame to bolt the lathe to that I can adjust and level with four fine threaded bolts at each corner.

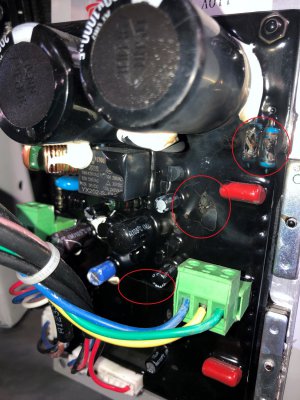
So I chucked up a length of 3/4" rod for my fabrication project and begin by facing and chamfering each end. Then I put the drill chuck in the tailstock and used a center drill to start. Marked my hole and put in a 7/32 drill bit to drill a pilot hole to depth. Lubed it up with some oil and was slowly working it in to my target depth of 1.25". I got to about a little over an inch when the spindle stopped. I pressed stop on the e-stop and turned the F/O/R switch to off. Then I switched it back to forward and pressed the ON button. There was a LOUD pop and the ground fault plug in the wall popped. Lathe was dead. I later tried again with even more fireworks. More pops, zaps, crackles and buzzes. Hit the stop again and unplugged the machine...
 
I watched some youtube vids on peoples' issues with Vevor and their warranties. Basically, they said they had to fix the machines themselves and Vevor would refund them for the parts they purchased. I thought many some wires were loose connections bad etc. in the back so I took the back cover off. No melted wires, evidence of parts shorting out. What I did find was some fried resistors on the control board and other spots where the resin coating on the board exploded and cracked. Areas of concern circled in red.
 

Attachments

  • Fried Motor Control Board marked 8.20.24.jpg
    Fried Motor Control Board marked 8.20.24.jpg
    298.7 KB · Views: 44
So I went to Amazon and clicked on get product support for my item. It takes you to a page that lists Vevor's contact info. Web page and a phone number. Called the number and it does not work. Clicked on the link to the support page and started a live chat. Told them what happeded and uploaded a pic of the fried control board. They told me they sent my info to the relevant department and they'd let me know when they heard back from them. After a couple of days, I tried the live chat again. Same thing, issue has been reported to the relevant department and they would let me know when they had more info. I contacted them every couple days with the same results. After almost a week, one CSR person says they "elevated my ticket" because I had gone so long without a response. So it takes almost a week to get an elevated ticket? All the live chat CSR have been very helpful but the relevant department gets zero stars so far. I was told by several people in the chat that I should see a response withing 24-72 hours.

Finally after the week wait I get an email that if the relevant department determines that a new control board with fix my problem they will send me one free of charge. A day later they did determine a new control board would fix my problem and that they would send me a new one. They asked me to send them my lathe's serial number. I did. The next day they asked for it again. And again the next day. They then said the next day the part would be shipped to their warehouse and wanted me to confirm my address was still the same. Shipping would take 10-15 days so please be patient. I did get another email asking me if I had connected the lathe to 220v power source and let me know that the lathe runs on 110v (duh). So when the control board arrives to their warehouse, they'll ship it to me and send me a tracking number. I reply to their emails about every day and so far no tracking number. I expect it will probably show up to my house in the next week or two before I get a tracking number.
 
So what have I learned so far? I've watched lots of youtube videos in the meantime and have now found a post or two in forums that say they're known for issues with motors and control boards. I expect that I may have to deal with an occasional control board or motor replacement. Vevor has a 12-month warranty and I paid some extra $$ to get a three-year warranty on the lathe through Amazon. For at least the three years I'll be covered. I am actually considering buying a control board and motor set off of ebay as a backup set. For a couple hundred $, I could even upgrade the motor from 750w to 1100w. Buy a warranty through square trade and go back and forth between Vevor and ebay parts as needed and hopefully minimize the downtime after break downs. I've even watched a video where a guy bolted a 3 HP A/C motor on his work bench and made the pulley set to drive his mini lathe and adjust speeds. Hopefully I won't have to go down that road.

Would I do it again? So far, yes. Several peoples' youtube vids that do reviews on their Vevor lathes after x amount of time usually say the same thing. I'm the type of guy that works on all my own cars and won't take them to a mechanic unless I can't figure something out (only twice in my 35+ years of driving and maintaining my cars). I've read several peoples' suggestions on don't buy the Vevor lathe, buy the PM10xXX lathe instead. I've clicked links taking me to lathes that are $2,800+ plus a couple hundred $ in shipping. Nope. If my job depended on a lathe and I was losing money with the downtime, that would be a whole other matter. I would be shopping for lathes much nicer than PM, but I'm not. Plus "old" used lathes in my area are $6K plus. So here I am.
 
Hello and welcome.

Well, now you know….

Hopefully when you get it fixed you’ll be able to complete your project. Super frustrating to buy a brand new product and have to fix it almost immediately.

If you haven’t found him yet check out


Might be a better bet than replacing with the same part that failed so quickly.

Stick around here, there’s plenty of advice beyond just “don’t buy this”. Also, post up some pictures :encourage:

John
 
I did find someone reference olduhfguy.com. I've saved it to my favorites. His page talks about options for different mini lathe makes and basically says under Vevor that the boards aren't worth fixing. But to give him a call and discuss options with him. I haven't yet but if the burn up/replacement routine is too often or repetitive, maybe I will. Maybe there's another manufacturer's board/motor combo that could be a potential mod for my lathe. Hopefully I won't have to go down that road. Right now, there are tons of parts available on ebay. We'll see and I'll keep the thread updated on my experience as I progress.

In the meantime, I did use the lathe and spun it by hand to mark some rods with the center drill and made a jig to hold the rods in my drill press so I could finish drilling and tapping my first set of rods. Finished with 5/16" x 1" bolts and washer to hold dock wheels on the shafts held vertically on the corner of the slip where I keep my sailboat.
 
While I've been wishing I could be working on the lathe and forced to watch youtube videos instead, I did find probably one of the most useful videos (to me) I have ever seen. I've seen lots of videos on thread cutting and comments on forums saying what threads you can a can't cut with these lathes. Title says pretty much all of it "Cut *any* thread pitch on a metal lathe" by Matthias Wandel. Great info:


I watched the video and clicked on the links to the excel file he created with the calculations for the gear combinations for cutting the different metric and imperial threads. Basically he found that the recommendations on the cover for the different thread pitches were often way wrong. He calculated what the pitches actually were from their settings and how far off they were % wise. He then wrote a program in Python that takes the pitches you want, the gears that you have, and produces which gears you need to put, and where, to cut x pitch threads. So I followed his work, figured out the calculations, and created my own excel file for my lathe. Then I realized the spindle on my lathe is 56 teeth instead of 54 like his, and redid the calculations again.

The first pic is the recommended gearing on the front of the lathe. Metric first, then imperial. Pink highlighted where they're way off. Orange are imperial pitches that aren't for any imperial threads I'm aware of.
 

Attachments

  • Vevor WM210V-L Thread Cutting Guide Metric.jpg
    Vevor WM210V-L Thread Cutting Guide Metric.jpg
    180.9 KB · Views: 14
  • Vevor WM210V-L Thread Cutting Guide Inch.jpg
    Vevor WM210V-L Thread Cutting Guide Inch.jpg
    148 KB · Views: 16
So my lathe came with quite the selection of gears. The gears installed on the lathe for power feeding are the following:
20, 24, 72, 80, 84.
Additional gears that came in the tool kit are as follows:
30, 33, 35, 40, 46, 48, 50, 52, 56, 60, 66, 70, 80
I thought I was going to need to buy an additional set of gears that Vevor sells but I took all the gears I have and put them into Matthias' Python script and found I should be able to cut about any thread I want with the gears I already have.

Here's the gear combinations I worked up with his Python script after adjusting for the 56-tooth gear on my spindle and loaded the pitches I wanted and the gears I have. The lines highlighted in green are the pitches that weren't on the front of the lathe. Orange are still the ones I don't know if they're even used for any bolts in imperial. Pipe taps maybe?

Just a note, anywhere there are "1:1" in the tables, it doesn't matter what size gear you use. Any size gear will work.
 

Attachments

  • Vevor WM210V-L Thread Cutting Guide Metric Corrected.jpg
    Vevor WM210V-L Thread Cutting Guide Metric Corrected.jpg
    197.9 KB · Views: 22
  • Vevor WM210V-L Thread Cutting Guide Inch Corrected.jpg
    Vevor WM210V-L Thread Cutting Guide Inch Corrected.jpg
    218.3 KB · Views: 18
Last edited:
Then I had to test one to see if it really worked. After I figured out how to disassemble the banjo and how all that worked, I found a long 7/16" bolt in my bolt bins and chucked it up in the 3 jaw. I loaded the gears where they go on the banjo and put a carbide thread cutting tool in the tool holder and moved it into the threads of the bolt until it just touched. I then spun the chuck by hand and traced the entire length of the 4 inches of bolt with the cutting tool. It scraped here and there but about as I would expect it to. In fact, I often spin production bolts and nuts with my taps and dies and find imperfections and tight spots. I guess it's all about the clearances...

In Matthias' video one of his combinations was .89% off target. He cuts a thread with that combination of gears and is easily able to thread a nut onto it. So he found at less than 1% error, he didn't have a problem. With my gear selection, the worst combination I worked up has an error of .26%. So if he could make .89% work, I think I'll be golden. I'll report back as I do additional tests of different imperial thread combinations.

So far though, I'm really content with what I've found. Lots of kudos to Matthias and his brilliant programming code that allowed me to calculate all the gear combos that I'll ever need for thread cutting. Especially because I don't have to buy any more gears, for threading. Well, maybe not just yet. Looking at threads on reverse tumblers that are needed for cutting left-handed threads. Maybe I'll need something else there or maybe a 3D printed gear to put in the drive chain to have a "sacrificial" gear in the combo. Thinking that may be a good idea as all the gears in my train are metal.
 
Then I realized the spindle on my lathe is 56 teeth instead of 54
It looks like the late in the photo uses metal gears instead of the common plastic ones. If you have access to 3D printing you can make the required gears. The top gear set looks too small to be the ideal 127/100 so there will be some minor compromises. I would figure out a way to power the lathe reliably and forget their control board.
That seems pretty wimpy! After the next failure find a more powerful solution.
 
Back
Top