Pulled the Trigger on a PM 45 CNC...

Ray, The holes on the base (same as yours) of my PM-932 were not symmetrical. I was warned of this by another user. Just saying so someone else doesn't plan something based on your drawing.

Congrats on the new machine. Look forward to seeing it it action.

J~
 
Ray, The holes on the base (same as yours) of my PM-932 were not symmetrical. I was warned of this by another user. Just saying so someone else doesn't plan something based on your drawing.

Congrats on the new machine. Look forward to seeing it it action.

J~
Wow, I'm actually somewhat surprised because mine were so well aligned and uniform, I figured they must have that casting process pretty well figured-out. I would estimate that mine were roughly in a +/- 1/16" inch range -which is about as good as you can expect for rough cast iron that's been epoxy coated.

Anyhow, I do thank you for the heads-up.

I'm curious, how out-of-whack were yours? BTW: I don't doubt you at all... I want to get feedback on this so maybe Matt can get the factory to address this.

Ray
 
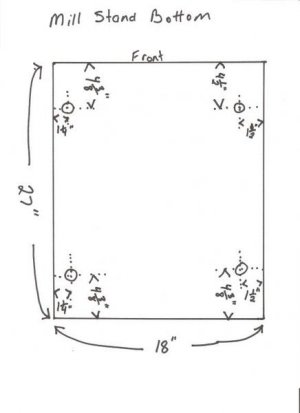
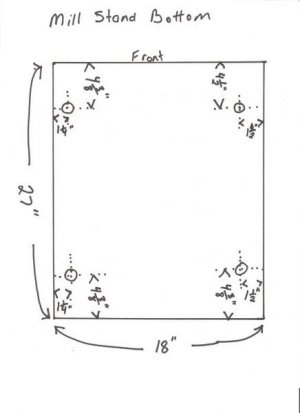
Ray, the bolt holes on the base of my PM32 were not symetrical. The holes on one side are 1/4" closer to the edge than the other side. Here is the drawing I made at the time.

millstandbottom_zpscc1c84b5.jpe

Not a very professional looking drawing but it doew the job.:LOL:
 
Ray, the bolt holes on the base of my PM32 were not symetrical. The holes on one side are 1/4" closer to the edge than the other side. Here is the drawing I made at the time.

millstandbottom_zpscc1c84b5.jpe

Not a very professional looking drawing but it doew the job.:LOL:

Perfect... I'll show this to Matt. I've sent him an email about this because most folks want to make a sub-base before the unit arrives and this throws a wet blanket on that idea...

Just so you know, the bases come from an entirely different factory and all they do is knock-out cast iron stuff. We can do our best to ask them to be more consistent. The equipment factories (for motors, gears and bed castings) have contracts. The peripheral stuff (like bases etc) are not under contract.

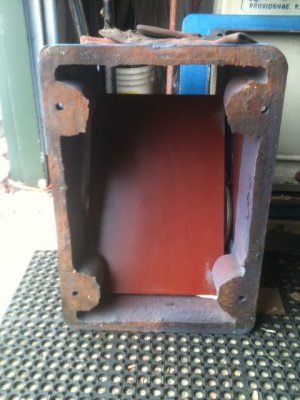
Here's a pic of mine and as you can see, this one is pretty good...


Ray
base holes.JPG

base holes.JPG
 
Wow, I'm actually somewhat surprised because mine were so well aligned and uniform, I figured they must have that casting process pretty well figured-out. I would estimate that mine were roughly in a +/- 1/16" inch range -which is about as good as you can expect for rough cast iron that's been epoxy coated.

Anyhow, I do thank you for the heads-up.

I'm curious, how out-of-whack were yours? BTW: I don't doubt you at all... I want to get feedback on this so maybe Matt can get the factory to address this.

Ray

Ray, i didn't record any measurements but as I recall is was similar to what Johnnyc14 posted, 1/8" to 1/4" out. My leveling casters are bolted to a 1/2" x 3" steel strap which is then bolted to each side of the stand. I did not make a square frame as others have.

J~
 
Getting all excited to do some welding today to make the sub-base. The pieces are cut; just need to drill a few holes. Also need to run down to the hardware store for some big bolts and nuts.

... I had a talk with Matt about the base. He says to flip it over and measure between hole centers and you'll likely find its never off more than 1/8". If you look at the photo from my earlier post, you'll see those holes are pretty clean from the bottom side. Just moments ago, I measured between centers and they were exactly 15.75 x 17.75" -and I mean, it was dead on. When you try to measure from any reference point on the lip of the base, things get dicey because, the cast iron is not even and the epoxy coating varies in thickness by almost +/- 1/8".

Also, when you measure the diameter of the holes from the bottom, they are almost perfect at 5/8". I will need to correct my drawing of 11/16 because, I measured at the top of the base where the hole is slightly tapered and uneven.

It seems to me that if you plan on the holes being 15.75 x 17.75 C-C and if you use 1/2" bolts, it will be just peachy.

I know a couple people who just ordered machines with these CI bases and they have now joined us for membership. I will ask them to check their bases when they arrive.


Standby for photos later today...

Ray
 
I would agree with Matt. Even on my Grizzly RF45 clone the bolt pattern was square(even) but like an amateur I measured from the uneven casting and got to drill my add on brackets twice. I think if you are going to have angle iron wrapping up around the base it would be wise to wait or leave extra room all around because variations in casting and finishing will happen.

Dave
 
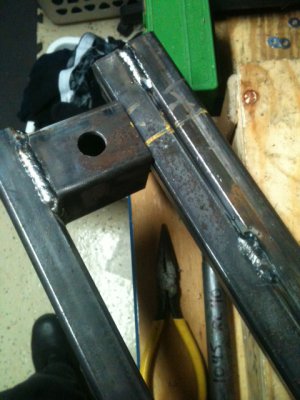
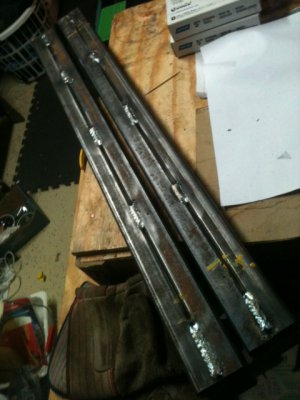
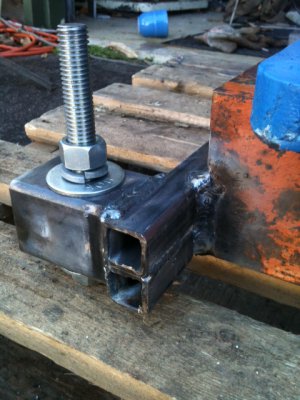
How in the world could it possibly be, that it took all day to weld these two beams together? Shop time was only about 30 minutes -if that much. Everything in-between -don't ask... Tomorrow is another day...

Anyhow, these will be the legs for the sub-base. And BTW, the 30 minutes of welding was wonderful. I really like 6013 for light-duty stuff like this. It's great stuff for tube stock and is exactly in-between 6011 and 7018. Not too much penetration and still makes a pretty weld. 6011 will dig a hole right through this stuff if you give it half a chance. I always wonder if straight-up 7018 penetrates enough for single-pass applications. Good old 6013 seems to split the difference perfectly! I really think this stuff is under-rated and never understood why it wasn't rated/allowed for structural use. There must be a reason...

Well, sorry gang, I wanted to get this done, painted and mounted to the base today but it will have to wait till tomorrow. Sash and I need to go to Lowes to get some big bolts. The local Lowes allows dogs and she loves that place.

-More tomorrow. And I promise to not spend all day in the office and on the phone like I did today...

Beam 1.JPGBeam 2.JPG

Ray

EDIT: Fixed a broken sentence. Brain too fast for fingers...

Beam 1.JPG Beam 2.JPG
 
Last edited:
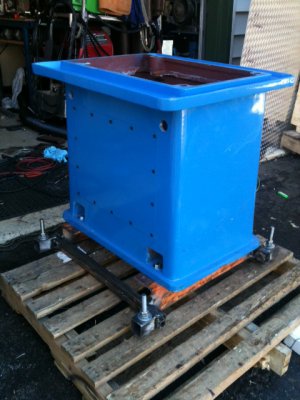
OK, finally, I got something done... Sheesh, what a slow poke I am...

Here you go. Any ideas for color suggestions?

Base 7.JPGBase 5.JPG'

After painting the base comes the hard part... Getting the mill up on top. I have a plan (and equipment).


Ray

Base 5.JPG Base 7.JPG
 
Back
Top