PM932 CNC Build

I think it is this bearing. You should verify the size. Same bearing from Amazon.

ABEC-5, 15 deg (15-18 are recommended for mills), resin cage. The data from Nachi says the max RPM for grease is 18,000.

Your information was very helpful. It helped me understand the suffix codes so that I could focus in on the correct bearings for the application. Found the bearings I need on eBay at a fraction of the cost (less than $100 for both). One is an ABEC 5 and the other is an ABEC 7. Two different brands but both are well known (SKF and NSK). The mechanical part of the conversion is coming together.

From what I understand VFD's put out a lot of electrical noise. How much separation is recommended between the VFD and the electronics (BoB, motor drivers, etc.)? If I remember yours is mounted on the wall behind your machine. Is this for convenience or is noise your concern?

Tom S.
 
My VFD is mounted to the side of the control box. This was the easiest place to mount at the time.

There are no sensitive components in the control box.

The router we built for the school has all the electronics in the same enclosure. On recommendation from an Industry expert in electrical noise we created compartments within the enclosure separating high voltage, low voltage and signal wiring. Except for the VFD to spindle wire all other shielded wires, the sheilding is terminated at the enclosure. Shielding within the enclosure acts like an antenna.

The enclosure that houses the BoB, motion controller & drives on my mill has mixed high low volt and signal with all sheilding terminating at the enclosre. Noise has never been an issue.

I suspect an open loop stepper system is less susceptible to noise than a servo/encoder system.

Sent from my SAMSUNG-SM-G900A using Tapatalk

Got it. Thanks.

Tom S.
 
Update on the coolant system. My diy check valve lasted until the spinning action created by the coolant flow cut the thin wall arrrow shaft serving as a guide rod in half. I replaced it with a solid rod and it worked for a few days and then would not pump even though it had a prime. I tried another check valve at the same. I removed the pump and flushed it out and reassembled with the commercial check valve. It ran for one tool op and quit at the tool change. I like the pump when it runs but too much time wasted fiddling around with it.

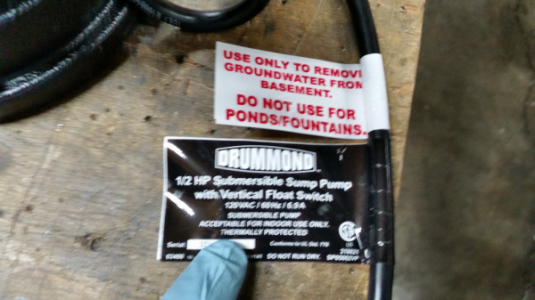
I picked up a 1/2 hp sump pump from HF. They are changing brands so this one is branded Drumond. There previous 3/4 hp pump which a lot of diy CNCers use was rated at around 2800 GPH. They didn't have any pumps in 3/4 hp so I just opted for the 1/2 hp. I didn't bother to read the label. It is rated at 4400 GPH. Holy crap this thing moves fluid. with the bi-pas valve at 70% open it will overwhelm the drain 1-1/2" drain outlet so it is about 85% open. No check valve needed and it has almost no startup delay. Much much better now. The 1/3 hp model of this pump would have been more that sufficient.

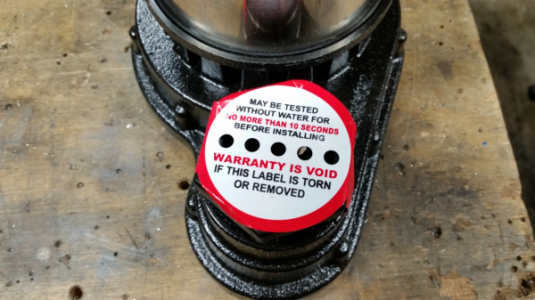
I had to laugh at the labels on the pump.

That's a short waranty...

20170105_185724.png

Indoor use only? I guess they don't want it to get wet...LOL

cp02.png

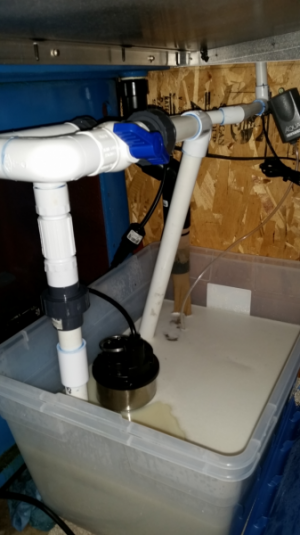
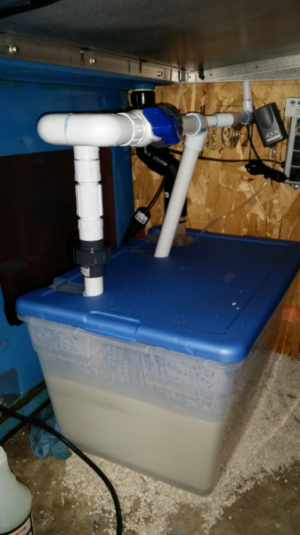
I also up sized the coolant tank from 7 gallons to 12 gallons. No chance of sucking air now.

cp04.png cp03.png
 
Update on the coolant system. My diy check valve lasted until the spinning action created by the coolant flow cut the thin wall arrrow shaft serving as a guide rod in half. I replaced it with a solid rod and it worked for a few days and then would not pump even though it had a prime. I tried another check valve at the same. I removed the pump and flushed it out and reassembled with the commercial check valve. It ran for one tool op and quit at the tool change. I like the pump when it runs but too much time wasted fiddling around with it.

I picked up a 1/2 hp sump pump from HF. They are changing brands so this one is branded Drumond. There previous 3/4 hp pump which a lot of diy CNCers use was rated at around 2800 GPH. They didn't have any pumps in 3/4 hp so I just opted for the 1/2 hp. I didn't bother to read the label. It is rated at 4400 GPH. Holy crap this thing moves fluid. with the bi-pas valve at 70% open it will overwhelm the drain 1-1/2" drain outlet so it is about 85% open. No check valve needed and it has almost no startup delay. Much much better now. The 1/3 hp model of this pump would have been more that sufficient.

I had to laugh at the labels on the pump.

That's a short waranty...

View attachment 143254

Indoor use only? I guess they don't want it to get wet...LOL

View attachment 143255

I also up sized the coolant tank from 7 gallons to 12 gallons. No chance of sucking air now.

View attachment 143257 View attachment 143256

Sorry to hear the original pump didn't work out. Sounds like you found a solution to your problem though.

Reading the labels it's clear that the pump warranty is valid only if you don't use it. LOL

Tom S.
 
Sorry to hear the original pump didn't work out. Sounds like you found a solution to your problem though.

Reading the labels it's clear that the pump warranty is valid only if you don't use it. LOL

Tom S.

No worries Tom. I like the pump but it does not like me. The new one is a lot noisier. Makes the machine sound bigger than it is. LOL We will see how it holds up.
 
Made some good progress on the belt drive conversion this week. The spindle bearings have been changed to angular contact bearings. The bearings are a press fit so I had to heat / cool components to get the bearings to drop in. That all went well except I forgot to preload the bearings when I put the spindle in the quill body. After the parts had cooled and or warmed up the locknut on the spindle would not move the bearing. I ended up using a piece of pipe, with the ends turned true, over the splined end and made a shim the thickness of the up-down play in the bearings and used those to press the bearing into the proper position. Keeping my fingers crossed I got enough preload on the bearings .

The pulleys are for poly-J belts. This has been used in a lot of other belt drive conversions so I went with it. The only downside is the vee-grooves are 40 deg. Carbide inserts for these are very expensive and seem to only come in 5 or 10 packs so the solution is to grind a cutter from HSS. I went with the typical 1:2, 2:1 pulley ratios. One thing to note is the splined sleeve has a pocket for a 6mm shaft key. I have a set of standard keyway broaches so I cut a 3/16" keyway in the pulley and made a 6mm to 3/16" adapter key out of 1/4" keyway stock.

The spindle, head cap with spline drive, pulleys and motor are installed and I was able to manually run the motor for the first time tonight. Everything ran great up to full speed (about 7K rpm at 120hz). My biggest issue is the noise and some vibration from the splined sleeve/shaft area. I'm not sure if others have run into this same issue. It is a lot noisier than I expected but not nearly as noisy as the gear head. I will try and post a video of the noise problem later in the week.

View attachment 98615 View attachment 98614 View attachment 98613 View attachment 98612

Jay - I've got my AC bearings and the Kluber spindle grease will be here sometime this week. Been surfing the net reading up on bearing preload but there doesn't seem to be much agreement on how to do it. Some say tighten the upper bearing lock nut until end play is removed then snug it a bit more to set preload. Others say leave a small amount of end play because the spindle will grow with heat and take up the end play and then some. And there are those that refer you to the manufacturer's technical literature. I'd need a PHD in mathematics to understand the formula's let alone calculate them. I'm a hobbyist and like most of us don't have the tools nor a climate controlled shop to accurately measure within a couple of tenths.

I like your approach to preloading spindle bearings. If I understand what you did you seated both bearings against their respective shoulders using a piece of pipe and shim. Where did you put the shim? Under the upper bearing outer race? Why a shim when you can use the lock nut to set preload? Did I leave something out?

Tom S.


Hi Tom,

What happened was that when I inserted the spindle while everything was free fitting I did not tighten the lock nut to fully seat the inner race at the upper end of the spindle. When the temps normalized the inner race was tight to the spindle and would not budge with the nut. This left some up-down play in the bearings. I'm trying to remember what it looked like but the pipe and shim set the max amount I could press in the inner race to seat the bearing and a few thou for preload. I had some concerns about getting it too tight. So far so good.

Had I done things correctly to begin with I would have tightened the nut until the bearings were starting to get stiff and then backed off a little. Not very scientific.

The lock nuts are a bit problematic in that they are retained by a star lock washer where you have to bend one of the star arms into a slot on the nut. If I recall I used some thin shims under the nut to get the lock nut to align with the lock washer.

My spindle temps only get a few degrees above ambient, never much warmer than that. Mine are both C5 so if you have C7 they may be more susceptible to heat expansion but I'm not sure what that would be.

Now I understand. I polished the spindle upper bearing journal so the bearing just slides on. That should help with assembly. I like your idea of using shims under the lock nut to get the proper preload and have the slot align with the lock washer tab. I'm going to steal your idea.

Tom S.
 
After swapping out the original stepper drive and power supply I finally got the 4th axis up and running.

Nothing special to look at. I was going to make a cover for the motor and coupler but I think I will just use a plastic bag. I may swap the stepper for a shorter body stepper and shorten the shaft to make it more compact. As it is now the motor sticks out too much to close the enclosure doors to use flood coolant.

View attachment 139002

Is that the 6" table from Wholesale Tools? I just got one in December.

Putting the motor mount on it and getting it running is fairly close to the top of my To Do list. I have motor mounts I made for the Hoss Phase 1 conversion and was hoping one of them would be useful.

I haven't even looked for a way to take it apart, yet, so no idea of dimensions or anything.


Bob
 
Back
Top