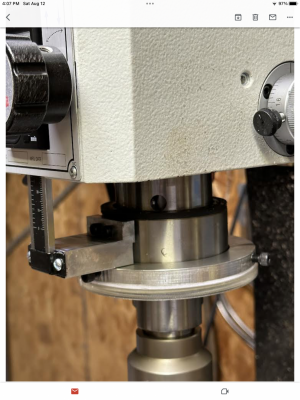
PM728VT quill DRO

I had the same problem with my quill DRO. It turns out to be a combination of 2 issues. The first is the somewhat flimsy connection bracket between the quill and the DRO scale. The second is the DRO scale doesn't slide smoothly in the DRO. There is an oversized copper alloy spring that positions the scale under the read head by pushing the scale against the side of the read head. But the scale is not as smooth as it could be, and the spring is too large, so the whole thing binds a little. The combination of flimsy and sticky add up to inaccuracy.
I fixed mine by replacing the DRO and the bracket. I might have been able to just remove the copper spring, but I had already ordered a new DRO which I like better anyways. It has an abs/rel button. There is a good video on the replacement from Blondihacks entitled "Small Milling Machine Improvements - PM-728VT". If you do the replacement, build the bracket to use the mounting hardware that comes with the DRO. Don't drill a hole in the DRO slide.

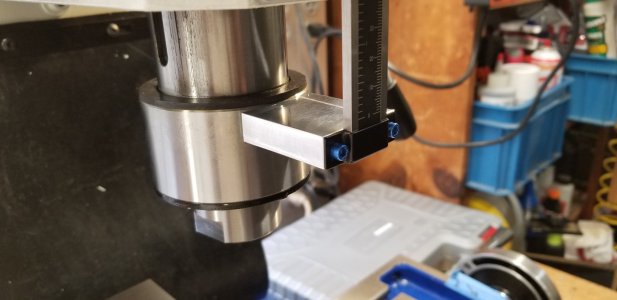
I replaced mine with same model that Blondihacks found. Her mount method wasn't ideal, which she acknowledged. Attached photo is what I did -- a simple offset bracket using the DRO's own hardware.

Maybe something like this would have helped the original DRO too.

IMG_4437.jpg
 
Looks similar to mine. I have hidden countersunk holes to attach to the quill. Excuse the blue anodized screws - it's the PC builder in me.
 

Attachments

  • 20230802_120316.jpg
    20230802_120316.jpg
    307.1 KB · Views: 100
Looks similar to mine. I have hidden countersunk holes to attach to the quill. Excuse the blue anodized screws - it's the PC builder in me.
blue screws -- nice touch.

I didn't think to remove the 'L' part of the DRO bracket, so I needed the offset.

K
 
Just curious, what are the dimensions of the part?
See attached. Based on the SHAHE scale Blondihacks used in her video.

I adjusted the drawing to fix interference with the M4 screw head (see the milled slot in the photo).

CYA: No guarantees it will work for your application :cool:

K
 

Attachments

See attached. Based on the SHAHE scale Blondihacks used in her video.

I adjusted the drawing to fix interference with the M4 screw head (see the milled slot in the photo).

CYA: No guarantees it will work for your application :cool:

K
Thanks for sharing the drawing. Like to see and modify different designs to aid my final design.
 
Mine was 1.786" between the quill and the bracket. I tried to match the length of the stock bracket. With some time I could have made measurements of the old DRO, the new DRO, the bracket, the washers,... and come up with the exact measurement. But, with a c-clamp, the new DRO, and the old bracket, it seemed to work fine - almost as if it was designed for the new DRO. I think the mounting of the DRO is very forgiving.
The holes in the quill are on 12mm centers, M4 screws. The holes on the scale holder are on 30mm centers, and I barely fit 6-32 screws in them. The width of the scale holder is 1.594" so I matched that. The height is 0.484" which is what 1/2" Aluminum is after I cleaned it up.
 
Thanks for sharing the drawing. Like to see and modify different designs to aid my final design.
Also, in my case, the vertical opening in the aluminum face plate needed to be extended about 1/16" to fit the new body. I had an old Adel-type sheet metal nibbler that did a neat job along with some minor file clean-up.

Auto-on and abs/inc are both good improvements to the original.
 
Finished my version of the mod today combining ideas from both examples above. Corrected the flex problem and new DRO is definite improvement over the original.
 

Attachments

  • IMG_0289.png
    IMG_0289.png
    1.5 MB · Views: 121
Back
Top