Planning a manufacturing class for coworkers

Some things I've come up with for the course.
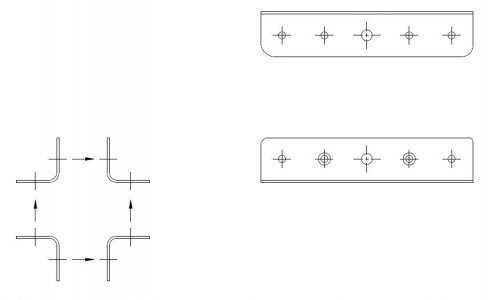
Angles.JPG


The goals would be simply to make the angles bent from sheet-metal and drill holes in a straight line across the flanges. Different holes can have different functions, such as rivets, countersunk rivets, or screws/bolts. Lots to talk about just with that. After the group makes these angles, they can assemble the pieces together. Alignment of the respective pieces requires matching the holes - starting with pilot holes and up-size drilling would be necessary.

Another lesson would use the lathe to make a simple bushing from round stock. To simplify, we can start with tube stock. To make it more challenging, the bushing can have a shoulder. Even more challenging would be to control the diameter of the bushing so that it press-fits into a hole (and drill+ream the mating hole).

Both of these offer a step-by-step series of operations, and time permitting allow the group to accomplish more or less tasks, depending on their ability and time available.
 
Some things I've come up with for the course.

View attachment 402768


The goals would be simply to make the angles bent from sheet-metal and drill holes in a straight line across the flanges. Different holes can have different functions, such as rivets, countersunk rivets, or screws/bolts. Lots to talk about just with that. After the group makes these angles, they can assemble the pieces together. Alignment of the respective pieces requires matching the holes - starting with pilot holes and up-size drilling would be necessary.

Another lesson would use the lathe to make a simple bushing from round stock. To simplify, we can start with tube stock. To make it more challenging, the bushing can have a shoulder. Even more challenging would be to control the diameter of the bushing so that it press-fits into a hole (and drill+ream the mating hole).

Both of these offer a step-by-step series of operations, and time permitting allow the group to accomplish more or less tasks, depending on their ability and time available.
out of curiosity how many times are you actually able to drill an assembly after forming? Most stuff was dumped on us in assembly as completed parts and then we had to bodge them together. So wouldn’t your angles be laid out first and drilled flat, then broke? Do your plans include setback or do the guys in fab have to figure that out?
 
I'd certainly be prepared in advance to show them the lay out of the bends on the flat part, and then go to the brake to demonstrate the bending process. Each of my novice colleagues have at least seen the brake and some have tried to use it. So far I haven't noticed them do any methodical attempts to create a part to size from a drawing, and that's what I'd be taking them through.

For starters, it's just a single bend with equal flanges. I prefer the bend allowance method. Setbacks work too. Maybe we'll try both, see what's the lowest odds of errors. We'll how our guys do against my, ahem, "foolproof" plan...

Might do a few extra pieces with-grain and cross-grain, to show the difference in result.

Holes first, or bends first? That's an eternal question! It depends... Usually I prefer all drilling done on the flat sheet before any bends. Sometimes you can't avoid it, such as determining the hole location based on distance from a bend. Before 13 people shout 'bad practice" at me for saying that, well, I agree, but consider first if there are times when you have no choice on a part with multiple complicated bends. The answer is "yes" even though "it sucks" too.

On a part with a single bend, it's easy to avoid those complications. Those are best saved for later. This is a group of novices who must be exposed to the simpler tasks, first.
 
to me it obvious that you can be more precise with a hole in a multi piece assembly if it’s drilled all together. But as one who was in the sphincter of assembly there were so many basic problems that nobody but us assembly grunts understood. Like a complete and total lack of extension cords, air hoses, hand drills and proper pneumatic tools. We were constantly dinged for not using power tools(not by the foremen as they knew, but the bigwigs) and I seemed to be the only one who say to them ok, where’s a drill, the proper drill bit and the appropriate extension or air hose? My biggest beef was most the assembly drones didn’t seem to under stand how to drill properly. Usually just blasting full speed burning up a bit ASAP. A lot of money could have been saved just only having the cheap HF 500rpm air drill available. That’s what my personal drill was.

But this is probably not applicable as you guys are probably better funded and not working with bear claws and stone knives like we were expected to work with.
 
But this is probably not applicable as you guys are probably better funded and not working with bear claws and stone knives like we were expected to work with.

Haha. Oh if only you knew the truth about the aviation business... Only the guys working at big OEM's get to play with the newest best tools. The rest of us make do with old Sears and HF stuff, just like you!
 
As a machinist :wanna be" in my home shop certain procedures and tools would be used to follow the assembly I think is indicated in the drawing. Never having used a Break and the thought of making identical parts that can be put together later reveals the need for close tolerances, accurate measurements and skilled usage of tools. I think you have a real challenge there.
Have a good day
Rock Breaker
 
Yeah, I don't want the "herding cats" experience, so preparation is necessary.

I'm pretty close to being ready to give the class. Unfortunately, work just got busy and the boss can't afford to give us a free afternoon to play in the shop.

Which is ironic, because a couple of these guys will WASTE more time in the next week ufking up drawings than they would use taking in this course. But that's just the pessimist in me talking. We shouldn't listen to him.
 
Haha. Oh if only you knew the truth about the aviation business... Only the guys working at big OEM's get to play with the newest best tools. The rest of us make do with old Sears and HF stuff, just like you!
For what we did HF was perfect. It wasn’t such a big hit when it got stolen and it got the job done. At one point the powers that be wanted to make several of us go to guys “leadmen”. no real wage bump just a title and put you in the crosshairs for butt chewing. No thanks. As I was the only one who did turn them down they asked me what I think they should do to increase production.

Management was constantly harping on it seemed that guys were walking around instead of working, and some were. Mostly the leadmen. The assembly shop was 40x400’ so a LOT of territory. With only one 4x6, DP and belt sander which because 100+ guys were constantly using them they were broken most times.

I thought a mobile workstation for each leadman with a HD benchtop drill press, 4x6 horizontal bandsaw, lockable cabinets for air hoses and extension cords would be a great start as those were what I was always looking for. Of course that was shot down. At that time each one of those workstations would have cost less than $500, a bargain IMHO.
 
Never having used a Break and the thought of making identical parts that can be put together later reveals the need for close tolerances, accurate measurements and skilled usage of tools. I think you have a real challenge there.
One of the best things I ever did was give myself permission to make tooling or jigs when the job calls for precision and repeatability. Very few I worked with thought that way.

One of our many machines was a fruit sizer. They could be hundreds of feet long with as many as 8 or 12 lanes with each lane having a huge chain that the mechanism for conveying the fruit was attached to. I described it as a golf shot, what is only a little off at the beginning at the end was waaaay off. One of their constant problems was laying the chain rails and return rails straight. They would go and cut a 2x4 or piece of tubing as a jig spacer. This worked ok until you went to get it out and the guys would just knock it out with a mallet, and wonder why when you looked back down the rail it was all schwangle. Then the yelling and pointing fingers would start each blaming the other. It seemed obvious to me things got stupid when you tried to remove the jig. So I took that same piece of 2x2 tubing and made 45deg bevel cuts opposite to each other and welded a hinge in the top of the bevel. Along with a handle. This way you could knock the rails right up against it, tighten down the hold down bolt and just lift the jig easily when tight. No muss no fuss. Soon as I got off that sizer that jig disappeared and they went back to 2x4’s. Fighting “historical engineering”(this is how we’ve always done it) was the worst part of the job.
 
Back
Top