Order of Operations

You might consider making the nut and the threaded section as separate pieces. My wheels have the treaded section mounted into the wheel from behind, then the nut (spinner) threads on the outside. In this case the nut holds a cover over the lug bolts.

wheel2.jpg
 
How is your threading? Generally, I try to do the most challenging operations early on if possible. Nothing worse than having everything else done and scrapping the part on the last op.
 
I tend to agree with MrWhoopee, make sure the most challenging details are covered first. I also obsess about rigidity, so I like to do all of my OD profiling first and save the ID profiling for last (if possible and it doesnt compromise the set up) since those steps remove material ultimately weakening the part. Not a big deal with thick walls, but the less flex in material you have, the more accurate your part will be.
 
Given that it's for appearances only and most likely you'll only see a few threads, I could probably achieve the desired effect without actually cutting a thread, just some concentric grooves with a threading bit. I still haven't settled on threads or no threads and the material won't be here until next week so I have lots of time to change my mind on that part twenty times or more. ;-)

@RandyWilson Oh, I'm familiar with those knockoffs, having spent 27 yrs in the performance aftermarket biz in a previous life. We sold a lot of those kits and sold even more of just the 3 wing knockoff part to all of the kids who had them fly off driving down the road!

Not sure I see the advantage of having a threaded adapter for my center lock and then a separate nut. It seems like a lot of extra work to make something that's fake function as though it was real. It's a lot easier to make it all from one slug of aluminum bar than to make it separate pieces. Looks exactly the same either way once it's installed.

I'm playing with an idea to 3D print some sort of lug nut cover but will wait until I see what the finished center lock nut looks like. Your wheel lends itself perfectly to the cover you have, not so much on my wheels.
 
I like the groove idea for easy control and the look you want. Great thinking.
 
Actually, those wheels can be had in either center-lock pin drive or bolt on with the covers. Same nut. They attach a bit better than the plastic spinners the Mustang crowd used to love. The point I was making was you don't have to cut all the intricate details to make it look two piece in a single block. Cut the nut. Cut a stub with treads. Attach them post machining. Press fit, even glue. to me that would be easier than trying to machine it to look like separate parts.
 
The fake spinners we sold were actually pot metal, chrome plated. They even offered a brass plated version. Those things were heavy, though, so heaven help whoever got in the way of one of those bouncing down the freeway!

That was actually my first inclination, to make the hex nut as a separate part. But finding aluminum hex rod larger than 2" proved to be a tall order.

Making it from the larger round stock requires the six cuts for the hex no matter if it's a separate piece of part of the one piece. If it's a separate piece then you have more operations to do to the nut and more material to remove from the "stub". I think you're trying to make the threading thing easier for me but as I said, it may not be part of the final design and if it is, it's a couple of mins to fake threads. I was never intending to set up real threads because my mini-lathe can't make a big enough thread pitch to look real.
 
I second or third... what Mr. Whoopee said. If the actual order does not matter then I like to do the most challenging function first so as not to waste time. I can't tell you how many of my guitar parts I've made and scrapped after spending hours on them. Foe example, for my bridge I'll spend a good amount of time hogging out the blank and then save the most dangerous part for last, threading the 48 holes. Of course I break the threading bit in one of the holes which instantly makes the wanna-be-bridge useless. Now I'll thread first and then hog out afterwards, and, my new Tapmatic has made threading so quick and easy and tool-breaking-free. So hard stuff first, easy stuff last.
 
Are there any "challenging" operations here? IF I do the "thread" part, it's likely just going to be 2 or 3 concentric grooves done with a 60 deg tool to make it look like a thread.

Probably for me the most challenging will be cutting the hex since I don't have anything on my mini-mill except a vise. But today I experimented with a scrap piece of Delrin and a protractor and with virtually no effort got a perfect hex cut in no time. The other operations are simple turning and drill/bore.

At this point I'm afraid the biggest challenge will be in getting the actual aluminum bar from FedEx. It was due Monday and yet it's been (supposedly) sitting in SoCal about 600mi away since Sunday. When this sort of thing has happened in the past, the item never arrived.
 
Well, better late than never.

By the time the stock got here I had decided to forego the fake threads on the hub. That's a detail that would have been so small that once on the car it wasn't really going to show up, so, not worth the effort.

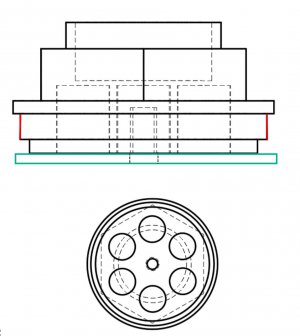
I also decided that the recess in the bottom of the part, originally designed so I could use some set screws to retain the whole nut in the wheel's hub was more trouble than it was worth as well. So I shorted the whole part and just put a 1/4"x20 thread and made some crossbars to register in the wheel hub. (green lines)
nut.jpg


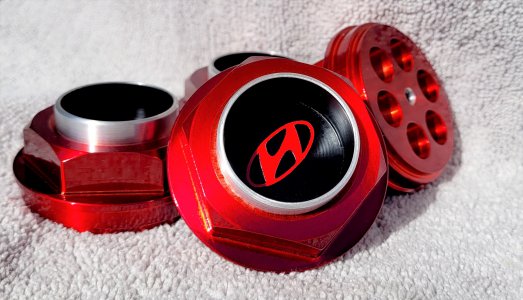
After making the first one I felt that it was pretty heavy so I measured it and it was 190 grams! That begat the six holes in the bottom, which took out almost 80 grams of aluminum! Plus, I wanted to mess with the circle function on my TouchDRO setup since I'd never used it for something other than a test.

Ok, back to my original question, order of operation. Yes, it definitely makes a difference, even in a relatively simple part like this. I considered BladesIIB's idea but since it was the opposite of mine I just chose to ignore the ton of experience and talent he has. ¯\_(ツ)_/¯

So on the first part I machined the bottom stuff first, then flipped the part and did the center bore before removing the part and putting it in the mill for the hex. As soon as I went to mount the piece in the mill vise I realized exactly why BladesIIB thought I should do the hex first! The amount of material that the vise contacted was really small, like .245". (red lines on drawing above) Had I done the hex before the lathe work, I would have had a lot more surface area to grab on to. I knew at this point that I needed to just go slow and take smaller cuts when making the hex.

I finished the first nut and switched to BladesIIB's idea, reversing the order. I figured once I got the hex done I could then clamp the lathe chuck onto the hex and have a more solid setup. What I didn't anticipate was that the .250" "hub" above the hex stopped me from being able to get the chuck jaws onto the hex at all! So I had to grab it with inside jaws, expanding out into the hub ring. Of course that hub area is pretty thin walled so I couldn't really crank the chuck jaws too tight but it worked out as I again just went to smaller DOC's.

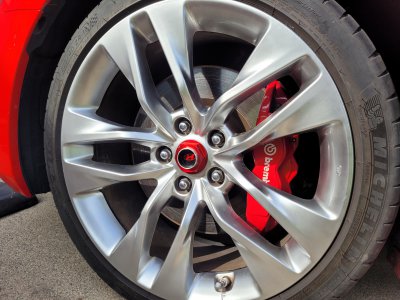
Here are some pictures of the finished project.
nuts.jpg


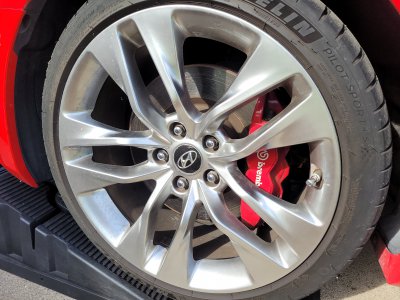
before.jpgafter.jpg

What did I learn? That even when you overthink something, dwelling on it for days and days before starting and getting opinions from people far smarter than myself, there's still going to be something that nobody could have predicted.

But hey, this was a fun project and it came out as good as I'd hoped and I kept myself busy for countless hours.
 
Back
Top