Order of Operations

a turret lathe would make quick work of those bushings.
i have a turret lathe with 8 stations on the turret.
i make a few hundred custom bushings a year.
the turret lathe is a time saver and has paid for itself 10 fold in the short time is has been in operation

all your drilling would still be a secondary operation unless the turret lathe had a crossdrilling attachment
I also struggle when I’m doing just about everything What are the advantages would the turret have since my lathe has one . Maybe I’m not using it to it’s full potential ? 5 positions, have a center drill and two drill chucks and a live center since I don’t have a tail stock
 
When he comes to me it's an emergency and I would never even consider saying no.
I feel your pain!!! I have a friend just like that who happens to be a full time farmer. Been-there-done-that several times with him.

One day, he charges into my shop with an emergency and shows me this:
IMG_1403.JPG

Didn't take a rocket scientist to realize it was pretty much broken. And there was nothing to compare it to.

From that, I needed to make this:
IMG_1405.JPG

It's a John Deere cultipacker bearing bracket:
IMG_1410.JPG

The miracle is that it worked.

Regards,
Terry
 
I think your order of operations looked pretty good. Only a couple of things I would change would be to always turn the ID and OD in one set up whenever possible for the best concentricity. Your steps indicate you did an ID turned did ID then OD turn and OD. If these run in pairs say one on each end of a pin OD and ID together is better. My only other thought is all steps together. Finish all three to the point in the lathe then go to the mill and drill all three sets etc. typically find ways to improve when doing the same thing repeatedly so all drilling together. Looks like they turned out great. Nice job.
 
I feel your pain!!! I have a friend just like that who happens to be a full time farmer. Been-there-done-that several times with him.

One day, he charges into my shop with an emergency and shows me this:
View attachment 363690

Didn't take a rocket scientist to realize it was pretty much broken. And there was nothing to compare it to.

From that, I needed to make this:
View attachment 363691

It's a John Deere cultipacker bearing bracket:
View attachment 363692

The miracle is that it worked.

Regards,
Terry
Yeah, I think that part was a "little" wore out! Good grief.
 
  • Like
Reactions: tjb
if you can make or buy a set of stops to set on the ways and cross slide, they can greatly aid sneaking up on tolerances

Would a DRO have helped? Your order of operations seems pretty much like I would have done it
Maybe making a mandrel to hold the ID would have saved some time after boring- drill the lube holes at the very end
Making only a few parts sometimes it's hard to decide whether to make special fixturing or not
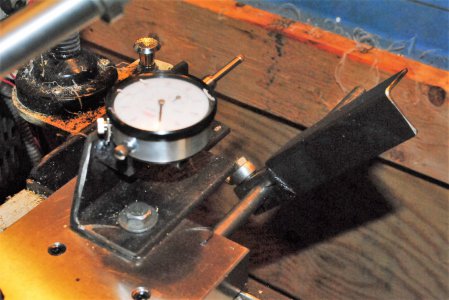
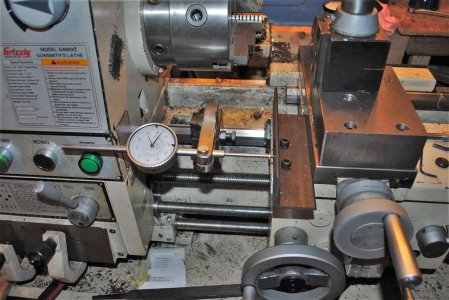
I use dial indicators on the long and cross feeds. I put on the 2 inch long feed DI as required but the 1 inch xfeed DI stays there all the time. It has an adjustable stop that just swings out of the way when I'm not using it. I was never any good with dials and would be lucky to hit plus or minus a half inch without my DI's.
 

Attachments

  • CROSS FEED DI 1 INCH.JPG
    CROSS FEED DI 1 INCH.JPG
    442.9 KB · Views: 9
  • LONG FEED   DI    2 INCH.JPG
    LONG FEED DI 2 INCH.JPG
    496.1 KB · Views: 10
A DRO and a QCTP may have sped up your facing roughing and grooving steps. For that precision on the ID and OD you likely would have been measuring all of your finish cuts regardless. Although a good DRO would give you the repeatability you need. I’ll PM you a link to a video for how to get the most out of a DRO and give you an idea if you would ever want one. They really do offer CNC like repeatability for many projects on a manual lathe.
 
Your bushings look great, good job! I have zero experience so I'm no help with your setup or the order of operation.

Sent from my SM-G970U using Tapatalk
 
They look really nice
What kind of material? In a preplanned job could maybe get some tubing or a larger drill to hog the middle. Carbide tooling?
Quite a bit of moving around really should have stayed in the 3 jaw until one section was complete inside and out then flip do the other side part off and drill the grease holes

If the happen to be loose on the OD due to loose bores in the machine locktite retaining coumpound and primer will help a lot
 
I also struggle when I’m doing just about everything What are the advantages would the turret have since my lathe has one . Maybe I’m not using it to it’s full potential ? 5 positions, have a center drill and two drill chucks and a live center since I don’t have a tail stock
with a turret, you can set different tools to different depths and diameters necessary in the list of operations
drills, an outside diameter tool, an inside diameter tool, material stops, reamers, box tooling, grooving tools, etc can all be set into the turret
the turret has the tools mounted, all you do is select the necessary tool-
you don't have to break down set ups after every operation
in one set up it is possible to do almost all the operations, if the turret is set up to do so
a vertical cut off tool on a turret lathe is the beezkneez :grin:
 
  • Like
Reactions: tjb
They look really nice
What kind of material? In a preplanned job could maybe get some tubing or a larger drill to hog the middle. Carbide tooling?
Quite a bit of moving around really should have stayed in the 3 jaw until one section was complete inside and out then flip do the other side part off and drill the grease holes

If the happen to be loose on the OD due to loose bores in the machine locktite retaining coumpound and primer will help a lot
The material was dropped off at my house along with the sample part. After I peeled off the rust with carbide (forgot about that step) I only had about .020 to go so used HSS for that. I did drill the bore in steps to the biggest bit I own. (1/2",,1",,1-3/16") My original plan was to do the ID and OD in one setup but It took me a long time to get the first bore and then I reset my xfeed dial indicator to zero. This helped on the next 5 so I didn't want to keep jumping from ID to OD on each part and losing my zero on the indicator. A real machinist would have done the ID and OD together but I am an imposter and a chicken. Since the sample part was never installed and was a fabricated part I had no idea about the exact size needed to press the new bushing into "something". The only thing I could think of was to make the bushings so close to the sample that I would be blameless if they didn't work. My 2-3" mike doesn't even read tenths so I used two calipers as GO and NOGO gauges. One set at 2.437 would not go over the sample and the one set to 2.438 would just fit with substantial pressure. I was shooting for 2.4375". Next week I'll find out if I'm a hero or a zero.
 
Back
Top