Newbie here, Project advice needed.

I didn't bring it up before, but I'm also going to mill some aluminum stock to make some (just about 4) strut channel nuts to hold down some solar panel clamps I'm mounting to some aluminum strut channel. I'm going to need to cut some narrow groves in them to help keep them from twisting inside the channel. This last part can certainly be a different discussion and thread.
This forum is all about pictures, so if you can include pictures of what you have in mind or your progress, you'll get much better advice.
 
I haven't cut any copper lately (except wire) but I believe the 4 flute would be less likely to grab the part and pull it out of the vise. Also it should give a
nicer finish but that may not matter in your application
The 3 flute should be ok
"4 flute would be less likely to grab" Kind of where I thought you might be going and based on what I've learned so far I can definitely see your point. Not knowing jack about this, I'm hoping the clear through slot I want to make will not be to difficult. Thanks.
 
It’s likely that the bandsaw will have an adjustable stop that you can set. If not, you be able to kludge up a stop with whatever bar stock and C clamps you can find.
Thanks, I'm going to definitely ask about this. I'm hoping that one of the good things about this maker space will be some helpful know how from members.
 
This forum is all about pictures, so if you can include pictures of what you have in mind or your progress, you'll get much better advice.
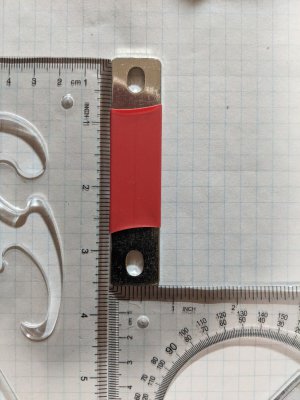
I read you loud and clear. I probably should have lead with this. Here are some pics of what I'm wanting to make:

Picture #1 is of the 3.5" x .75" buscar I'm wanting to duplicate with my thicker stock. The 4.5" x .75" busbars will be the same just one inch longer.
#1
PXL_20220724_012710614_copy_756x1008.jpg

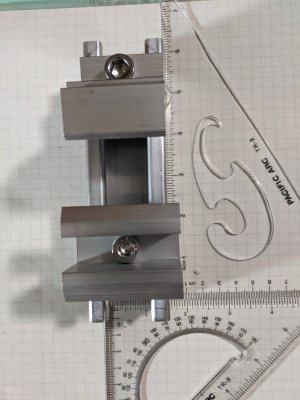
Picture #2 is a picture of a piece of the aluminum strut channel, I'm using, with two types of the solar panel clamps I'll be using. The clamp at the top was easily converted to a 3/8" x 16 caso screw and a standard SS 3/8" x 16 spring nut, but the lower clamp does not have the tolerance for the 3/8" call screw so I need to use the 8mm cap screw and make a new nut for these clamps. OEM, they came with approx. 1/4" thick aluminum nuts. So, that is what I'll be making the new ones out of.
#2
PXL_20220724_013121958_copy_756x1008.jpg

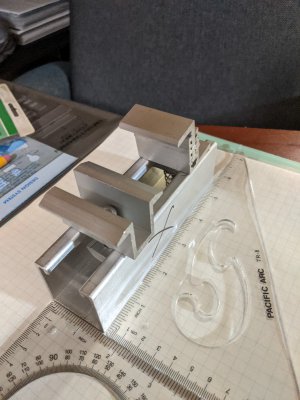
Picture #3 is a side view. Is hard to make out, but the nut is just dangling inside strut opening because it's so small.
#3
PXL_20220724_013344655_copy_756x1008.jpg

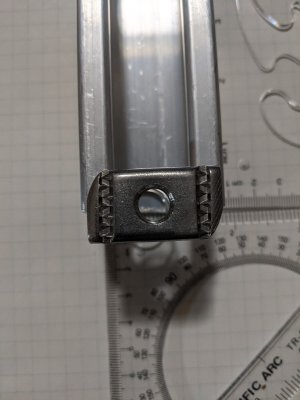
Picture #4 is a picture of the proper sized strut nut. Naturally, it will be inside the strut channel when properly installed. I'd like the ones I make to be similar. I do not expect to get the groves the same texture wise, but I have ideas for them. The purpose for the groves is to prevent them from rotating once they are tight. I'm thinking maybe I can make a few shallow thin parallel lines within the groves to serve the same purpose.
#4
PXL_20220724_013708953_copy_756x1008.jpg
 
The buss bar work I have done many (too many) times in steel mills. I used a hand drill and just wobbled the bit to make wide slots. A milling machine is nice but a hand drill is sufficient. It just leaves a rougher finish. Once it's bolted up, you'll never see it. Cutting the pieces with a hacksaw works fine, just slower. Most "casual use" bandsaws don't have an auto feed feature. A stop set to the appropriate length will have to serve.

As far as the channel, it appears to be a smaller version of "Uni Strut", which has been in use for well over 50 years. If the nuts can be slid in from the ends, they don't need to be curved on the ends. Nor do they need to be "grooved", just a chunk of steel drilled and tapped. The grooves are mostly to make sure it doesn't move once tightened. Depending on the application, they may not be necessary.

There are many warnings about copper, it is a very "tenaceous" metal. A cheap drill press and a center punch will pay good dividends there. Keep in mind that the jumpers you are duplicating come from an automatic machine that makes thousands per shift. They use punches and dies that cut the metal and punch out the elongated holes in a second or less. Same for the unistrut nuts, they are cut and punched in the same time frame. Threading the hole takes a little longer, but the tap is machine driven under a constant stream of lubricant/coolant.

In most cases, when I drill copper for buss bars, I drill a fuzz oversize and don't bother with the wiggling part. When you clean up the cut ends of burrs, DO NOT use a regular grinding wheel. Use a Silicon Carbide wheel (green wheel), the same as used for aluminium.

Realizing you are after a "tight" installation, be sure to leave a little space between the batteries. They will tend to swell a little from heat as they are cycled. I would recommend at least a quarter inch per gap. Absolute minimum is a piece of rubber floor mat for each gap. The buss bars may be a little longer, just get a little extra copper.

.
 
The buss bar work I have done many (too many) times in steel mills. I used a hand drill and just wobbled the bit to make wide slots. A milling machine is nice but a hand drill is sufficient. It just leaves a rougher finish. Once it's bolted up, you'll never see it. Cutting the pieces with a hacksaw works fine, just slower. Most "casual use" bandsaws don't have an auto feed feature. A stop set to the appropriate length will have to serve.

As far as the channel, it appears to be a smaller version of "Uni Strut", which has been in use for well over 50 years. If the nuts can be slid in from the ends, they don't need to be curved on the ends. Nor do they need to be "grooved", just a chunk of steel drilled and tapped. The grooves are mostly to make sure it doesn't move once tightened. Depending on the application, they may not be necessary.

There are many warnings about copper, it is a very "tenaceous" metal. A cheap drill press and a center punch will pay good dividends there. Keep in mind that the jumpers you are duplicating come from an automatic machine that makes thousands per shift. They use punches and dies that cut the metal and punch out the elongated holes in a second or less. Same for the unistrut nuts, they are cut and punched in the same time frame. Threading the hole takes a little longer, but the tap is machine driven under a constant stream of lubricant/coolant.

In most cases, when I drill copper for buss bars, I drill a fuzz oversize and don't bother with the wiggling part. When you clean up the cut ends of burrs, DO NOT use a regular grinding wheel. Use a Silicon Carbide wheel (green wheel), the same as used for aluminium.

Realizing you are after a "tight" installation, be sure to leave a little space between the batteries. They will tend to swell a little from heat as they are cycled. I would recommend at least a quarter inch per gap. Absolute minimum is a piece of rubber floor mat for each gap. The buss bars may be a little longer, just get a little extra copper.
Hi Bill,
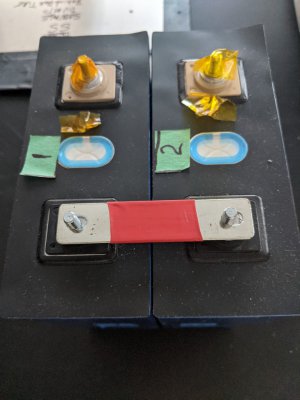
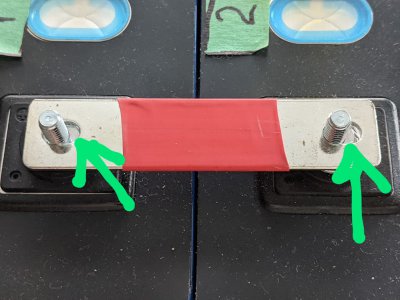
Thanks for all of the detail you provided. As you mentioned, the busbar I want to duplicate is certainly an automated production product. It's also nickel (or similar) plated. They're exactly 2mm thick, about 5/64". The bare copper I'm using is more like 3.5mm a bit over 1/8". Off topic, I intend to nickel plate the busbars I'm making as well to minimize oxidation. Anyway, reason for duplicating the slots is for the exact reason you pointed out. Cell expansion. The slots should take care of any expansion pretty nicely. Check out pic #1 and #2 below:
#1
PXL_20220724_104851939_copy_756x1008.jpg

#2
PXL_20220724_105037661_copy_1008x756~2.jpg

The channel is 1-5/8 x 1-5/8 "uni-strut" like. This is made by a different company and it's aluminum which is perfect for my needs and it also accepts standard uni-strut spring nuts, etc. I've mounted the channel on the roof of my Airstream travel trailer where I'm using it to mount (8) 100w solar panels.

Use a Silicon Carbide wheel (green wheel), the same as used for aluminium.
Thanks for the tip. Is this a slap disk?
 
Based on your picture you need to assemble the cells together with more space between them. Once that buss bar is tightened down the will be no give for expansion. The buss bar will NOT move on the terminals no matter how much slot they have. The slot is only for ease of initial assembly and to cover manufacturing tolerance on the actual location of the terminal on each cell.

Take
Hey there Take, So, I'm guessing that this is where I'm either misunderstanding or respectfully disagreeing with the idea that cells should have spacing. I do know that there is the "leave space" line of thought out there, but the manufacturer's recommendation and what I see mostly on the forums, sites and the YouTube channels I follow is that compressing cells together is best.
That said, I can think of one popular YouTuber, a guy in Australia that does not compress his cells. He has a lot of interesting stuff on his channel. Again though, I can't think of anyone else I follow that does not recommend compression. So, at least for now that is where I sit. Not wishing to offend anyone or change it change minds it's simply my choice at this time. As for my pics #1 and #2 showing the gap next to the terminals, I placed the busbar on the terminals like that to clearly show the expansion they are able to compare for, in the event a cell does swell. Under no circumstances that I can think of, would I recommend they be installed like that. I would always center my busbars. So, not saying I'm right, just saying it's the method I'm subscribing to.
 
To take things as they are in my mind, (backwards as usual) a "green wheel" grinder stone MAY be available as a "flap disk", I don't know. They are normally configured as grinding wheels, same as what comes on a bench grinder. I'm sorry, I'm half asleep as I write this. I don't think clearly this time of day.

The material of a regular grinding wheel is good for steel(iron) but when used for softer metals, the metal tends to melt off little pieces that imbed in the wheel. The end result is when the wheel builds up heat and/or grinding effiencey gets lower, the wheel will crack internally. In a worst case scenario, the wheel will come apart. In a less dangerous scenario, small bits of the soft metal are thrown off. The green wheel is of a different material that grinds down the surface as it is doing "its' thing". In a commercial setting, OSHA requires green wheel use for grinding any "non ferrous" metal.

Now, on spacing and the buss bars, and other miscellaneous details of the batteries. . . The buss bars have elongated holes probably because they fit many different configurations. There must be a little space between the batteries. Just ambient temperature will have the usual side effect of expansion when hot. When they are racked up, temperature is near ambient. As they are working, discharging or charging, the internal temperature tends to rise above ambient, hence pressure. The batteries can stand being pressed together, they're plastic and there is some give as they expand. But if they expand that last little bit, the plastic tends to fuse. A pain in the wazoo to break things down for maintenance. And dangerous. . .

There is a "seperator" sheet sold for that particular purpose. Sort of like a cardboard box, but a rubber like material. Crushable so expansion is taken up. For my own projects at home, I just use a little spacing. Things like that usually aren't a problem until that unhappy time when you do need them. Then they pay off, with interest.

As far as UniStrut goes, the aluminium is somewhat deformable. If you use a steel nut, it will deform the strut somewhat as it is tightened. That is the reasoning behind that little "curl" along the edge. The big issue there is the galvanic corrosion between the aluminium and the steel. Aluminium nuts are the quick answer for that, but aluminium nuts won't stand near as much torque as steel. Some form of resistance between the two metals is vital. If nothing else, a grease between the two will slow the process considerably.

Unless you live near salt water, then all bets are off. In the '80s I worked overseas, on an island, for the US government. The local engineer had specified aluminium rigid conduit (Sched 40) for electrical installations. But the normal installs involved couplings and other fittings that the purchasing agent, who didn't know any better, had bought steel because the price was lower. The conduit only lasted a couple of years, then corroded to the point where a storm would rattle hanging conduit, cutting the wires. I only worked the job a year or so, but had to make repairs to many installations where galvanic corrosion had taken its' toll.

In 2005, I was badly burned when an industrial UPS (USSteel) caught the batteries on fire. A salesman convinced my boss that the new, miracle batteries would work fine. They didn't. . . When a power failure transferred the UPS, it attempted to start a few hundred HP worth of hydraulic pumps. The battery bank (seriesed for 240 volts) blew up and caught fire. Right next to where I was working. My only way out was through the battery room. I had other routes, but when the power failed I headed for the substation, not a safety point.

I didn't get my skin burned, but my lungs are shot from the acidic smoke. Ces't la Vie ($#|t happens) Safety is one thing, but when one is dealing with a couple hundred tons of molten steel, safety regulations go out the window. You do what you gotta do to keep the steel contained. The bottom line is I personally don't trust those miracle batteries when they take a heavy load. The 3-71 Detroit finally started and took the load. But the batteries melted. . .

I could go on and on about "web ex-spurts"(has been drips under pressure) and their lack of foresight. But this tretease has gone on far too long already. Just think ahead for worst case situations and set aside what little makes sense.

.
 
Is this for a lithium solar power storage battery? If so I'd imagine the cooling requirements (or risk of expansion) are lower than in a high drain application like a car, so packing them in probably won't cause any issues. Wouldn't hurt to do a power draw analysis though. I'm curious why you're making the bus bars from thicker copper - are you worried about the current capacity of the interconnects?
 
Back
Top