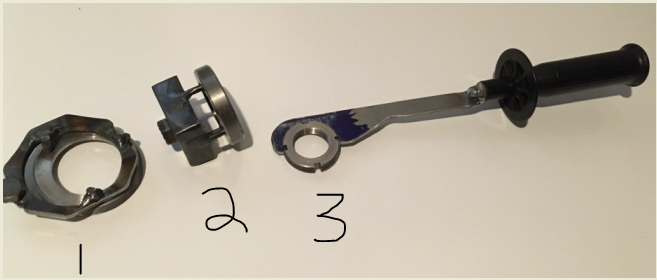
A few tools I made real quick to deal with the spindle. Maybe an hour or so total into all three as they will likely be used once and function over flavor in that case. Nothing really special, scrap bin stock I had, only tools used were the porta-band, welder, battery drill, files, and angle grinder.
1. This is a tool to remove the bearing cover on the bottom of the spindle, it has three un-evenly spaced and fairly shallow spanner pockets. I had a scrap piece that already had a big hole in it, thus the odd shape. I just needed to tack some rod on it while it sat on top of the ring to ensure alignment without any precise measuring. Welded a nut on it so I could use the battery impact, worked like a champ.
2. Similar to the first tool, there is a spanner nut holding the 3 belt pulley on top of the spindle that needed removed. Once again unevenly spaced but 4 pockets that were a larger diameter. Since this need to be removed while on the machine and I did not want to precisely measure to save time, I also made it one peg at a time. First I grabbed a small piece of 2" square tubing and a rod that was the shank of an old wood paddle bit that had a broken tip that was in the scrap bin. I always toss small broken metal stuff in the bin, comes in handy more than you would think. I sawed the rod into 4 pieces and welded 1 piece on. Then I took the 1 peg leg tube along with another piece of rod back over to the machine, and lined it up with the pocket hole 180 degrees across, clamped the rod piece in place with vice-grips and then took it back to the welder. Check fit and repeat process for other two pocket holes, weld a cover and bolt on top and done. I left the pegs long so I could see what I was doing and I had planned to trim them down to increase the stiffness, but it was so stiff I didn't even bother, worked great as is.
3. I already had one spanner and used that to take the nuts off, but since this is a jam nut arrangement that holds the top bearing on the quill, I will need another wrench for reassembly. I took a flat bar and brushed on some blue dykem and traced one of the collars with a carbide scribe. I made a bunch of quick cuts with the porta-band, taking out the bulk of the material. Some careful use of a cutoff wheel in the angle grinder got most of the rest. Finished up with some hand files to get sharp corners on the 3 teeth. Since this is probably a one time use tool and I did not want to waste time or materiel on making a nice handle, I simply unscrewed the handle from the angle grinder and grabbed a nut that fit it and welded it on. This is a great way to make temporary handles on lots of seldom use tools while only using a nut.


