- Joined
- Nov 5, 2016
- Messages
- 1,420
The longer I have it, the more I love my little Rhodes shaper! What a handy machine to have in the shop. I needed to make two internal spline hubs for a fellow machinist I know that's an odd size. Both he and I searched, but couldn't find generic hubs for a 1-3/8" OD x 10 involute spline shaft that matched up to what he needed. I had some leads on a couple of "spline" specialty houses, but even they didn't have something that would work, although they would make some to fit. So, here we go for some fun!
I needed to grind a proper tool so I drew the spline profile up in Fusion 360 and 3D printed ring gages until I came up with a very good fit. I then cut out a section of the ring gage to use for a gage for grinding the tool. Starting on the Cincinnati tool and cutter grinder I started the profile and finished it up by hand on my bench grinder.
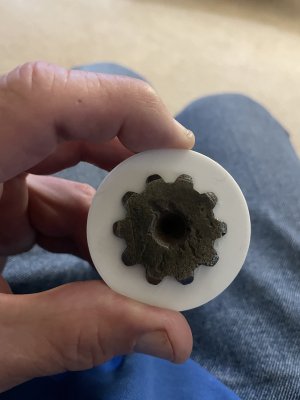
The tool looks bigger in the picture than the gage piece, but it must be just because it's up higher closer to the camera, because it fits nicely.
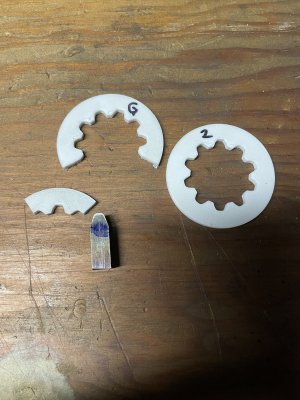
For something like this that is basically trial and error to fit, I don't like using a dividing head for a few reasons. First, you can't see what's going on while cutting. I like to be able to watch the tool in action to judge depth of cut (or allow a couple of spring passes) and also have an easy path for applying cutting oil. Also, once in the dividing head chuck the piece must remain there for the entire operation. I like being able to remove the workpiece for trial fitting and inspection to determine any adjustments I must make. So, I drill/ream the required divisions on a short section of additional length for an indexing pin. Works great!
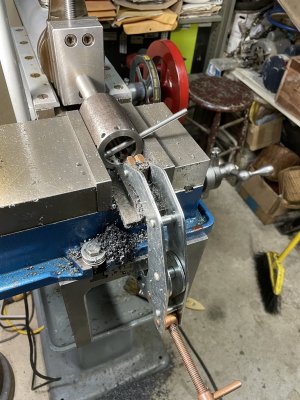
I made up a nice, solid bar holder a while back replacing the clapper for operations like this. Much more solid setup. Form tools can build up some forces on this little 7 inch machines. But, after what seemed like a thousand strokes, the two spine hubs were done. Only had to machine off the short section of extra length with the indexing holes. Fit like a glove!
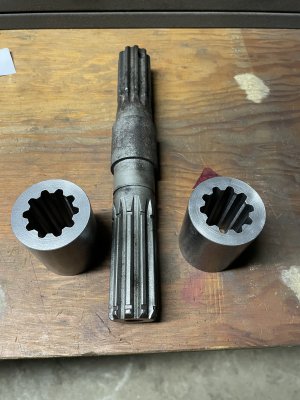
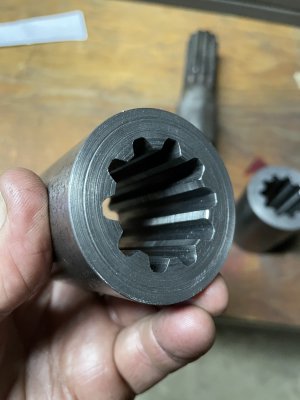
Man, I love this little machine! Fun project with a little CAD, 3D printing, lathe, mill and shaper work.
Ted
I needed to grind a proper tool so I drew the spline profile up in Fusion 360 and 3D printed ring gages until I came up with a very good fit. I then cut out a section of the ring gage to use for a gage for grinding the tool. Starting on the Cincinnati tool and cutter grinder I started the profile and finished it up by hand on my bench grinder.

The tool looks bigger in the picture than the gage piece, but it must be just because it's up higher closer to the camera, because it fits nicely.

For something like this that is basically trial and error to fit, I don't like using a dividing head for a few reasons. First, you can't see what's going on while cutting. I like to be able to watch the tool in action to judge depth of cut (or allow a couple of spring passes) and also have an easy path for applying cutting oil. Also, once in the dividing head chuck the piece must remain there for the entire operation. I like being able to remove the workpiece for trial fitting and inspection to determine any adjustments I must make. So, I drill/ream the required divisions on a short section of additional length for an indexing pin. Works great!

I made up a nice, solid bar holder a while back replacing the clapper for operations like this. Much more solid setup. Form tools can build up some forces on this little 7 inch machines. But, after what seemed like a thousand strokes, the two spine hubs were done. Only had to machine off the short section of extra length with the indexing holes. Fit like a glove!


Man, I love this little machine! Fun project with a little CAD, 3D printing, lathe, mill and shaper work.
Ted

