Mini-lathe chucks are they located?

There has to be a register, a step, on the nose of the spindle. That step fits into a recess in the back of the chuck. Take a pic of your spindle and let's see what you're dealing with.
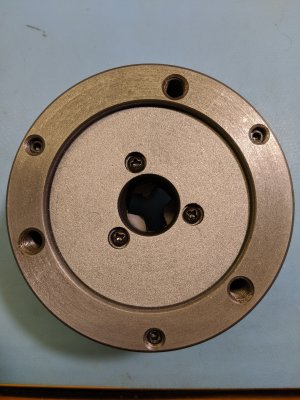
I just took a pic of the back of the 3J. Do you see a register? Oh groan, it's the step it self. I was looking for a key for angle. It's rotationally symmetric. I was expecting a pin or notch.IMG_20191221_204824.jpg
Yes my spindle has something that fits this. But apparently there is nothing to locate in an angular sense.
 
I just took a pic of the back of the 3J. Do you see a register? Oh groan, it's the step it self. I was looking for a key for angle. It's rotationally symmetric. I was expecting a pin or notch.View attachment 308375
Yes my spindle has something that fits this. But apparently there is nothing to locate in an angular sense.
It only needs to be rotated to a clock position where the three bolts line up. The tightened bolts keep it from slipping.
 
I mark jaw number 1 on the spindle and original chuck with a center punch after making sure the original chuck is balanced and not vibrating or showing too much run out.Then clean the spindle and chuck so it is pristine. Screw the studs into the chuck and mount it on the spindle. It should fit the spindle with no slop. Be aware that the bolt pattern allows rotating the chuck to 3 positions but the spindle has extra holes for access to the front bearing cover plate. This means that it is may be out of balance in one or 2 positions. So tighten the nuts good and tight and mount a short piece of round metal in the jaws - not good to spin the lathe up with the jaws loose. Center the work piece. Turn on the lathe and get the rpm up and feel for vibration. If you get vibration try rotating the chuck and try again. Once there is little or no vibration mark the chuck inline with the mark on the spindle so it always goes back in the same orientation. I believe the registration boss on the spindle is 55mm.

Roy
 
Last edited:
I just took a pic of the back of the 3J. Do you see a register? Oh groan, it's the step it self. I was looking for a key for angle. It's rotationally symmetric. I was expecting a pin or notch.View attachment 308375
Yes my spindle has something that fits this. But apparently there is nothing to locate in an angular sense.

Holy cow, a brand new chuck with no chips on it! Listen to Roy (and Bob). He has a lot of experience with this class of lathe.
 
My new QCTP holder is expecting a dovetail or a post. My crummy Harbor Freight indicator has a hole.

You've probably got a plunger indicator with the lug on the back that has a hole which doesn't seem to fit anything. You can mount this by:
* putting the non-moving part of the stem of the indicator into a clamp or snug
* making a stepped shaft which goes into the hole of the lug and goes into a clamp or snug
* using a bolt-washer-nut combo which goes into the hole of the lug (generally has a lot of play)
* removing the back face and replacing it with one which is magnetic
While you're thinking about your indicator, save yourself some grief by finding an all-steel snug that matches the diameter of rod you'll be using (McMaster Carr has them, ebay/amazon seem to carry them). The rods themselves can be drill blanks, drill rod (tool steel rounds), etc.
 
Thanks for that tip Woodsman!
I have several DI's like that, one of which is a Fowler that appears to be in mint condition, and was wondering how to mount it other than a redneck bolt/nut approach.
 
Last edited by a moderator:
I have several DI's like that, one of which is a Fowler that appears to be in mint condition, and was wondering how to mount it other than a redneck bolt/nut approach.

I made a few mounting rods for those lugs. Take some round steel bar of the diameter that you use in snugs (let's just say 3/8), turn it down to the ID of the lug on the indicator (probably 1/4") for precisely the width of the lug (usually 0.20-0.25", err on the side of shorter rather than longer). The shoulder has to be sharp, so use a parting tool to clean it up. Bore a hole for the bolt diameter of your choice (#6 or #8, usually). Then you put the thin end through the lug, put the bolt through at the thick end, use a nut and washer at the thin end to keep the indicator in place. Sounds complicated (and the order of operations is somewhat backwards), but it only takes a few minutes and saves a lot of headache.
 
I made a few mounting rods for those lugs. Take some round steel bar of the diameter that you use in snugs (let's just say 3/8), turn it down to the ID of the lug on the indicator (probably 1/4") for precisely the width of the lug (usually 0.20-0.25", err on the side of shorter rather than longer). The shoulder has to be sharp, so use a parting tool to clean it up. Bore a hole for the bolt diameter of your choice (#6 or #8, usually). Then you put the thin end through the lug, put the bolt through at the thick end, use a nut and washer at the thin end to keep the indicator in place. Sounds complicated (and the order of operations is somewhat backwards), but it only takes a few minutes and saves a lot of headache.
@ThinWoodsman Your suggestions are very helpful! I'll make a mounting rod for the indicator. The nut and bolt thing I have is quite wobbly. Your ideas will result in something much better. Thanks!
 
Back
Top