Measuring "squareness" Accurately

Look on the starrett site for a picture , it's a precision ground cylinder . I would use a height gage and a surface plate.
A height gage alone would not show if the ends are square to the cylinder, only that the walls are the same length. The cylinder might be tilted and the ends not square. If you can determine squareness at each quadrant and then flip it over and repeat, you have then proved it to be finished square at both ends, which is what the OP was concerned about.
 
That's a great question. After the scope is reassembled, the only adjustment is the tilt of the secondary mirror. This is indicative of the design known as Schmidt Cassegrain. This adjustment is known as collimation. In practice, this is done by observing a bright star and then de-focusing the image and aligning the concentric rings in the diffraction pattern. Once done this type of scope will remain in collimation unless bumped very hard. In other types of reflecting telescopes, such as a classical Newtonian, both the primary and secondary mirrors have independent adjustment and need to be tweaked each time there are used.

View attachment 118766 View attachment 118767
Yes, you align the optics to an infinity target. And the alignment is done with screw adjustments and not the squareness of the outer case? But yes, it helps to have the ends of the case as square as possible. But I think a contractors/carpenters square could be used for the purpose…Dave.
 
I would think that setting the tube upright on a surface plate and using a precision machinist's square at four points around the circumference to check for square should be adequate. This would need to be done for both ends.

As an alternative, a person could use a height gauge and a surface plate to give you an indication of square with high probability. I know, some of you are going to want to argue this one, but please read the rest of what I have to say before you start typing a response. I hope to kick off some constructive discussion on the subject, so please don't assume that I am trying to tell people not to respond.

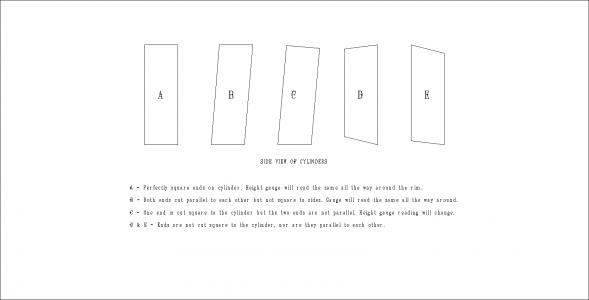
When a cylinder is cut to length, the two ends will usually not be perfectly parallel to each other, nor will they be perfectly square to the sides. Cutting with a saw or similar device is just simply not a high precision process in most cases. Bob Korves is correct that it is possible for the same height gauge reading to be had all around the rim of the cylinder but it will not be square. However it is highly improbable that this would occur. For that to happen, the two ends would need to be cut perfectly parallel with one another, in other words they would both need to be cut crooked by exactly the same amount and in the same orientation to the cylinder. I am not saying that it cannot happen, but I am saying that it is highly unlikely.

So, for that reason, one could quickly check for square of a cylinder by standing it on a surface plate and checking the height all around the rim. If the same reading is obtained all the way around, there is a high likelihood that the cylinder is square on both ends. A quick check with a precision machinist's square would back up that conclusion. The attached illustration should help to demonstrate what I am getting at. Keep in mind that the out of square errors are greatly exaggerated in the drawing.

Cylinders not cut square.PNG
 
Last edited by a moderator:
I would think that setting the tube upright on a surface plate and using a precision machinist's square at four points around the circumference to check for square should be adequate. This would need to be done for both ends.

As an alternative, a person could use a height gauge and a surface plate to give you an indication of square with high probability. I know, some of you are going to want to argue this one, but please read the rest of what I have to say before you start typing a response.

When a cylinder is cut to length, the two ends will usually not be perfectly parallel to each other, nor will they be perfectly square to the sides. Cutting with a saw or similar device is just simply not a high precision process in most cases. Bob Korves is correct that it is possible for the same height gauge reading to be had all around the rim of the cylinder but it will not be square. However it is highly improbable that this would occur. For that to happen, the two ends would need to be cut perfectly parallel with one another, in other words they would both need to be cut crooked by exactly the same amount and in the same orientation to the cylinder. I am not saying that it cannot happen, but I am saying that it is highly unlikely.

So, for that reason, one could quickly check for square of a cylinder by standing it on a surface plate and checking the height all around the rim. If the same reading is obtained all the way around, there is a high likelihood that the cylinder is square on both ends. A quick check with a precision machinist's square would back up that conclusion. The attached illustration should help to demonstrate what I am getting at. Keep in mind that the out of square errors are greatly exaggerated in the drawing.

View attachment 118769
Agree totally with your first statement and disagree with the second. Terry, imagine for a moment a shop manufacturing these things. The carbon is molded as a longer tube. They have a band saw, chop saw, or something similar to cut the tube into shorter sections. The saw does not get re-squared after every cut. It can get out of square. They make a cut, slide the stock down to a stop and make another cut. It is quite possible for one end to be wrong in the same plane as the other end. OK, perhaps they are using a stop and a small cutter and turning the big tube around to cut it. A bit of swarf gets between the stop and the tube, the swarf turns with it, and you have an end that is not square. When the non square end goes against the stop and the next tube gets cut it makes a perfectly lined up copy of the angled cut at the other end. I think the OP is correct to test it before installing it, and would be smart to test it in a way that proves the squareness of both ends -- not "highly unlikely", but proven correct geometrically, and the geometry is his concern. It is not a big deal, he could use a machinist square and it is cheaper and even more common than a height gage. Just how I see it, and I could be wrong.

Actually, after thinking about how those telescopes work, I do not think the squareness of the tube is an issue at all as long as it is not a gross error. I still like to do things the correct way, especially when it is easy to do so.
 
Exactly what I was thinking as I was reading down the page Terry.
 
Not enough information.
Is OD of the tube ground or turned? Either process would create a reference surface for all following operations during manufacturing. Using a precision square against a raw composite tube will simply tell you that is is not a particularly flat surface.
 
I know what you mean, fellas, but you are assuming that when they slide the tube to the stop to make the next cut that the tube does not get rotated at all. If it rotates only slightly the two ends will not be cut parallel unless the cut is being made perfectly square to the tube.

Not trying to argue, and I guess that this may even be considered to be a bit of a thread hijack, but rotation of the tube between the two cuts makes all the difference. WreckWreck also brings up a good point about the surface finish of the tube being far from ideal.

As for how telescopes work, I agree that squareness of the tube would not be an issue unless the ends were severely out of square.
 
Before you even check for squareness, you would need to check the tube for roundness. An out of round tube could check out square on one side but be out of square from a different angle.

Actually, I agree with Bob that precise tube squareness should not be a major issue. Aside from blocking out stray light, the only other purpose of the tube is to provide support for the corrector plate/secondary mirror assembly. The alignment could be done by tweaking the seating of the tube in the primary mirror assembly.

However, (assuming the cylinder is truly round) if one wanted to check squareness of a large tube, it could be done with a flat surface like a surface plate, a piece of flat steel or iron bar or plate, and a test or dial indicator with magnetic stand suitable to reach the top of the cylinder or a suitable distance above the base.

The bar or plate would be placed on the surface. Preferably, it would be clamped down to prevent movement but if it was heavy enough, that wouldn't be necessary. The magnetic stand would be mounted on the plate so that indicator point is directly over the edge of the plate. The cylinder is swept past the indicator and the maximum deflection is noted. The indicator dial can be zeroed, if desired. The cylinder is rotated and the new maximum deflection is noted. Continue rotating and noting the maximum deflection. If the cylinder is truly square, the maximum deflection will not change as the cylinder is rotated. Note that this will also work for checking a cone for squareness of the base to the axis of the cone.
 
Back
Top