Measuring "squareness" Accurately

angelfj1

Active User
Registered
Joined
Jan 20, 2013
Messages
112
I'm in the process of rebuilding a telescope. The original aluminum tube was damaged in an accident and I have secured a replacement tube made of carbon fiber. The new tube is approx. 12" diameter and 16" long. Since optical elements are mounted on both ends of the tube, it is very important that the end cuts were performed accurately. I suspect that the factory did a good job, but just to be sure, I would like to check just how square the end cuts were made. Verifying the squaring and making adjustments now could save a lot of grief later.

Thanks, Frank
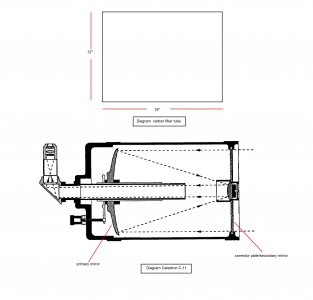
Tube diagram.jpg
 
Can you quantify the required accuracy? The obvious thing to do is to stand it up on your surface plate and check at three places with your precision square.
+1 on quantifying the required accuracy. Also, does the manufacturer specify the accuracy? Is it advertised as precision squared and ready to use?
 
I agree that it would be helpful to know just what tolerances you are talking about.

If you have a surface plate and a height gauge they would do the trick. Failing a height gauge (which I don't have), I'd try using a dial indicator or a DTI and rotate the part on a surface plate.
 
Don’t you align all the optics in place? So then the concern of squareness has little or no change with the end viewing result?
 
you can cast it's shadow on the wall to check squareness.
clamp a straight edge to a surface plate, strike a line parallel to the straight edge half the diameter of the tube away from the straight edge.
Set the tube on against the straight edge, make a mark on the tube where it intersects the line.
Project it's shadow on the wall and use a straight edge to strike a line along the shadow.
Rotate the tube 180 degrees so the mark on the tube lines back up with the line on the surface plate.
cast the shadow again and compare it to the previous shadow.

You will obviously have to find a way to make sure the light is positioned the same for both shadow casts.
Repeat for each 90 degrees.
You can square the tube by lapping it on some sandpaper (this is how precision cylinder squares are trued).
 
+1 on quantifying the required accuracy. Also, does the manufacturer specify the accuracy? Is it advertised as precision squared and ready to use?

I appreciate all of the great recommendations and comments.

I wish I could comment on the necessary accuracy, but I'm not sure. This tube is advertised as a replacement for the original aluminum tube, but no specifications are given.

What is a cylinder square?
 
Look on the starrett site for a picture , it's a precision ground cylinder . I would use a height gage and a surface plate.
 
Don’t you align all the optics in place? So then the concern of squareness has little or no change with the end viewing result?
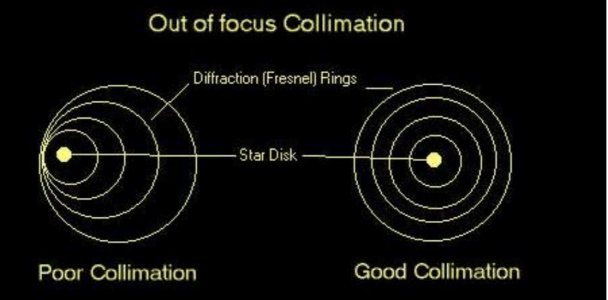
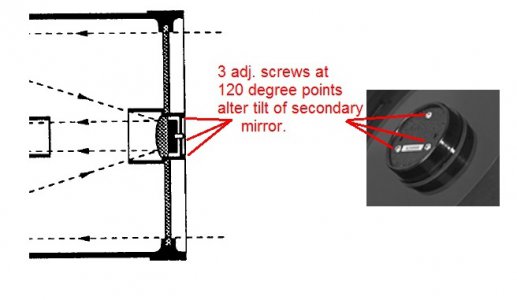
That's a great question. After the scope is reassembled, the only adjustment is the tilt of the secondary mirror. This is indicative of the design known as Schmidt Cassegrain. This adjustment is known as collimation. In practice, this is done by observing a bright star and then de-focusing the image and aligning the concentric rings in the diffraction pattern. Once done this type of scope will remain in collimation unless bumped very hard. In other types of reflecting telescopes, such as a classical Newtonian, both the primary and secondary mirrors have independent adjustment and need to be tweaked each time there are used.

collimation-1.jpg collimation-2.jpg
 
Last edited:
Back
Top