Making a tapered gib

Yes.....You Got Mad at it and yourself wasting so much time. It's a learning curve. I call it step scraping and Blind scraping. Paint on the yellow highlighter and figure out how many times you need to step it down. Most scrape of a minimum of .0002" per scrape and if it were off .002" You could divide the gib into 5 steps - the ,002 end would need to be blind scraped 10 times and the thinnest end No times.
 
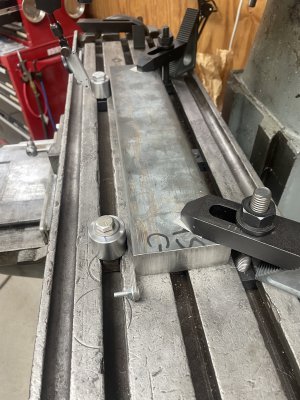
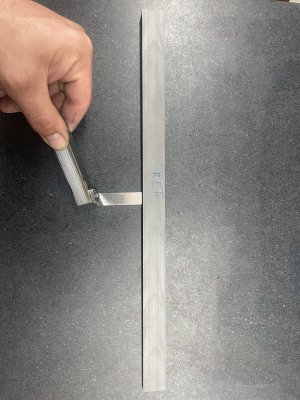
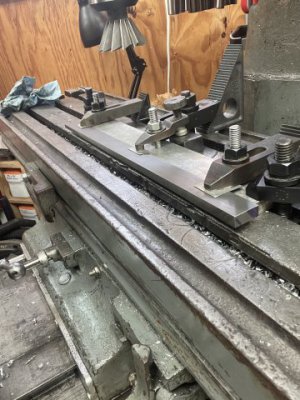
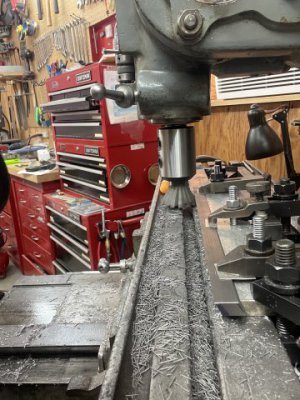
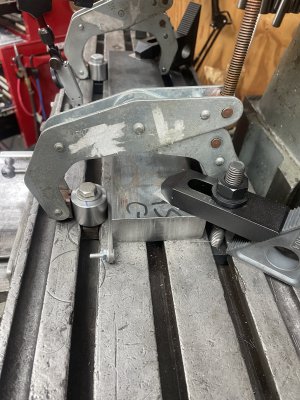
Well, it’s been a hectic couple weeks for me, but I finally got some shop time to work on the gib. This was my setup on the mill. I made two stops from some drill rod and indicated them to be in line with the long axis of the table. Then clamped the finished edge of my stick to them with a stack of feeler gauges in one end to produce the correct angle (kinda like a sine bar).3E39D843-84C2-4162-A843-703EAFB1F9FB.jpeg

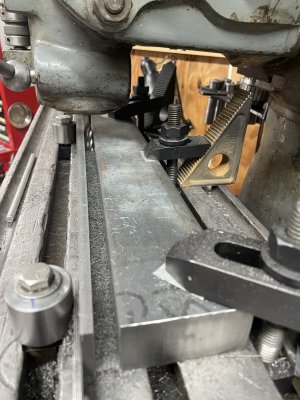
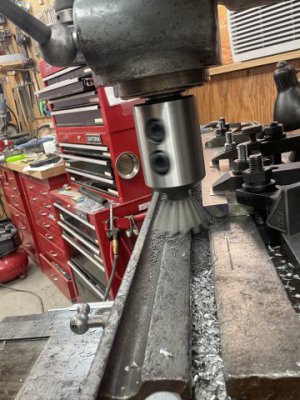
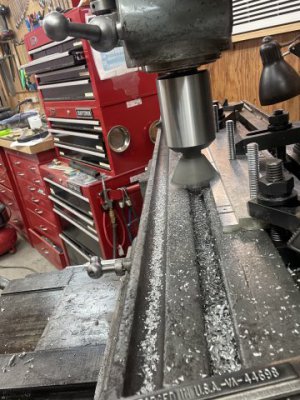
After clamping it down to the table, I removed the Kant twist clamps and milled a groove to an adequate depth.557CF798-27F5-44B6-8225-AA39B1874BFA.jpeg113835AF-FA4C-422E-90DD-32803ED6FE01.jpeg

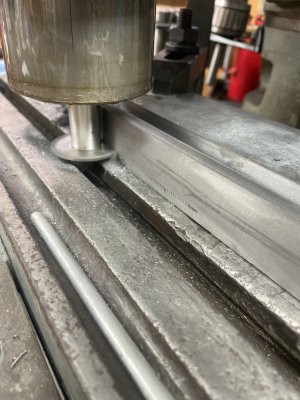
I then brought the gib to final thickness by side milling and freed it with a slitting saw.3A056241-BBC8-4D2E-9E99-05D48DEA5CC4.jpeg

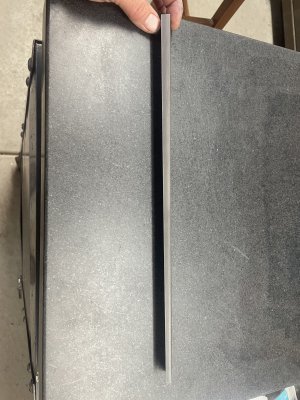
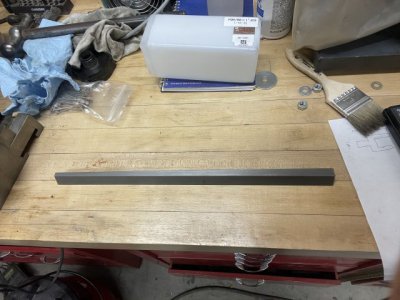
I’m pretty happy with it so far. It did acquire a slight bow (0.003”) as measured with feeler gauges on the surface plate.91A80220-4C50-4732-BD85-4B01BBA03763.jpegFCEB1FA8-21DE-4A40-AFC2-761A890E073D.jpeg

I won’t be surprised if I get some more warpage when I mill the 60 degree edges. My plan is to use a dovetail cutter like Kieth Rucker did in one of his recent videos on his Monarch restoration. I’m waiting on some tooling to arrive, so no more progress for now.
 
It
Well, it’s been a hectic couple weeks for me, but I finally got some shop time to work on the gib. This was my setup on the mill. I made two stops from some drill rod and indicated them to be in line with the long axis of the table. Then clamped the finished edge of my stick to them with a stack of feeler gauges in one end to produce the correct angle (kinda like a sine bar).View attachment 386140

After clamping it down to the table, I removed the Kant twist clamps and milled a groove to an adequate depth.View attachment 386141View attachment 386142

I then brought the gib to final thickness by side milling and freed it with a slitting saw.View attachment 386143

I’m pretty happy with it so far. It did acquire a slight bow (0.003”) as measured with feeler gauges on the surface plate.View attachment 386144View attachment 386145

I won’t be surprised if I get some more warpage when I mill the 60 degree edges. My plan is to use a dovetail cutter like Kieth Rucker did in one of his recent videos on his Monarch restoration. I’m waiting on some tooling to arrive, so no more progress for now.
It is possible to straighten that gib as taught by Rich King, by carefully hammering on it with a soft hammer while resting on a couple of blocks on the ends, or just scrape it out, and likely as you scrape it, it will likely move around and need straightening. Scraping can induce some bending by sort of a peening effect, sometimes it can be stress relieved by "ringing" the part while suspended loosely by a cord or whatever, I have done it, and it definitely works.
 
It It is possible to straighten that gib as taught by Rich King, by carefully hammering on it with a soft hammer while resting on a couple of blocks on the ends, or just scrape it out, and likely as you scrape it, it will likely move around and need straightening. Scraping can induce some bending by sort of a peening effect, sometimes it can be stress relieved by "ringing" the part while suspended loosely by a cord or whatever, I have done it, and it definitely works.
But.. is it necessary to straighten the bow? it should flatten out when it's in the slide. .003 is just a spring, not an out of flat or rise (excess material) at this point, right?
 
Leaving the bow in is not a good idea, and you could not rely on a perfect fit on the taper without scraping; a few thousandths do matter in fitting a tapered gib.
 
It It is possible to straighten that gib as taught by Rich King, by carefully hammering on it with a soft hammer while resting on a couple of blocks on the ends, or just scrape it out, and likely as you scrape it, it will likely move around and need straightening. Scraping can induce some bending by sort of a peening effect, sometimes it can be stress relieved by "ringing" the part while suspended loosely by a cord or whatever, I have done it, and it definitely works.
John, I never hit a gib with a soft blow hammer You must be thinking of someone else. Scroll to 5:30 on this You Tube show and it shows how I do it.
 
John, I never hit a gib with a soft blow hammer You must be thinking of someone else. Scroll to 5:30 on this You Tube show and it shows how I do it.
Gotcha, Rich; now I know the RIGHT way to straighten a gib, thanks for the correction!
John
 
More progress - finally! As I mentioned in my last post, I wanted to use a dovetail cutter to mill the angles on the short sides of the gib. I’ve had a pretty nice dovetail cutter in my toolbox for a while, but never used it since it has a 1” arbor. We’ll I figured this was the job for it, so I ordered a 1” R8 end mill holder from Shars the week before Thanksgiving. After 10 days of waiting on USPS to deliver it, I contacted Shars about it and the post office told them it was lost. They then sent me a replacement via FedEx. As luck would have it, both items showed up on the same day this week. :confused 3:

So, back to work. Here are some pics of my setup.
The fixture:
7B0A6F1D-C138-409B-B826-6C5D46A0BBF8.jpeg
Milling the first side:
9AD0FEAE-5F6B-42BC-98BC-15636054729B.jpeg
Cutting a dovetail in the jig:
5AC25E3F-C252-4600-A227-07667D694F62.jpeg
Milling the second side:
ECD6B5F4-6CE8-413E-88A6-D52EF4B62EA6.jpeg
The finished product:
EAA7E23B-09DD-4539-B6FA-81B9A77AA0FF.jpeg
Here is the video Keith Rucker made on this process. He does a much better job of explaining it than I could do in writing.

After milling, I checked the straightness. The bow had actually improved to .001”. I successfully straightened it to within less than .0005” using Richard’s method. I am exceptionally pleased with the fit of the gib as milled. With the gib in place, I can detect no side-to-side play in the cross slide with an indicator. Now, on to scraping!

PS: My apologies for the poorly framed photos. I’ve managed to smear the main camera lens on my phone with something that won’t come off. These photos were taken with the forward facing “selfie” camera:cower:
 
I just finished tearing the Takisawa apron apart to fix the oil pump, and examined the cross slide gib. I wonder if it really needs to be extremely flat, since there are a bunch of gib screws for adjustment that could easily take some slight bow out.
 
Winegrower, Most machines use a taper gib with two retaining screws on each end to keep it from sliding in and out. I suspect your gib is flat and it has several dog point set-screws holding it in from the side casting. If the gib is not worn on the ends as all gibs are because the dirt slides under the ends first you can leave the middle side set screws looser then the ends. But if you have a tapered gib, you have to scrape it and I would scrape the center 40% lower then the ends about .001" - why? where does the dirt get in and wear the gib first? You also need to leave the gib loose at least .0005" when your done so you get a .00025 film of way oil on it to lube it. If T J's machine ways where the gib rides against the section is worn and when he moves the slide to the ends it will bind up if he sets the gib in the worn middle. So he has to set the clearance on the ends of the way.
 
Back
Top