Making a longer chuck key

Oxy, acet, and the HHO torch are NOT stored in the wooden structures. Nobody but a fool would put an Oxy/Acet rig in the basement, even with a concrete floor above.
I'll take that as a general warning for people "watching along", rather than a personal admonishment. I've done numerous minor foolish things in my life, but I'm not a fool.

I would never use oxy/acet in the basement. Way too many things can go wrong: from tipping the gas tanks, getting the tanks downstairs, to just plain fire hazard issues. I have full size tanks for my oxy rig. It's unwieldy. Using a plumbers torch, well that's different. I have a B-tank, which is transportable by hand. There is an 8 foot hose between the tank and the torch. Flame size is smaller, and less hot. Sure you can burn your house down, especially if you have to solder pipes inside a wall. Which I have had to do. (I watched and learned from a professional plumber.) You have to use common sense and take several precautions. Like using fire proof shields, having a water sprayer, and a fire extinguisher at hand. Normally, the plumbers torch is kept out of the house.

Using a plumbers acetylene torch in a non-confined space is fine, with a relatively small tip. Heating a chunk of steel that's sitting in a fire brick enclosure on a concrete floor is about as safe as you can be with fire. The cone of the flame was only 1/2" long and the rest of the flame was entirely inside the fire brick enclosure. The heating time was a whopping 4 minutes, no worry about using up all the oxygen. Fire precautions were taken. Life is risky, machining is certainly risky. So is fire. If one does the right things, you can minimize the risk and accomplish your goals.

Now, as for making things a different way - that's ok. It's why I am on this forum, to interact and learn new things. I thought about an insert. Generally, I don't like two piece units. My experience is that the pieces have an inexplicable desire to become unattached. Brazing an insert is a good idea. Thanks for mentioning it. (Have the torch!) If this current project goes further south, I may take that approach. I'll want to put in something a bit more sturdy than keystock. The keystock I have is kind of soft. Not sure if one can heat treat the keystock to toughen it, just haven't researched it yet.
 
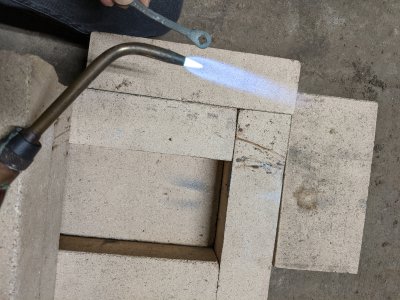
FYI, this is the flame I was talking about. The torch is a Prest-o-Lite. I got it from my Grandfather. Apparently one can still get a complete (clone) setup on the order of $120, including the regulator. Prestolite is now owned by ESAB, no idea what an actual Prest-o-Lite system costs. You need to supply the acetylene tank. Once you have used a system like this, you will never go back to a Bernzomatic burner directly mounted on a small propane bottle. This flame is much hotter (than propane), and helps you get work done significantly faster. You can use the torch in any position. The next paragraph is really important.

Acetylene requires proper handling, if you are going to use it, you should read about it, and follow the recommended instructions. Failure to follow the instructions could result in serious injury or death. This includes always keeping the tank upright, and not using the acetylene at too high a rate for the tank. Acetylene has the highest explosive limit range of flammable gases. That means, mixtures between 2.5% and 100% acetylene in air will burn. It can be quite dangerous, especially if there is a leak. Leak check often! With all that said, it's hot, and it works (heats) fast.

The ID of this tip is about 0.16". I've got larger tips, but this is the one I used. The metal key at the top of the picture has a square hole punched out to fit a 1/8" stem to turn on and off the B-tank. (Kind of a scale for the drawing.) The tip of the inner cone is the hottest part of the flame. Also the flame extends about 10-12 inches or so. It can catch things on fire, if you are not careful. @Bi11Hudson is right, acetylene is dangerous, but it's manageable. The flame is nearly silent on a Prestolite, so once it's lit, it's straight to business. When you are done, you turn if off, and it makes a pop. When I was heating the workpiece, the entire flame was inside the "oven". You can see the shadow of the workpiece on the fire brick, that's where I concentrated the flame. In a minute I'll show you the workpiece, but I have to go get it. (and take a picture!)
IMG_20200119_155128.jpg
 
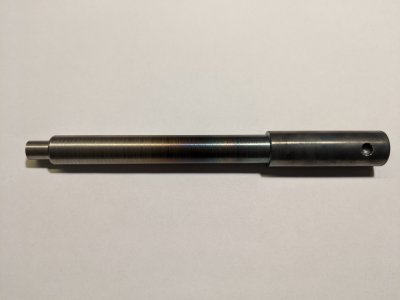
The annealed part. I concentrated the heat on the right most 1" of the part. The part is 6" long. If you look carefully, there is a bright ring around the edge of the hole. That's where I turned a drill by hand to see if it could scratch the steel now. I also was able to scratch the steel using the edge of my calipers. Hopefully it's now soft enough to drill again. I'll find out soon!
IMG_20200119_165204.jpg
 
The keystock I have is kind of soft. Not sure if one can heat treat the keystock to toughen it, just haven't researched it yet.

That really depends on the carbon content.....which is unlikely to be specified.
You could run some tests however.....
....and you could case hardened it.

Personally I bet the (untreated, unhardened, normal state) key-stock would be fine for the square drive tip of a lathe chuck wrench.
It's not something you'd use a hammer or gorilla grip on.

-brino
 
Last edited:
Maybe I'm being mislead by the ceramic belts I have. That keystock melted like butter when I was grinding lathe bit models. It's not case hardened, at least what I have. There was no resistance at all. Files and hacksaws cut it with ease. HSS offered some resistance on the grinder.

You are probably right for the keystock. I don't have any intention of gorilla grip, but stuff can happen in the heat of frustration.

I admit it - there is some element of overdoing it. However, I really dislike doing things over again, might as well do them right first, even if it takes a little longer. In any case, I have 2 keys to make. I have 2 chucks, and two short knuckle-buster keys. Of course they are different sized! My mind is open on the construction of the second one. Maybe I'll braze the tip in.
 
Right, sorry, I meant it as "you have the option of case-hardening it!"

I went back and edited my post #34

from:


to:


-brino
That makes more sense. :) Never tried case hardening, although I've read about it long ago, in the context of antique firearms. How does one do it nowadays? It does sound like case hardening might be good.

Would one case harden the square bit and then braze it to the handle?
 
Didn't heat it up enough. HSS drill bit isn't touching it. I think I misread the annealing temperature. Dull red isn't hot enough. It's more like bright red nearly orange. 1450F is recommended according to Hudson Tool Steel. It has to be hotter than the demagnetization temperature. Have to try again. This time, I'll do things a little different. 1) Go hotter and test with a magnet 2) Stay at temperature longer, I didn't let it sit at temp long enough. Need to be at temperature for a little over 1/2 hour 3) Put piece in vermiculite so it will cool off slower. Sigh, the things you do to recover when you mess up. Still, in a bizarre way it's kind of fun.
 
I probably would have extended the body of the existing short key with a tube. You could always just grind the square end to a pretty good fit.
 
After letting this sit around for 7 months now, decided to look at this again. This piece of steel was sitting around saying, "Do something!" This time I was a lot better prepared. What that means, if you can't guess by now, is cash was spent on this machining malady in the intervening interval. Bought a mill. Bought and made some tooling, etc.

Consequently, what followed was pretty easy for me... Used a square collet block in my mill, positioned by a mill stop that I recently built. Milled off the flats with a carbide end mill. Flipped the piece around and drilled out the hole for the handle with a 11/32" carbide drill. Pulled out the piece and chucked it in my lathe. Center drilled and drilled for a 1/4-20 set screw to secure the handle. Tapped in the handle and screwed in the set screw. The flea-bay carbide drill was slightly undersized, so I had to vigorously tap the handle home, with my machinist hammer that I had made 3 weeks ago. Filed some edges and test fit. Perfect fit in the chuck. Sometimes the blind gopher gets the nut!

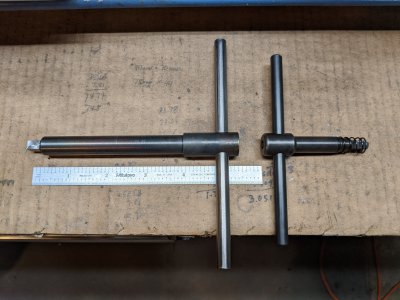
So here's the first one. You can see the original short one next to it. Learned a lot along the way.
IMG_20200810_185337.jpg
 
Back
Top