- Joined
- Jan 3, 2015
- Messages
- 400
I bought this screen set from the CNC Woodworker after having it recommended to me back in April. I built a little touch plate like the one on the first page in this thread. and wired it into my BoB. That works: I can see the indicator in Mach3 turn on and off when I touch the plate to the spindle.
I've tried this a few times, and I can't get the simple autozero routine to work right. Can anybody here help?
The quick zero routine is supposed to lower the probe in the spindle until they touch, then back off a small distance, like .050". Then it's supposed to probe for the touch plate at a smaller rate (1 IPM), set zero, and retract to the clearance plane.
What happens is that the spindle lowers, finds the plate, then retracts about an inch. It lowers the spindle at 1 IPM for a while, about 0.2", then stops, goes through a couple of moves and says it's zeroed, but it's not. It's off by a LONG way. I can put a shop square base that's 0.72" thick between probe and the touch plate. I don't have 0.72" offset anywhere, so I don't have a clue why.
The docs with it say "It hasn't been tested, but it should be possible to use this without a Z axis home switch. To do so, edit the homing script used so that it only home's X and Y. Jog the Z axis to it's highest position, and Ref (Home) the Z axis. This should set the Z axis Machine Coordinates to 0.0."
Since I don't have limit or home switches, I put the Z axis up to the upper limit of its travel and zero and reference the machine coordinate there. I've referenced all three axes, then use the current DRO settings.

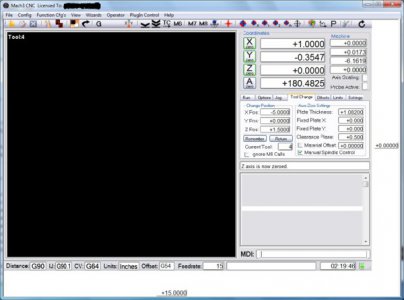
I thought this was the most important screen. This is after telling the mill to go to Z0.000. The probe is about 0.72 above my test plate, which is shown as 1.082" thick in the top box on the right. That tells me where the probe is now should be getting set to 1.802.
Bob
I've tried this a few times, and I can't get the simple autozero routine to work right. Can anybody here help?
The quick zero routine is supposed to lower the probe in the spindle until they touch, then back off a small distance, like .050". Then it's supposed to probe for the touch plate at a smaller rate (1 IPM), set zero, and retract to the clearance plane.
What happens is that the spindle lowers, finds the plate, then retracts about an inch. It lowers the spindle at 1 IPM for a while, about 0.2", then stops, goes through a couple of moves and says it's zeroed, but it's not. It's off by a LONG way. I can put a shop square base that's 0.72" thick between probe and the touch plate. I don't have 0.72" offset anywhere, so I don't have a clue why.
The docs with it say "It hasn't been tested, but it should be possible to use this without a Z axis home switch. To do so, edit the homing script used so that it only home's X and Y. Jog the Z axis to it's highest position, and Ref (Home) the Z axis. This should set the Z axis Machine Coordinates to 0.0."
Since I don't have limit or home switches, I put the Z axis up to the upper limit of its travel and zero and reference the machine coordinate there. I've referenced all three axes, then use the current DRO settings.

I thought this was the most important screen. This is after telling the mill to go to Z0.000. The probe is about 0.72 above my test plate, which is shown as 1.082" thick in the top box on the right. That tells me where the probe is now should be getting set to 1.802.
Bob

