-
Welcome back Guest! Did you know you can mentor other members here at H-M? If not, please check out our Relaunch of Hobby Machinist Mentoring Program!
You are using an out of date browser. It may not display this or other websites correctly.
You should upgrade or use an alternative browser.
You should upgrade or use an alternative browser.
Low budget aluminum casting
- Thread starter ericc
- Start date
- Joined
- Dec 9, 2016
- Messages
- 1,133
Pretty much but you need to put a can with both ends cut out around the spout to create the "funnel" to keep sand from collapsing into your pour. All but the top of the spout and vent spurs should be covered in plaster and the plaster needs to be completely dry or it causes big problems....mix it thin enough that you can either dip or "paint" on the multiple thin layers. i always do at least 5 coats +/- to account for slurry consistency which should be like thin pancake batter.
Last edited:
- Joined
- Dec 9, 2016
- Messages
- 1,133
Check out this guys video, it gives a decently good description of the process and his voice keeps it a bit interesting.
Btw, i dont think sanding down the "thick" portion of the plaster is at all necessary as the reason for the Thinning is to make sure All aspects of the foam are coated in a way it can flow out so there are no bubbles or brush lines and to be sure it completely dries without cracking. Also the reason for the surface flaws and the ruff texture is because his plaster shell wasnt thick enough as you shouldn't be able to see through it.
Also if you wanted to go through the extra step you could burn out the foam core before you pour the metal which helps with the off gassing problem. Hope it helps.
Last edited:
I took a quick look at the video. There's a lot of work for not much gain (at least for casting gear blanks and flanges). The main defects may have been caused by excessive turbulence and pouring too hot. I had similar defects, probably due to the can coating off-gassing, but my result was actually a bit cleaner, despite the fact that very little time was used to prepare the can molds. Really, the only thing I did was place them over the furnace vent for a few minutes to make sure there was no moisture. Next time, I will do the experiment with an uncoated can, then go to the foam if really necessary. Actually, after turning the puck in my lathe, the only real problem was the ridges in the can that left "proving" marks on the surface. These go down about 0.1", so represent quite a bit of waste. The next can I use will have no ridges.
If just making blanks of aluminum to machine down I use seamless pipe 3,4,6” big. Surface finish is good just have to wait for it to cool before it’ll slide out of pipe. I also use 4x4 and 6x6 square tubing to make square chunks.
- Joined
- Aug 22, 2012
- Messages
- 4,260
You can melt aluminium in tin cans, it works for one only casting as it will burn through on the second melt.
I've just cast two blanks this way.

 www.hobby-machinist.com
scroll down to post 208
I've tried lost foam and plaster, a lot of work in my opinion for not a lot of gain.
I didnt like it but may have a go again in the future.
I've just cast two blanks this way.

The Giant Binocular
Sav, have you looked at the various wetsuit repair kits available, might find something useful at a SCUBA shop. Must be a few in your area of the world. John. Yes, they are for sticking neoprene to neoprene. Works well for that but doesnt stick to the glass or aluminium. I will experiment today...
 www.hobby-machinist.com
I've tried lost foam and plaster, a lot of work in my opinion for not a lot of gain.
I didnt like it but may have a go again in the future.
- Joined
- Jun 17, 2011
- Messages
- 2,069
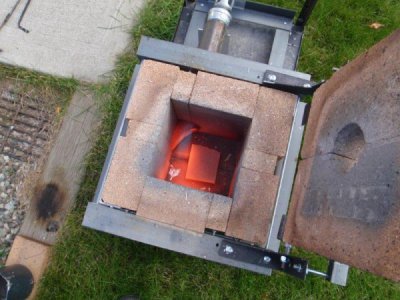
The crucible I use I made from a small fire extinguisher. Very similar in construction to a propane cylinder. It glows quite brightly, but is still solid. I've read that a bit of the iron does dissolve into the aluminum, but I promise not to cast any parts for a Mars lander.
Firebrick foundry, propane burner. You can see the crucible at the bottom corner of the picture.

Firebrick foundry, propane burner. You can see the crucible at the bottom corner of the picture.

- Joined
- Aug 22, 2012
- Messages
- 4,260
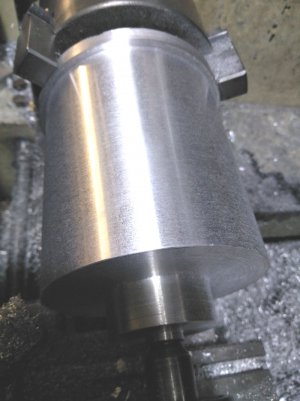
Heres the solid cast from the tin can. originally 98mm dia and 150mm long, reduced to to 85mm dia, the short end in the tailstock is 40mm long and 45mm dia.
No trace of porosity.
However, the centre wont be as good as there was no riser so there will be shrink cavities in the centre.
In this case it doesn't matter as the centre is being bored out.
The tail stock end is what was the base of the can and has set solid.
The top is really crap with some dross and a few shrinks but again I dont need that as the total length will be around 80mm long so I didnt bother skimming it before I let it set in the crucible can.

Some of the ingots that made up the total amount of aluminium (unknownium actually) did have a heap of visible porosity everywhere but by only just melting it seemed to remove them so I will do this on my next real casting.
I believe I have been getting the melt way too hot in the past.
No trace of porosity.
However, the centre wont be as good as there was no riser so there will be shrink cavities in the centre.
In this case it doesn't matter as the centre is being bored out.
The tail stock end is what was the base of the can and has set solid.
The top is really crap with some dross and a few shrinks but again I dont need that as the total length will be around 80mm long so I didnt bother skimming it before I let it set in the crucible can.

Some of the ingots that made up the total amount of aluminium (unknownium actually) did have a heap of visible porosity everywhere but by only just melting it seemed to remove them so I will do this on my next real casting.
I believe I have been getting the melt way too hot in the past.
This is a great result from a tin can. Mine have porosity, but it is miniscule. There are hot tears and inclusions as well. I will turn it down more to see if it is clean. I only need two gears for now, the rest are flanges, which don't have to be very high quality.
