Is There An Easier Way For Initial Set-up of 4 Jaw Chuck?

That said, when it comes to indicating in square things in the 4 jaw, I am awful! I always forget to pull the plunger back on 1 and screw up my setup

Joe Pie has an alternate method that avoids that issue:

 
  • Like
Reactions: Z2V
I use a method my dad taught me and without trouble I can get parts within .01" TIR, square, rectangular or hex, even torch cut parts that are egg shaped.

Please tell us the method you use?
 
you can use a scribe on a block and visually dial it in to less than the movement of the dial indicator.
Just keep halfing the error aproximatly by eye.

I see a lot of "oldy timey" films where they are using chalk to mark the high spots.

If you wan't to have a lots of fun with a four jaw chuck you should use a 10th's indicator ;)
 
Please tell us the method you use?
This may seem laborious to set up but once done dialing in a 4 jaw is simple

Running a 32” machine with a 24” chuck using two chuck wrenches is impossible and a pretty lame method in my opinion. This is the method my dad showed me and it works really well.

First you have to have the 4 jaws numbered, this can be challenging as they are usually hardened. I used a die grinder and put 1 through 4 lines on the side of each separate jaw.

Next you have to number each slot so the correct jaw always goes in its proper spot. I used a center punch and marked the area at the top of the screw, slot 4 depicted.
1597028715495.png
Now chuck some stock in your chuck, for an 8” chuck use maybe something around 2”. Use something good and round not hot roll. Indicate the stock so it is running as close to 0 runout as you can and also make sure the stock is running true not wobbly.

Once you have it running true the last step is to mark the jaw screw, as these can be hardened also, I used a die grinder and made a radial mark on the head of the jaw screw. The radial mark needs to be the same relationship for all the screws I.E. all of them at 12 o’clock or 3 o’clock.
1597028791997.png
Now when you put a piece of round stock in the chuck eyeball the jaws so they are equally spaced from one of the radial face lines on the chuck, just close so you are not one turn off from another. When the lines on the jaw screws are aligned such as 3 o’clock the part is centered. The same applies for square stock.

For rectangular stock let’s say jaws 1 and 3 are at 10 o’clock but 2 and 4 may be a 9 o’clock
 
I do a quick eyeball using the rings or the projection of the jaws out side the chuck body. Then I take whatever tool is in the holder and run it up to the part adjusting with 2 chuck keys for consistent gap. In 30 seconds the part is well with in 1 rev of the DI.
 
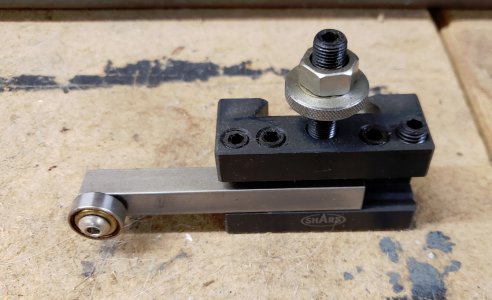
Long ago I acquired ( eBay perhaps?) this bit of alignment tooling to supposedly get parts centered by gently 'nudging' the part into center using the crossfeed. It's just a ball bearing mounted to a tool mounted in a tool holder set to center of work height. Have the part a bit loose in the chuck, manually rotate and as you move the crossfeed inward you are moving the part to center. Tighten the jaws once you get as close as you want. I rarely use it anymore but it's there in the quiver if needed.

This gizmo does sorta work on square stock in a 4-jaw also. Then you're 'nudging' the corners of the stock.

I'm still enough of a 'hacker' that the 3-jaw is close enough for most of my needs on round stock and only get out the 4-jaw for odd shapes.

CenteringTool.jpg
 
Last edited:
This method has worked the fastest for me. I can get pieces held in my Asian made chuck that came with my g4003g dialed in about 2 tenths in short time compared to other methods I've tried.
 
Once you have it running true the last step is to mark the jaw screw, as these can be hardened also, I used a die grinder and made a radial mark on the head of the jaw screw. The radial mark needs to be the same relationship for all the screws I.E. all of them at 12 o’clock or 3 o’clock.
1597028791997.png
I like it. Job for this evening.
 
Back
Top