I cut a thread and I have some questions

Calculations are a waste of time, I always feed in with the compound, I don't usually reduce the OD before threading and take heavy cuts at the start, gradually reducing infeed as the thread approaches sharpness, file the burrs on the crest and try the thread with a gage or nut that has been cleaned out with a sharp tap, and repeat cuts until it fits, sometimes I will use a thread mike. This is what would be called a seat of the pants approach, it gets the job done with a minimum of time and trouble. One job that I used to do frequently was to thread 1-1/8 -7TPI square disc axles, with a 45 deg. tool, I cut the square to round in perhaps two cuts to an undersize and beveled the end, then with the threading tool 6 0r 7 passes finished the thread, this was done by taking an approx. half depth cut on a number on the thread dial, then taking a second cut at the same depth splitting the lead on the dial so the result looked like 14TPI, then proceeding back with subsequent cuts on the numbered lines, the split cut essentially roughed out half the cut and allowed large infeed to finish the thread, this was called "the oilfield thread", it can only be used for odd nombered threads so far as I know.
As far as calculated thread infeed is concerned, the fact is that it could only be counted on to be accurate with a sharp V tool, which is to be avoided, I prefer to grind tools with a small flat for fine threads and wider for coarser threads, I use Aloris thread tools and carefully stone a tiny flat on the fine thread tool, and surface grind the flat on the larger tools, this makes them hold up much better than the sharp point that they come with from the seller.
 
Thread wires are a PITA to use, as anybody who has used them has found out, I picked up several thread mikes on E Bay, and make use of them especially for odd threads or duplicating an existing odd thread.
 
Thread wires are a PITA to use, as anybody who has used them has found out, I picked up several thread mikes on E Bay, and make use of them especially for odd threads or duplicating an existing odd thread.
Yes they are. The way around that can of worms is to position the wires in the thread, then loop rubber bands on each end to hold them in place. They won't be perfectly parallel top and bottom, but done correctly the mic you measure with will take care of that.
I've also seen an old timer in inspection put his mic in a stand, adjust it to close to where it should be and use his fingers to hold the wires until he could get the small part in. I tried his way several times. I looked the fool each time. Got the company to buy me more rubber bands.
 
I mostly do what John said. Keep cutting the thread until the nut fits.

I use thread wires if I need to have a thread where I don't have a nut for trial fits. I don't have any problems using them anymore. One day I needed to set the wires down while I grabbed something. I forget what. I set the wires on the thread and they just sat there. Didn't fall off. So now I place two wires on the top of the thread and sit the micrometer on top of them. Then put the other wire on the bottom and take the reading. Works for me.

IMG_4099.JPG IMG_4100.JPG

IMG_4101.JPG

I used to rubber bands.

IMG_3904.JPG
 
Hey All!

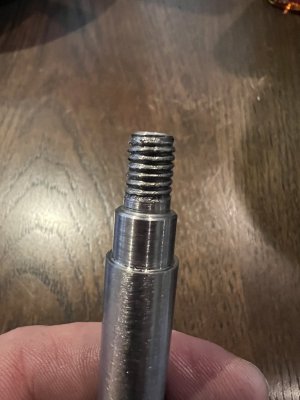
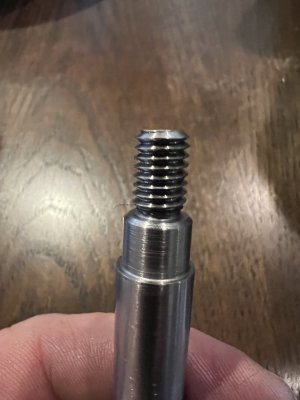
Been prepping to make a stud for my toolpost on my lathe, and I decided to practice single pointing a little bit today:

It came out well, I was trying to test how much stick-out I could manage and get it to cut down. The bottom thread I'm holding was actually my first try, and after doubting myself, I slipped a die on part of it, only for it to slip in the chuck and force me to start over. On the second try I did the threads on top.

That's pretty OK looking for just getting going.....

Overall, I cut 1/2-13, because I had hardware I could test fit with, and my 'production' run will be m16-2 threads, which is comparable speed to the 13tpi.

Be careful using hardware grade nuts and bolts as "gauges". They're sloppy. But if that's what you're building stuff out of..... I'm not saying it's wrong..., just be aware, and careful.

So, on to my question. I saw diameter #'s out of the book as .500 and ~.405, or 95 thousandths to cut on the diameter. Half that being 48 thousandths to cut, and with my compound at 30*, doing a bit of math, I figured 55 thousandths on the compound would get me to where I needed to be. <-- Does this track? Did I do this right?

Books and tables are a good thing, but they require some attention to detail. They tend to be based on a theoretical sharp thread profile, which in the real world is not a workable thread. The crests and the roots are actually flattened and rounded from the theoretical dimensions. This will affect your depth of cut tremendously. If you know the root radius accurately on your threading tool, and your starting diameter, you can do the math on that to figure how much "theoretical depth of cut" you're missing when the rounded tip makes contact. Then "trig" the compound to get your infeed amount.....

I cut down my stock to .499 diameter, and then cut the threads with the numbers above, but it was way too tight for the handful of nuts I tried (only thing I have to test with). After several spring passes without it fitting, I ended up cutting another 10 thousandths (65 total) on the compound (55 thousandths total depth on x-axis). It now threads smoothly with every 1/2-13 thing I could find in the garage, so it works.... but I feel like I got to the right answer the wrong way here. I don't have a way to measure minor diameter, any problems with that extra 15 thousandths cut?

Appreciate any advice as always, and if you see anything wrong with the threads in the picture I'd love your feedback! Go hard on me here, trying to get better.

So, I'm speculating here, but I suspect.... You've got threads that are more pointy on top than they should be, and thinner than they should be, relative to the valleys, and your nuts are "riding" on those peaks, without fully contacting the flanks of the threads

Advice number one- After taking what I just said with a grain of salt, as I'm not looking at the part the same way you are, and I'm not feeling the nut on it the way you are.... Advice number one is to validate or invalidate my suspicions about what's going on with your lack of fitting right when the dimensions should have been right. I could be off on that speculation, but I'll guarantee it's an easy way to screw up a thread. Trust me, I checked. More than once.

Advice number two- It's cool to be able to make threads "by the numbers", and just make stuff that works. I'm not there yet...... My method (and I don't stop keeping track of or paying attention to the numbers) is to do it like this: I'll take the threaded thing down to it's final actual diameter (NOT nominal diameter. For a "standard" screw thread, there is a range you can be in, but an easy spot to be, without compromising much of anything, a comfortable place to be is nominal diameter less 10 percent of the thread pitch. So in your case, a half-thirteen thread, I'd take the thread pitch (one over thirteen, or 0.0769 inches, call it 77 thousandths), ten percent of that, call it a shy eight thousandths, so 0.500 (nominal) less 0.008 tells me that the unthreaded blank would be 0.492 in diameter to start.

By doing it this way, I will not have any interference with the rounded roots of any internal thread I've cut (or any nut that I've bought, I'm guilty of that too...), so that as I work out theoretical numbers, as I watch closely to see when my thread starts "looking like it should", in case I'm off base and it starts looking OK before the numbers say so, and I can confidently "guage" the thread with a corresponding thread, knowing it's NOT binding on said pointy peaks.

For me, (admittedely an amateur) this keeps me very much out of trouble, and keeps me making functional threads, even if I screw the numbers up.

And to be clear- There's a thousand ways to approach this. Nearly that many are socially and morally acceptable. I know many prefer to thread first, and then flatten the crowns, and there's nothing wrong with that. But doing it this way is just an approach that works for me. Maybe it'll work for you.

Or..... If you're really in a pinch, if you're having trouble getting a good finish on the threads (the larger they are, the worse that is), if you're locked into a boarderline workable but not ideal overhang level, and taper is an issue... Single point as much of the thread as you can, without blowing the final size anywhere. Then, with 80 percent or more of the material removed, you can run a die down it, which will follow the thread keeping the effort at just a small fraction of what it would normally take, the die will follow the cut threads, both forcing it to start and stay dead straight, not just straight enough, and keeping as much pitch accuracy as your lathe has over as long a distance as you can do by single point cutting, which is a WAY better result than just straight up using a die. It is a kick in the pride to do so, but it's an awesome crutch, maybe even a bailout, when you're half way done threading the last piece of rod you own in that size, and realize that things aren't going as ideally as you'd like.
 
If you don't want to bother with messing around with the compound slide and you want to feed in at 30 degrees, try this.

Set the compound slide in line with the thread axis ( zero ). For every radial unit you feed in on the cross slide advance the compound slide 1/2 a unit. This keeps the cutting on the leading edge of the tool exactly the same as using the compound at 30 degrees. It's simpler to then just dial in the thread depth and no calcs.

In a jobbing shop you won't see anyone using the compound when they can simulate the same using this technique.

Don't forget to keep the crest burrs radiused before you take the final cuts if using a female thread as a gauge.
 
I ran into this issue myself recently. I’m new to the hobby. The issue I discovered was that I was not cutting a deep enough relief, and towards the end I would chip off the tip of my insert without even knowing it. By the time the nut was fitting, it was loose.

I tried doing a cut with a big box Irwin die. Will never cut threads with a die again. At least not in steel. Single point when done correctly is heavenly. worth the chipped inserts to get better at it. If I do use a die, it will be HSS high quality, and I’ll still single point 80% of the way. Cheap dies are crap.
 
Last edited:
Cut with cheap die vs cut with lathe.
 

Attachments

  • A6AFAE83-16AF-47D3-9F92-154CBB222A20.jpeg
    A6AFAE83-16AF-47D3-9F92-154CBB222A20.jpeg
    195.1 KB · Views: 16
  • AC03F65E-E86C-4CA3-BAA6-BC04EBD86405.jpeg
    AC03F65E-E86C-4CA3-BAA6-BC04EBD86405.jpeg
    174.9 KB · Views: 16
If you cut a 1/2" 13 thread, you probably want to cut 1/2" 13 TPI UNC nut thread. But you could also mean a Withworth thread or a pipe thread or a, etc. I guess you mean a UNC thread having an included thread angle of 60°.

It starts by the outer diameter. For a normal (hardware store thread) I would start using an outer diameter of 12.49 mm or 0.492". Your 0.499 mm outer diameter would result in a thread without play. That is pretty difficult to make.

The second is the depth of cut. That depends on the tool you use. If you use a self grinded sharp HSS tool, it would be 1.37 mm or 0.054". If you grind a radius on the tip or use a threading insert, it depends on the radius of the tool. The smaller the radius, the deeper you need to cut. Calculating that cutting depth is a bit complex but if you draw the tool (+ radius) and the thread using a CAD program you can measure the required cutting depth.

Finally you can thread using an infeed angle of 0, 29.5° or 30° Personally I only use (CNC threading) a 0° infeed angle because there is not much to gain using the other angles. If you do use an infeed angle, than the infeed would be 1/cos(infeed angle). So at a 30° angle it would be 1.154 * the infeed at 0°.

I cut my thread using a sharp ground HSS tool (no radius on the tip) or using an insert that has a (known) radius on the tip. You can calculate the tip radius if you know the smallest thread pitch you can cut using this radius. For an Metric/UNC thread the cutter tip radius (for making a Nut) is 0.1446 x pitch

For measuring a thread using the 3 Wire method I have made several set of 3 wires from spring steel. You can also use 3 needles of the same and appropriate (known or measured) size. You can calculate the recuired data using an online 3 wire thread calculator.
 
Last edited:
Back
Top