How to remove seized bolts on aluminum?

I was doing a transmission oil change, and I broke 3 bolts so far. I was very careful, but I didn't believe penetrating oil would work, or if I would have time to wait for them to penetrate.

So after 3 broken bolts, I am ready to accept being wrong, and hopefully there is some penetrating oil that would work helping me remove the rest of the bolts, and figure out how to drill the other bolts out.

Is there a penetrating oil that would work with steel bolt on aluminum?

I may try again, with a hammer hitting the bolt head a few time before removing them, but I think I need some help.

Also, any tip on how to drill these out? I think alignment is the hardest. Since it's 10mm socket sized bolt, it's very small, and I don't know if tiny bolt extractor will be able to remove them. The other option would be larger bolt, or using inserts.
Are the back side if the bolts exposed? If so clean the BeJeezus out of them best as possible.
Often on small steel bolts into Aluminum the corrosion is just below where they break

My method involved cleaning really well , wire brush and pick out any corrosion you can see , heat , tap it , try to loosen it.

I will try and work the bolt back and forth.

If you can get a good straight shot at drilling them its probably the quickest way.
 
I heat the bolt red hot with acetylene. When it cools you can often turn it a tiny bit. Keep repeating and each time you can turn it a little more. Hope fully you can separate the parts by pulling it right over the broken bolts then heat them up as well. I have stainless bolts in aluminum (the worst) on my boat engines. A bear if you don't keep up with maintenance.
 
Make a drill guide.

Make it from steel, minimum 1 inch tall.

If man is still in place cut the bode to allow it to be a good fit.

Figure out how to clamp it, maybe use nearby holes with a cross bar.

If the bolts broke flush difficult to align, if recessed a bit can be used.

You should make a bushing to allow a smaller first hole then remove bushing and drill larger one.


Sent from my SM-G781V using Tapatalk
 
Some updates ...

I made a vertical drill guide by drilling 4 several different hole sizes to a 1" thick piece of steel.

I was busy, and it was raining, cold, etc. So I started working on it again yesterday. It was so cold and windy and I barely made some progress. Of 3 broken bolts, the 1st one, I was somehow lucky to drill right in the center, and after several steps up to near the inner diameter of the thread, it went out with the drill bit.

The second one was hard, the broken surface was not flat, and I tried with a center punch and angled a small drill bit to start. It all looks good to be center before I start drilling, when I drilled, it was off to the side. So I could not drill all the core out because it would eat into the thread on 1 side. After that, I used a small file to try to file the other side. It took forever, especially with the file's teeth too small. I just left it there for now.

I went to the last hole. I said to myself that whatever I do, I need to make it center. I used center punch, high speed rotary with carbide bits, diamond bits, etc., to make sure it was center. I even used a magnifying glass to check. It looks really center.

Then I drilled it, and it was still a bit off :)

I then tried to use a drill bit to push side pressure to drill the side out. Some small success, but I left it there for now.

If I do it again, maybe I should have follow one of the advise above, use the other 2 adjacent bolts and make a small plate guide with 3 holes, then bolt it in to help line the first small drill hole and hopefully it's center.

I think part of the problem is the small space and maybe my eyes are just not that good any more.

But as any machinist here knows better, it must be a wrong technique that I used. A guide of some sort must be used to center the drill.

I am still wondering once that I drill all the cores out, how will I get the thread out. I tried to pick it out, but it sticks pretty hard.

If all else fails, I will just skip the holes, and just use RTV.


Anyway, just hopefully to entertain you (on my misery :) ). Thank you all again!
 
Back when I used to work in a job shop, the owners decided that I was the only one that they would assign broken bolt removal to. I normally use a Bridgeport mill, but sometimes had to do it freehand. At the risk of sounding self-promoting, I found that this process is actually an art.

This is because the threads spiral into the workpiece. If you center off the "circle" at the surface of the workpiece, you will be off-center to the fastener. The ratio of fastener major diameter to minor diameter and thread pitch affect the appearance of the center point. If the fastener breaks off at an angle, you will not be looking at a true cross-section of the fastener. This can throw you off, too.

In the Bridgeport, I tried to mount the work so the fastener was aligned with the spindle vertically. That way if I centered on the fastener, I would not drill out through the side. I would use an end mill smaller than the minor diameter of the fastener, then remove material until I was below the next thread (one full turn) and then expand the hole until I reached the threads all the way around. I could then see where the center of the fastener was quite clearly, and center the spindle over that. Center drill, the use ever larger drills until I only had the spiral of the old threads left, the work that out. If not perfectly centered, use a smaller end mill or carbide burr to work the hole round and centered.

If I couldn't get it in the vertical mill, it became a game of trial and error using hand tools. The most important thing was to go slowly and take only a little metal off at a time between checking for location. Again, don't go too deep until you have determined the center location very closely. If you get off center, use a carbide burr to "fake in" the hole round and centered. Use a fine-tooth burr and be very careful not to let it dig in and start flailing around in the hole. Once you get a hole that will center a drill bit, spot the center and use a small drill to establish that center 1/16" or so, the use a drill about 1/2 the root diameter of the thread to check your work. If it is going well deepen the hole in small steps, first the reduced diameter, the tap drill size so you are following the threads.

Absolutely do not drill a pilot hole through the fastener because if you are not on center the whole way, you will drift out into the treads as you enlarge the hole. Don't get impatient if you feel you have centered the drill and think you can now just drill out to the bottom. Working by hand is not precise enough for that.

Back in those days, I didn't have access to left-hand drill bits. I do now, and they sometimes get the broken fastener out while I am proceeding with the process I describe. That is the best scenario.

If at all possible, I now weld onto the broken fastener and unscrew it that way, but if that doesn't work, I'm stuck with using carbide tools to get through the heat affected zone.

Using a drill guide is effective, but if using hand tools it must have a hardened bushing or the drill can eat it out before you realize what is happening and you are now off-center.

My boss made sure that the customers understood that getting the broken fastener out would take a lot of time, and that it would be expensive. He had other machinists that did jobs quickly, but none of them had the patience to this job.
 
You can get a dental carbide, they fit in a dremmel tool.

With time you can carve out the off center ones.

Sent from my SM-G781V using Tapatalk
 
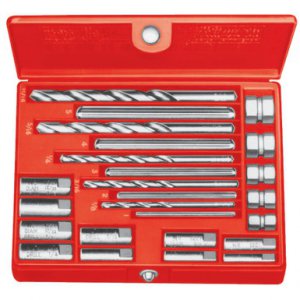
At work we had a Blue Point ( Snap On ) screw extractor sets , they have hardened drill guide bushings with the idea of say an exhaust bolt , you would use the guide bushing with the exhaust manifold holding it in the correct position, though I had limited success with the splined hardened pins that you would drive into the hole and a hex that matched the different size . Most times if it didn’t come out because of rust/ corrosion,you would at least have a hole centered enough you could work your way up to use a pick or tap to clean the threads . https://www.ridgid.com/us/en/10-screw-extractor-set. Here’s a Ridgid brand that looks exactly the same
 

Attachments

  • ABC3A33D-4C57-41A2-9BDB-00C981CFFFE6.jpeg
    ABC3A33D-4C57-41A2-9BDB-00C981CFFFE6.jpeg
    57.4 KB · Views: 4
At work we had a Blue Point ( Snap On ) screw extractor sets , they have hardened drill guide bushings with the idea of say an exhaust bolt , you would use the guide bushing with the exhaust manifold holding it in the correct position, though I had limited success with the splined hardened pins that you would drive into the hole and a hex that matched the different size . Most times if it didn’t come out because of rust/ corrosion,you would at least have a hole centered enough you could work your way up to use a pick or tap to clean the threads . https://www.ridgid.com/us/en/10-screw-extractor-set. Here’s a Ridgid brand that looks exactly the same
I've had this (Blue Point) set for 40 years. Sometimes it works, but centering is reliant on the hole in the exhaust manifold being perfectly in line with the threaded hole for the fastener. In my experience, that is rarely the case. The usual result is a Helicoiled hole in line with the hole in that particular exhaust manifold.
 
I am happy to update that I managed to get the remaining 2 broken screws out. After ordered a helicoil kit, with some confidence that if I mess up, I will just use the helicoil. I went to Harborfrieght with today's 30% off, trying to find a small file that has large teeth. I ended up with a chain saw file set. The smallest one of the 3 helped me filed the rest almost out. I then just brute force it with a hand tap, and hope that it would cut the right thread, and it did. I moved very slow (about 1/16"-1/32" at a time of cut) with a lot of pressure. It appears 2 of the 3 have good thread. The 3rd one, I am not 100% if it can hold the torque for this. I will see. I will put RTV on it to be sure.
 
Advise from a former Ford mechanic, who spent more hours than he would like to know doing Triton exhaust manifolds.
Heat, BG InForce penetrating oil, drill through the broken bolt/stud.
get penetrant into backside, heat, try an easy out, if it doesn't move, helicoil it.
I processed plenty of claims for cracked manifolds and got extra time fir removing broken bolts-studs.
Sometimes the head has to come off. But you know this story.
 
Back
Top