How To Hold Thin Flat Stock?

RVJimD

Active User
Registered
Joined
Dec 30, 2014
Messages
259
Guys,

How should I hold this thin part on the rotary table? It is 1/8" thick and about 3x3" square. I wanted to make the radius on the top side as shown on the layout. I was going to make a round plate with counter bores that I could bolt to the table, then tap a few holes in that to clamp the part down using some 1/4-20 screws. Didn't want to drill any extra holes in the part but it looks like I'm going to have to. Wish I had some 6" round instead of the 4" but I don't. Would having 6" change how you would do this?

Thanks for any tips!

Jim
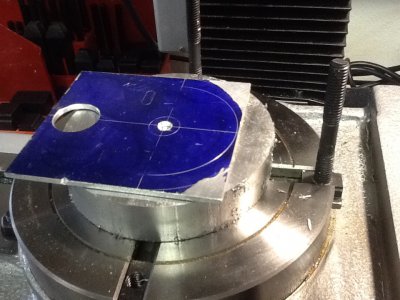
image.jpg
 
Using what you have in the pic.

You can always put 4 toe clamps on(90 degrees apart) it and when you come close to one of them stop and remove the clamp and then continue on. Once you get enough clearance put the toe clamp back on and then continue on until you reach the next one. Rinse and repeat until your done.

If you don't race through the material you can get away with 3 toe clamps. 2 on the y axis and 1 on the x axis.
or
Drill and tap a hole in your 4" stock for the hole in the center and that larger drill hole and just use a couple toe clamps.
 
Last edited:
What is your tolerance? Can you belt sand it. You can mill it rotating the part around a pin from that center hole. DON’T climb mill with this method!!!. AND hold the part with some added leverage attached to the part. And be safe. Good Luck, Dave.
 
I would do the same thing.
Using what you have in the pic.

You can always put 4 toe clamps on(90 degrees apart) it and when you come close to one of them stop and remove the clamp and then continue on. Once you get enough clearance put the toe clamp back on and then continue on until you reach the next one. Rinse and repeat until your done.

If you don't race through the material you can get away with 3 toe clamps. 2 on the y axis and 1 on the x axis.
or
Drill and tap a hole in your 4" stock for the hole in the center and that larger drill hole and just use a couple toe clamps.
 
I should have mentioned the tolerance. The radius is a simple outside shape so it doesn't need to be precise at all. I was wanting to mill it using the RT just to learn how to hold it and perform the operation. I did think about roughing it out on the band saw, but went back to trying to learn how to use the RT on the mill.

Jim
 
One method that I use for thin stock is double sided carpet tape. If you are doing light machining, it will suffice. I use it for milling printed circuit boards and engraving. For more aggressive machining, I will try to use at least one hold down (belt and suspenders ;)). If toe clamps and the like are too bulky, you can use a sub-plate with tapped holes for machine screw hold-downs. Another method of holding is to use a hot melt adhesive. OxTool did a couple of recent YouTube videos on the subject:

I have tried the method of relocating clamps as I am machining and will avoid it if possible as it will put a different bias on the piece which can result in different machining depths. When I do use it, I try to have at least two clamps engaged while I am relocating another to prevent the part from shift while clamping.
 
I would bolt the aluminum backer to the RT with flathead screws. Then drill and tap for the center hole of the part, then bolt down using a large washer under the bolt. I make flange washers for this purpose, like saw arbor washers they clamp on the outside rim. Then one clamp on the bottom of the part would hold it fine.

Rather than sacrifice a chunk of aluminum, I would use 3/4 MDF as a backer. It even threads pretty well and is good for a few parts.

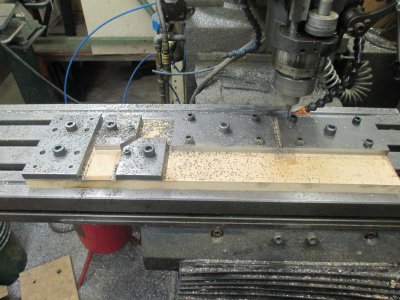
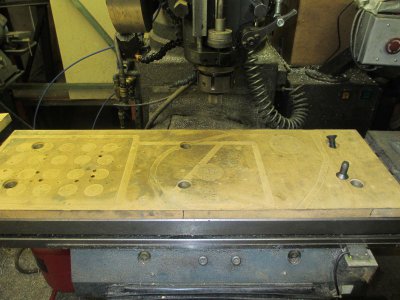
Here is a couple of pictures of a backers I used on a projects.

In this case the 1/2 bolts are bolted through to the T-nuts, the 3/8 bolts are threaded into the MDF. Profiling 1/2 steel plate.

IMG_0554.jpg

You can see the outline of several parts I have done on this backer. The flathead screws are bolted to the T-nuts

IMG_0539.jpg
 
Thanks for the quick tips! I think I used a bit of each one!

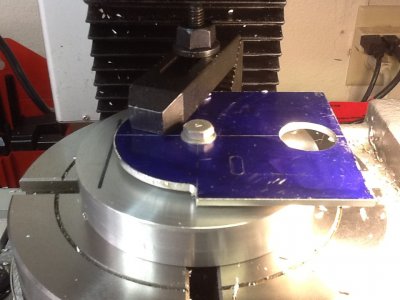
The disk is taped 1/4-20 and I bolted the thin stock to that. The disk also has a short taper on the bottom that indexes into the MT hole in the RT, so, since the precision was not critical i didn't even bother indicating the disk. I did center the RT using a center plug in a collet.

Then I used one toe clamp on the top to hold it all down and moved it half way around. I was anxious to try it, but I am going to find a 6" round and make another disk and then counter bore holes to bolt the disk to the RT. I also put a large washer under the part to hold it up off the disk so I didn't have to cut my disk.

I did it pretty slow feed and only had a bit of chatter when the aluminum tried to stick to the cutter.

Thanks for the tips!

image.jpg
 
I have one of these - an idea by Jim. Mine is 7". I have found it very useful for clamping all sorts of shapes.
It looks like it would be much more versatile the Tee slots.
 
Back
Top