-
Welcome back Guest! Did you know you can mentor other members here at H-M? If not, please check out our Relaunch of Hobby Machinist Mentoring Program!
You are using an out of date browser. It may not display this or other websites correctly.
You should upgrade or use an alternative browser.
You should upgrade or use an alternative browser.
Hendey Refurbish #3
- Thread starter 682bear
- Start date
- Joined
- Nov 23, 2014
- Messages
- 2,634
Me too on my Grizzly.Now that looks like something I should add to my Southbend taper attachment..... those areas are always full of chips!
Thanks for sharing.
Brian
Bruce
- Joined
- Nov 28, 2016
- Messages
- 2,793
This morning I started working on the taper attachment adjustment knob again.
I finished turning the nose of the knob and bored it for the gear...
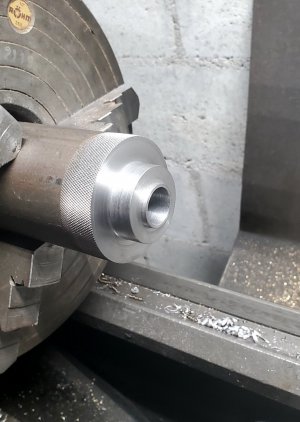
...then took it out and machined the gear to fit the hole...
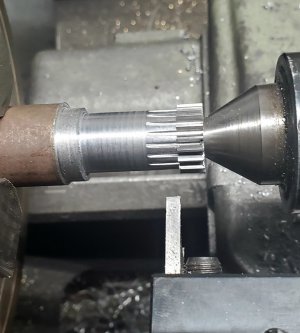
This is the piece of material that I used machining the same gear for Hendey #2. Luckily, I had machined the gear teeth long enough to use the scrap for this gear, also. I machined the shank down behind the gear with a regular turning insert (vpgr332), then used the parting tool to square up the back of the gear and cut it to the correct thickness. I then cut it off in the bandsaw, cleaned the cut edge up, and pressed it into the knob (I left about 0.0015 pinch).
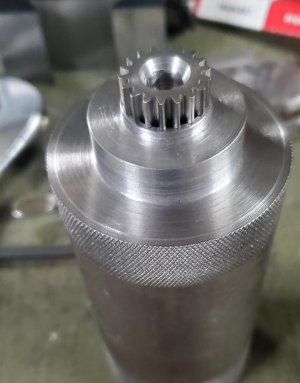
Next, I cut the knob off the material and set it back up and began machining the pocket in the knob...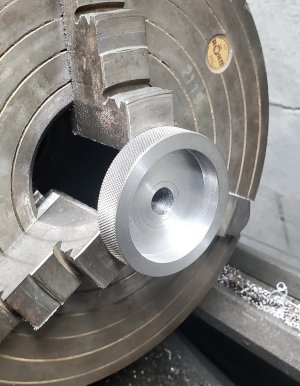
It's finished...
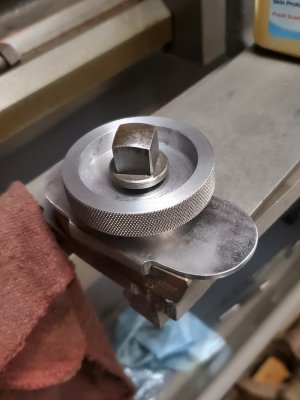
It fits the taper attachment like it was made for it... it operates very smoothly with no noticeable play.
The locking bolt in the pic is the one off of Hendey #2... it won't thread all the way down for some reason... It works fine on #2. The hole in #3 probably needs a tap run through it... I just ran a wire brush through it when I cleaned it up.
-Bear
I finished turning the nose of the knob and bored it for the gear...

...then took it out and machined the gear to fit the hole...

This is the piece of material that I used machining the same gear for Hendey #2. Luckily, I had machined the gear teeth long enough to use the scrap for this gear, also. I machined the shank down behind the gear with a regular turning insert (vpgr332), then used the parting tool to square up the back of the gear and cut it to the correct thickness. I then cut it off in the bandsaw, cleaned the cut edge up, and pressed it into the knob (I left about 0.0015 pinch).

Next, I cut the knob off the material and set it back up and began machining the pocket in the knob...

It's finished...

It fits the taper attachment like it was made for it... it operates very smoothly with no noticeable play.
The locking bolt in the pic is the one off of Hendey #2... it won't thread all the way down for some reason... It works fine on #2. The hole in #3 probably needs a tap run through it... I just ran a wire brush through it when I cleaned it up.
-Bear
- Joined
- May 3, 2017
- Messages
- 2,028
It was! Typically great work, Bear. And a very nice Rohm chuck I might add.It fits the taper attachment like it was made for it...
Regards
- Joined
- Nov 28, 2016
- Messages
- 2,793
- Joined
- Nov 28, 2016
- Messages
- 2,793
Since it's been over two months since I've updated this...
I've been tinkering with the Hendey off and on, but haven't accomplished much. It was in my shop up until the middle of December, when I realized all the cold, wet weather we've been having has caused condensation in the shop. This led to surface rust beginning to show up on the ways...
The week before Christmas, I moved the lathe into my basement, where it is warm and dry. I've had to re-derust, clean, and oil the ways.
I began assembling the taper attachment, and ran into a problem. The gib adjustment screws wouldn't thread through the holes in the slide. They are non-standard 5/16 x 20 TPI threads, so I had to find and order a tap. I used the tap to clean out the holes, which fixed 4 of the 6 holes. The other two still won't thread in deep enough to contact the gib.
After fooling with it for an hour, I finally determined that the heads on the screws are binding against the sides of the counterbore on the holes. Either the heads aren't concentric with the screws, or the counterbores aren't concentric with the threaded holes...
I'll probably fix it by skimming 0.005" or so off the screw heads... that would be easier than trying to open up the counterbores.
This morning, I began working on the cross slide lead screw assembly... it has to be installed before the taper attachment. I've mostly assembled it, but haven't installed it yet...

and again, I've run into a problem...
The large screw that fastens the lead screw nut to the cross slide has a 1/4-24 set screw in the center... it is removed to oil the lead screw. This set screw is rusted into the large screw... rusted solid...
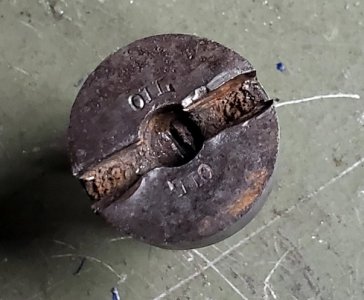
My plan is to soak it in evaporust for a couple of days, then soak it in Kroil for a few days... if that doesn't work, I may have to drill it out. Or I could simply machine a new screw...
-Bear
I've been tinkering with the Hendey off and on, but haven't accomplished much. It was in my shop up until the middle of December, when I realized all the cold, wet weather we've been having has caused condensation in the shop. This led to surface rust beginning to show up on the ways...
The week before Christmas, I moved the lathe into my basement, where it is warm and dry. I've had to re-derust, clean, and oil the ways.
I began assembling the taper attachment, and ran into a problem. The gib adjustment screws wouldn't thread through the holes in the slide. They are non-standard 5/16 x 20 TPI threads, so I had to find and order a tap. I used the tap to clean out the holes, which fixed 4 of the 6 holes. The other two still won't thread in deep enough to contact the gib.
After fooling with it for an hour, I finally determined that the heads on the screws are binding against the sides of the counterbore on the holes. Either the heads aren't concentric with the screws, or the counterbores aren't concentric with the threaded holes...
I'll probably fix it by skimming 0.005" or so off the screw heads... that would be easier than trying to open up the counterbores.
This morning, I began working on the cross slide lead screw assembly... it has to be installed before the taper attachment. I've mostly assembled it, but haven't installed it yet...

and again, I've run into a problem...
The large screw that fastens the lead screw nut to the cross slide has a 1/4-24 set screw in the center... it is removed to oil the lead screw. This set screw is rusted into the large screw... rusted solid...

My plan is to soak it in evaporust for a couple of days, then soak it in Kroil for a few days... if that doesn't work, I may have to drill it out. Or I could simply machine a new screw...
-Bear
- Joined
- Sep 28, 2013
- Messages
- 4,395
I'd go with a new screw and put a ball oiler in there. I've also encountered that "bolt head off center" problem. Usually counterbores are oversized a bit to take that into account, but sometimes it's not enough. I've skim cut quite a few bolt heads when I've gone too tight on the counterbore
- Joined
- Nov 28, 2016
- Messages
- 2,793
I've mostly assembled the taper attachment...
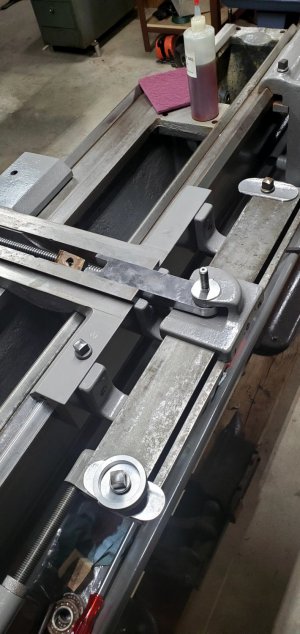
Hopefully, I won't have to take it back apart for anything.
I've mocked up the upper clamp that I found on ebay (see post #9)...
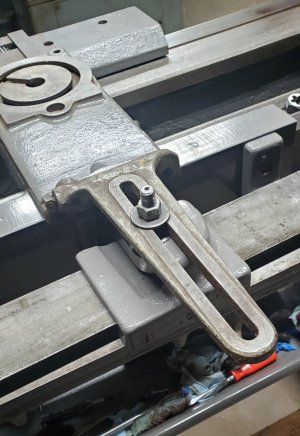
It is a little too high, and the mount holes are not aligned exactly... but it's close enough to work with a little tweaking... I hope.
-Bear

Hopefully, I won't have to take it back apart for anything.
I've mocked up the upper clamp that I found on ebay (see post #9)...

It is a little too high, and the mount holes are not aligned exactly... but it's close enough to work with a little tweaking... I hope.
-Bear
- Joined
- Nov 28, 2016
- Messages
- 2,793
Wow...
I honestly didn't believe I would ever get this set screw out...
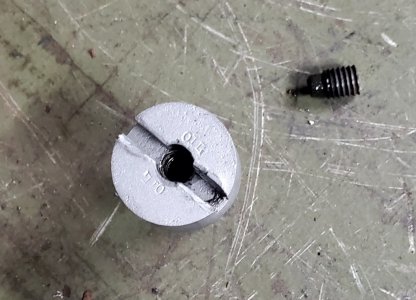
A couple of days in Evaporust followed by an overnight soak in Kroil and it came out easily. I'm very surprised!
I've started fitting the upper clamp for the taper attachment... I mentioned in the last post that it was too high... by my calibrated eyeball, maybe .050-.060". I compared the thickness of this one to the one on Hendey #2, and this one is .050 thicker. I set it up on the milling machine and cut .045 off the bottom...
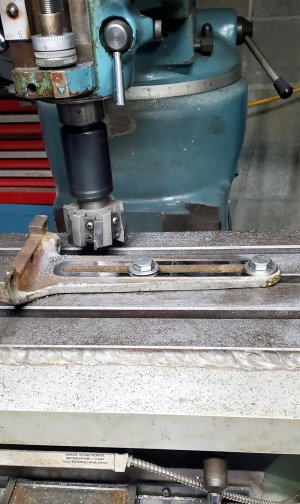
It looks like it is sitting at the right height on the machine now... I may set it up on the surface grinder and just clean the milled surface up.
It has a cutout in the bottom of the end that mounts to the cross slide... this cutout is clearance for the cross slide dovetails. The cutout wasn't quite wide enough to clear the dovetails, so I milled a little off the sides to fix that issue...
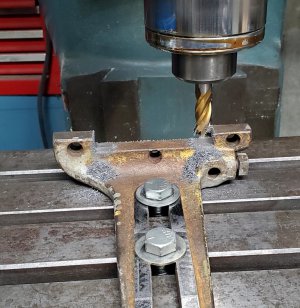
Now I need to 'massage' the mount holes just a fuzz to get the correct hole spacing for the screws, then this will be ready to clean, paint, and install. So far, this has been an easier job than I thought it would be.
-Bear
I honestly didn't believe I would ever get this set screw out...

A couple of days in Evaporust followed by an overnight soak in Kroil and it came out easily. I'm very surprised!
I've started fitting the upper clamp for the taper attachment... I mentioned in the last post that it was too high... by my calibrated eyeball, maybe .050-.060". I compared the thickness of this one to the one on Hendey #2, and this one is .050 thicker. I set it up on the milling machine and cut .045 off the bottom...

It looks like it is sitting at the right height on the machine now... I may set it up on the surface grinder and just clean the milled surface up.
It has a cutout in the bottom of the end that mounts to the cross slide... this cutout is clearance for the cross slide dovetails. The cutout wasn't quite wide enough to clear the dovetails, so I milled a little off the sides to fix that issue...

Now I need to 'massage' the mount holes just a fuzz to get the correct hole spacing for the screws, then this will be ready to clean, paint, and install. So far, this has been an easier job than I thought it would be.
-Bear

