Got an 11" Logan lathe

When I was in the army I was a machinist in a truck motor pool.
One day I was asked to go to the tank repair machine shop at a different company and see if I knew anything about a machine they had. It was a like new #5 W&S turret lathe that nobody knew how to run. So it just sat there. Wish I could have got my hands on It.
 
Wanted to give an update, it has been awhile since my last posting. Since my last posting, I reviewed the Logan exploded drawings and determined that I was missing some components for the head-stock assembly. About two weeks later and $350 poorer, I got the parts that I needed for my son and I to put the head-stock completely together. Also, I have begun to completely tear down, clean, inspect, and rebuild the quick change gearbox. I knocked out and cleaned all of the bushings, hot tanked the casting, painted the selector arms, cleaned all the gears, and blued some of the parts. This weekend, i hope to get it painted and completely re-assembled.
WCE,
You are doing a great job. You are going to find uses for this machine you never dreamt of. When I restored my 14 inch Logan I actually cut several gears for the quick change gearbox. I found it was cheaper to buy the cutters and make my own, than to hunt and buy the gears I needed online. Maybe I should start a thread of my restoration. Good luck and you'll have no regrets on your purchase.
Randy
 
Got another update. I got the quick change gear box done. Everything has been cleaned. Bare metal parts have received a parkerizing surface treatment, and all the gears, shafts, and bushings got a good coating of 75W-90 gear oil. Next up will be tearing apart, inspecting, repairing, and painting the Saddle / apron assembly. Here are some pictures of the gear box done.
 

Attachments

  • IMG_3972.JPG
    IMG_3972.JPG
    292.2 KB · Views: 21
  • IMG_3973.JPG
    IMG_3973.JPG
    291.5 KB · Views: 21
  • IMG_3974.JPG
    IMG_3974.JPG
    305.5 KB · Views: 20
  • IMG_3978.JPG
    IMG_3978.JPG
    281.6 KB · Views: 21
  • IMG_3979.JPG
    IMG_3979.JPG
    248.8 KB · Views: 22
  • IMG_3981.JPG
    IMG_3981.JPG
    275 KB · Views: 22
Looking good.
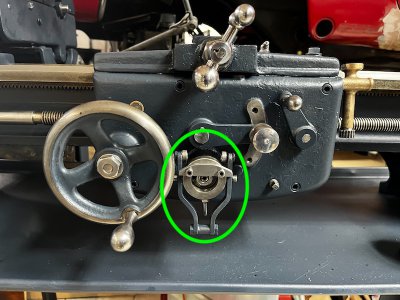
having fun with the carriage clutch yet?
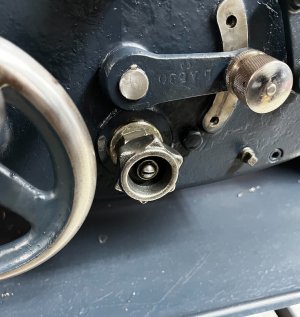
Ha!! Funny... That sucker... that sucker.... I tell you... hahahahaha... I replace what the previous owner had with a factory setup... took me some time to figure out how it worked and how it needed to be mounted...

I removed the original part from the assembly I found in eBay... I have to say, I am so glad I had the spare assembly so I could see how it worked. Installing that knob correctly was a royal PITA...

From this (that was cool on how it worked... could have kept it)

Clutch1.jpeg

To this, the original setup...

Clutch2.jpeg
 
I have another update, finally. It has been 100+ out in my garage most of July and August, which proportionally saps my motivation to work on anything. Anyways, I was checking the play in the spindle and noticed it had about 0.013" - 0.014". I happened to find a piece of 0.013" galvanized sheet at the local Ace Hardware. I measured the I.D. and O.D. of the front bearing cover plate and cut out a shim to ride inside the bearing outer race counter bore. Also, I have started putting on the back drive assembly and all of the QCGB gearing. Next will be the new motor and large pulley assembly. Then onto the saddle and apron assemblies.
 

Attachments

  • IMG_4379.JPG
    IMG_4379.JPG
    473.7 KB · Views: 18
  • IMG_4384.JPG
    IMG_4384.JPG
    342.7 KB · Views: 18
  • IMG_4382.JPG
    IMG_4382.JPG
    188.4 KB · Views: 16
  • IMG_4381.JPG
    IMG_4381.JPG
    339.1 KB · Views: 16
  • IMG_4383.JPG
    IMG_4383.JPG
    233.9 KB · Views: 17
Any updates?
I have a few that I can share. Progress has been slow still. I am hoping to get a lot more done this weekend. The weather is going to be nice enough to work out in the garage again.
Anyways, I am working on getting the new single phase motor installed. When I mocked it up initially, it was obvious that the wiring box was to large to allow the motor fit into the space provided by Logan. So I fabricated my own wire egress system and I am beginning to install it. Below are a couple of pictures of the work I did last weekend. I will build a bracket and a box to finish the wiring to the switch over the next couple of weekends.
 

Attachments

  • IMG_4435.JPG
    IMG_4435.JPG
    251.4 KB · Views: 13
  • IMG_4436.JPG
    IMG_4436.JPG
    181.9 KB · Views: 10
  • IMG_4437.JPG
    IMG_4437.JPG
    238.4 KB · Views: 10
  • IMG_4438.JPG
    IMG_4438.JPG
    160.6 KB · Views: 10
  • IMG_4439.JPG
    IMG_4439.JPG
    180.8 KB · Views: 12
When I was in the army I was a machinist in a truck motor pool.
One day I was asked to go to the tank repair machine shop at a different company and see if I knew anything about a machine they had. It was a like new #5 W&S turret lathe that nobody knew how to run. So it just sat there. Wish I could have got my hands on It.
Being it was the Army were you asked or Told to go over there? :)
I got to run a WS#5 in the Navy. A little...
They had an E4 who was the turret lathe man.
i was only E3 then.
 
Back
Top