Getting a little more Y travel, looking for some additional ideas

My PM30-MV had the rubber sheet. Could not stand the bunching up. Thought about window shade idea but giving up at least 1" of travel from the roller would hurt. Went the good old accordion type. 1" tall so that it's heavy enough to stay flat. Right now, the accordion cover squeezes down to 3/8" in thickness and I'm spanning about 8.3" easy. It would be fine for 12". Good old McMaster. :)
If the roller is mounted on the head why does one give up y travel?
 
Just off the top of my head, an extension off the back of the saddle casting wouldnt be difficult. I'm sure if it was made of steel or 6061 it would be plenty rigid enough.

Pics explain an idea in more detail, with fewer words. I don't see any reason something like this wouldn't be doable.

 
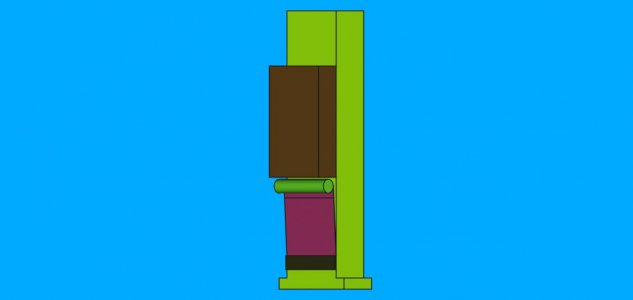
My CAD skills pale compared to @Ken226 but, I was thinking of an interim solution of mounting a roller (green) to the head (brown) with some brackets (not modeled here). The thin rubber sheet (magenta) is wrapped around the roller. The rubber is fixed to the column at the bottom with a thin metal piece. The roller is spring loaded (with no ratchet) and just rolls and retracts as the head moves up and down. I need to check if the roller hits when the head is down. All other times, the roller is out of the way.
rolleridea.jpg
 
My CAD skills pale compared to @Ken226 but, I was thinking of an interim solution of mounting a roller (green) to the head (brown) with some brackets (not modeled here). The thin rubber sheet (magenta) is wrapped around the roller. The rubber is fixed to the column at the bottom with a thin metal piece. The roller is spring loaded (with no ratchet) and just rolls and retracts as the head moves up and down. I need to check if the roller hits when the head is down. All other times, the roller is out of the way.
View attachment 402112

You'll need some kinda wiper to keep little chips that stick to the rubber from building up inside the roller and gumming up the works, but it looks good.
 
You'll need some kinda wiper to keep little chips that stick to the rubber from building up inside the roller and gumming up the works, but it looks good.
Good point. Might the wiper be a brush like thing or more like a windshield wiper insert? Or a thicker piece of rubber edge like a squeegee? Maybe I can find a squeegee insert.

Found a inoperable old window shade to take apart. I'll see if I can modify it for this use. If nothing else it will give me something to take apart and see how it really works. I've seen some pictures, but they don't show the details that I'm interested in.
 
Good point. Might the wiper be a brush like thing or more like a windshield wiper insert? Or a thicker piece of rubber edge like a squeegee? Maybe I can find a squeegee insert.

Im not sure which would work better. You might have to try a couple ideas to find one that works. Your in experimental territory with this idea.

I'm curious to see how it turns out.
 
Im not sure which would work better. You might have to try a couple ideas to find one that works. Your in experimental territory with this idea.

I'm curious to see how it turns out.
Seriously experimental. In Rube Goldberg territory. :)

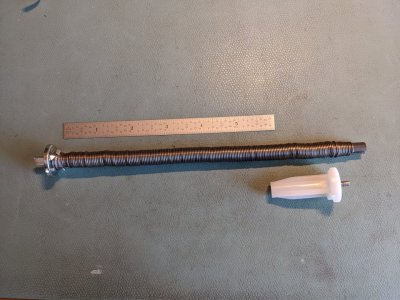
Speaking of which, I took apart an old window shade and pulled out the innards. This shade was retired for not working. It didn't want to come apart, so I put the whole roller in the lathe and turned down the cardboard tube diameter until it weakened enough to pull off the crimped ferrule. It seems that the spring was (still is) totally wound up because of the ratchet mechanism. Have to figure out how to clamp the spring safely and un-tension the spring. Don't want the spring flinging about (really dangerous). Then I need to reduce the spring assembly length from 8" to 4". Don't know if the spring tension will be adequate for that, but there's only one way to find out. BTW, cardboard tubes are awful things to turn on a lathe. They turn initially, but then tear. Cut a 6" piece of PVC 1/2" Schedule 40 pipe, which has nearly the same diameters, to use as the new roller.
PXL_20220329_154740011.jpg
The tube that the spring is wrapped around seems to be some kind of grey plastic. The spring is retained by a slot cut on the right hand side of the tube. The slot appears to be made with a handsaw of some sort. Pretty cheap mechanism, but it worked for 20 years or so.
 
If the roller is mounted on the head why does one give up y travel?

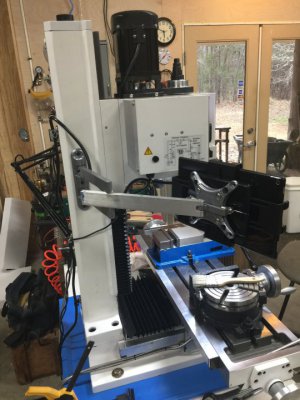
Ahh, that bellows. the PM30-MV defaults with an accordion style chip cover for the column side. I misunderstood and though this was in reference to the one covering the y slides. See below for the "other" one. :)

IMG_2394.JPG
 
Have managed to unwind the spring in the roller. Was kind of difficult, since the pawls had become magnetized and were attracted to the ratchet wheel, and the spring was overwound. So I would release the pawls and get a whopping turn at a time, before the pawls re-engaged. These pawls have no springs, they are just loose on pivots. But somehow they would find their way back into the ratchet. Used a demagnetizer that I made with 6 magnets, mounted the demag unit in my lathe and spun it next to the ratchet mechanism. I think it helped, and was able manage the pawls a little easier and release the tension from the spring. Now need to find my hard wire cutters to cut the spring. I will cut the spring in half, and reduce the size of the spring rod to 4".
 
Ahh, that bellows. the PM30-MV defaults with an accordion style chip cover for the column side. I misunderstood and though this was in reference to the one covering the y slides. See below for the "other" one. :)

View attachment 402249
That's pretty nice for the y bellows. My PM25 uses a rubber sheet for that. Yes, I was talking about the Z bellows and the bracket holding it in place. If it was 10-20mm higher, I'd have less of a problem. Maybe I can just raise the bracket or reduce its depth. That's worth checking out.
 
Back
Top