First Freehand Turn on Mini Lathe

TomWS,
Took me a moment to figure it out, but we are "lathe cousins" (there are not that many types of 7 X 16 lathes out there). Yours appears to be a LMS 5100, Mine is a LMS 7350. It looks like you have jumped into machining with both feet, and are working to get the feel of things. There are a lot of machinists who have never even tried their hand at "free-handing" metal.

Your lathe is a great one to "accessorize". Some of the first things I suggest is tapered head bearings, Brass Gibs, Extended cross-feed (gives you an additional 1 inch towards the operator), updated compound slide (less vibration), and Carriage Lock (bolts on where follower rest would set). The four inch 4-Jaw chuck accessory is also a good thing to add.

Best of luck with your lathe, looks like you are off to a good start.
 
I saved the following thread a couple of years ago for when I actually get around to properly learn graving, ever since I started working with copper, I do feel it is time for me to make the small brass ornaments, easier than how I've been machining them, anyhow, this is the thread that has tons of valuable info in it, IMHO it should be a sticky:
 
I saved the following thread a couple of years ago for when I actually get around to properly learn graving, ever since I started working with copper, I do feel it is time for me to make the small brass ornaments, easier than how I've been machining them, anyhow, this is the thread that has tons of valuable info in it, IMHO it should be a sticky:
Yeah, that's the thread (post #10) where I found the advice on using an ER32 chuck to save knuckles!
 
And another approach for mini lathes for free-handing. Those who make fountain pens on a mini-lathe use this for artful shapes.
$568.43 for that tool rest? Could buy an entire wood lathe for that
 
To round out this thread, I'm posting my 'method' for machining the mounting hole for the Pull. I'm not calling it a method because my motivation was primarily to try out some new Christmas presents and just to see how it would work out. Net is that it worked out pretty well although there are probably more efficient ways of doing this...

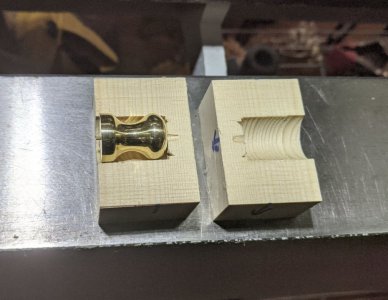
First trick was to create a clamping block that was soft enough to avoid marring the polished finish on the pull, but still hold it well enough so I could machine off the nib left from parting and drill a hole exactly in the center of the base of the pull.

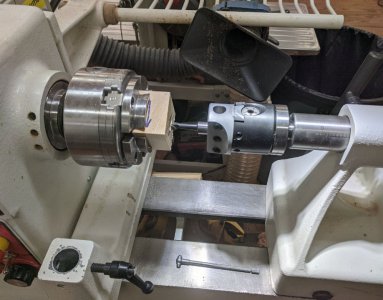
So, being a woodworker AND receiving an MT2 base for my boring head AND receiving a set of telescoping bore gauges for Christmas, this is what I came up with:
PullBoringHead.jpg
I wanted a controlled depth and a clamp for the top and the bottom of the pull. I needed two bores, one to fit the knob of the pull and a slightly larger one to fit the base.
Here is the result, sliced in half with a thin Bandsaw blade so there was clamp pressure most of the way around the pull:
PullInClamp.jpg
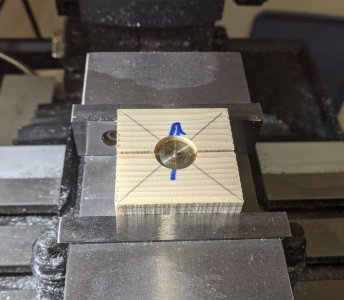
And here it is clamped in my mini Mill...
PullClamped.jpg
Worked like a champ!
 
$568.43 for that tool rest? Could buy an entire wood lathe for that
I am not sure where you got that price. But, it is only about 69 bucks from Little Machine Shop. The part number is in the picture and can be
searched on their website. Part number 1685. You may have confused $68.43 in my low resolution picture for 568.43
 
What's the updated compound?
LMS part 1677 is the base (lower half) of the compound feed. It provides a second set of holes to mount the base of the compound in a more rigid position for SC2 SIEG lathes and their derivatives.
 
LMS part 1677 is the base (lower half) of the compound feed. It provides a second set of holes to mount the base of the compound in a more rigid position for SC2 SIEG lathes and their derivatives.
Seems like that part doesn't require you to fully retract the compound to change the angle or remove it entirely. Is that true?
 
It also reduces the overhang, moves the whole compound closer to the center of the cross slide.
 
Back
Top