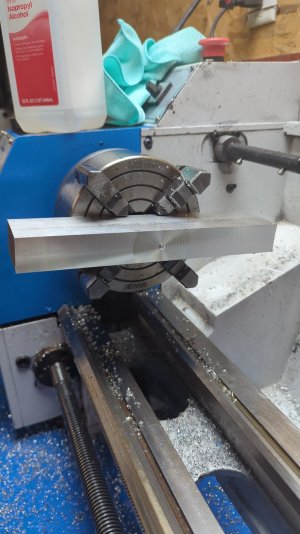
Hi, this might be really obvious to some, but im still pretty new to this and don't have anyone to show me the ropes, so take it easy lol. Stumbled across an issue i haven't run into yet, I have piece of 7075 that is 8"2"x1", and i need to cut the height down about .200". i have a 5" 4 jaw chuck (i also have a 6" and 8" 3 jaw, but i figured the 4 jaw would be better?). Is this a NO-NO, or am I over thinking it.
I wouldn't rule this out at all as a "no-no", but rather a different category. It's very much "off label", and brings with it some cautions and extra care on your end, but it's doable.
My gut feeling is NO, as it could slip out since there isn't a jaw on each edge, or get knocked out of the chuck due to the height of the stock vs the amount of jaw contacting it...
The jaws do not have a positive grip in this case. I 100 percent agree, the jaws need to be flipped so that the tall edge is gripping, HOWEVER... Don't bank on the grip being any better. (well, probably "some" better, but not hugely so) You're loading the jaws sideways, not "in line". No matter how perfect the chuck and jaws are, the jaws are really only gripping at the very inside, as the outer most part of the jaws will be tipping away to "some" degree, depending on the chuck's overall original tolerances and current condition.
The extra "depth" in the jaws by doing it that way doesn't so much buy you any more grip (although it may), but it buys you more time to get the machine shut down if the cut starts getting 'funny'... It doesn't even have to be a work slipping problem, if ANYTHING starts getting funny, that bar is a HUGE lever arm compared to what that chuck is intended for.
Tailstock support would be your best friend there. If you can live with a center feature in the bar, great. If not, you can knock out a little flat disc of scrap metal, and put a center feature into that. That piece can go between the live center and the work, to provide pressure to hold the work flat against the chuck body. Especially during the outside part of the cut. Once the cutter is well within the diameter of the chuck body, there will be a LOT less forces acting on that bar, trying to pull it out of the compromised, but still pretty adequate grip. Once you work down the thickness up to somewhere near that center feature (or where the disc is if you go that route), you'll be cutting well into the chuck diameter, the cutting should not be trying to "ungrip" the part from the chuck, then it could be backed out to whittle down the center most area.
I have done interrupted cuts on smaller stock with no issues,
One thing you're gonna see doing that, is that the outside of the work (the diameter of the work, even though most of the "circle" is not there), that diameter is quite large, you're going to have to keep the spindle speed WAY slow as you start in. That's a long enough that you're going to want a handfull of speed changes throughout each cut. (Or if you can keep a finish, just leave it slow....).
The other thing to keep in mind, the larger the length of that "bar" hanging out, the LESS off of center it needs to be in order to cause large forces from an unbalanced chuck/work assembly. I would measure that very carefully, and even though it theoretically doesn't matter to the finish, I'd take great care to get the workpiece very, very well centered. Especially with a grip that's in the "very doable, but not ideal" catetory.
but nothing bigger than the chuck and always had a jaw on an all 4 edges. I tried searching for an answer, but don't think I'm using the right terminology, a picture says a thousand words, so see pic below. any suggestions on how to do this would be appreciated, my other thought was chucking up a tool and mounting the stock to the cross slide, but i would only be able to cut half or less, the move it, re-square it up, ect. I only need to make 2 of them. Thanks in advance,
It's hard to search for a procedure that isn't a procedure, and if you do find it, you won't find a whole lot of agreement. The biggest thing (And it takes practice, as there are a LOT of things going on in a a machine as simple as a lathe, you've got to figure out how to keep track of and manage them, and there isn't always one right answer.
Set it up, take a cut or two, (start LIGHT and work up....) and see how it goes. If it works well, great. If it doesn't work WELL, stop and find out why. The best tip I can offer is that if you're doing "off label" stuff, is that if it's not working WELL, it's time to stop and re-evaluate the situation right then. Before it's gone off the rails.
So, with all that cautionary stuff said- It (probably) won't come out with the best finish you've ever made, but I'll bet you can get this done.
One other thought- Does this piece (in the finished product) get any holes in it? If so, that "may" present an opportunity. If there were a hole in the center, that could be pre-made into a smaller threaded hole, you can certainly use threaded rod, with a nut and a washer at the back of the spindle, to hold it in "drawbar style". Or if there's other holes in it elsewhere, the often forgotten faceplate method might present some options. Maybe/maybe not in this case, but thinking through a whole process will very often open up options of that nature, that you can cash in on.


