external threading away from headstock

It is quite possible to use a boring bar with a threading tool mounted on the back side of the work, cutting side up, and run the spindle in reverse (clockwise), tool moves away from headstock. This will not work if the work piece is between centers with a standard tool post, or for threads over 4 1/2" diameter on my 13x40 lathe. This is not for long threads or threads a long distance from the right end of the work. It works great otherwise! The same setup works for boring away from an internal shoulder or face, but with the tool cutting on the near side of the bore, tool cutting edges facing down.
 
It is quite possible to use a boring bar with a threading tool mounted on the back side of the work, cutting side up, and run the spindle in reverse (clockwise), tool moves away from headstock. This will not work if the work piece is between centers with a standard tool post, or for threads over 4 1/2" diameter on my 13x40 lathe. This is not for long threads or threads a long distance from the right end of the work. It works great otherwise! The same setup works for boring away from an internal shoulder or face, but with the tool cutting on the near side of the bore, tool cutting edges facing down.

I'd like to echo Bob Korves post. I've had good luck with this technique.
However, depending on the diameter of the work it can still be challenging to see the cutting tip.

Daryl
MN
 
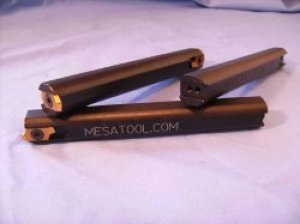
When I looked for left hand threading/boring bars, I had a hard time finding a lay down threading bar which would work well for this application. I vaguely recalled something from Mesa Tooling, which makes some nice turning tools more applicable to the hobbyist. I checked today and they do have a unique threading bar with the insert attached to the end so one can thread with the bar parallel to your work, and it can thread ID/OD forwards, backwards, upside down. The cutting edge of insert is on centerline, so this would work well in this application. The bar is reasonably priced, the limitation is you need to use their inserts, there is also left hand and right hand inserts.

http://www.mesatool.com/products/threading-tools/
http://www.mesatool.com/products/carbide-inserts/

58threadinggroovingtool.jpg
 
My only complaint with the Mesa tools are the very delicate inserts. Alot of front relief under the cutting tip makes for a pretty weak tool. The tool is also not well trapped in the mount, it is partially trapped and held in with a screw. Slightess mishap with this puppy and you are buying a new insert. its reasonably priced but not a perfect tool in my view. You can thread very close to a shoulder with it while threading towards the headstock.

If I have room for a relief groove to use my half inch HSS bit upside down and turning away from headstock that is my preferred set up. I like the Mesa but it has weaknesses in my view. If I needed to turn fine threads it would be my choice but I rarely thread anything finer than 20 tpi.
 
There is a way to use a die and cut a complete thread to the shoulder/fixed end point, I do this all the time for smaller threads. I cut the thread with a die the conventional direction to the shoulder, I then spin off the die and flip it and thread it onto the shaft cutting the final few threads to the shoulder or ending point with the full thread die end. You need to be careful not to over tighten the die against a shoulder or force it with the last thread. If cutting larger threads, then I also would cut away from the headstock if I did not have an electronic stop system.

Yep, do that frequently. For this particular job it did not work well enough. The upside down treading tool worked best in that situation.
 
Rgray, like your rear tool post. I've considered making one also. Care to share details on how you made it?
 
Rgray, like your rear tool post. I've considered making one also. Care to share details on how you made it?

The top of my crossslide was surface ground (probably not necessary it's pretty flat the way it comes).
The T-slot is from a piece of D2 and bolted down with 6 1/4" bolts.
The tool post is 2x2 hrs. It locates into the top of the tee slot so is non rotatable (just means I need to build a rotatable version also).
The dovetail and all other machining was done and then I case hardened it. It is a piston style tool holder the piston is brass.
The cam is made from a car axle and turned that nice color of black all by its self after heat treat.
The spacers through the center of the cam are small engine wrist pins (chainsaw probably).
The T-nut is 2" long and the 3/8 hold down bolt had the head cut off and threaded to go into the t-nut.
I know that's fairly vague... There's lots of thinkin that goes into building the cam and piston, the rest is pretty straight forward.
If you take a piston qctp apart you will learn alot.
For the piston I use a 5/8" piece of brass tuned down to 1/2". the 1/2" end is what protrudes to lock the tool holder. There is a 5/8 hole through the opposing side where I used a 5/8 end mill to make the cam end of the piston hole 5/8"...a stepped hole so a spring can be fit around the 1/2" part of the piston to push it back against the cam.
 
Back
Top