[How do I?] Drum Switch Wiring Done, Help Switching Dual Voltage Motor To 115v (1 Phase)

MasaAMD

Registered
Registered
Joined
Jan 1, 2017
Messages
31
***Edit***
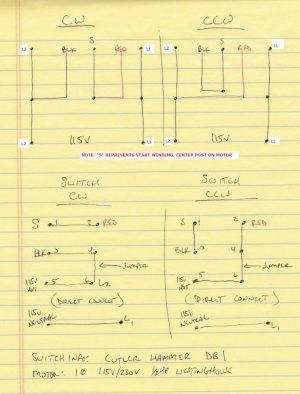
Drum switch wiring has been resolved. See post #4 (http://www.hobby-machinist.com/thre...tage-motor-to-115v-1-phase.54152/#post-449303) for wiring diagram. New issue is trying to switch the motor over to 115v
***Edit***

So I've been rebuilding a new to me Zip-Cut vertical mill over in the Restoration Forum and its time to wire up the motor.

In hopes that it was wired correctly from the previous owner, I cleaned up the terminal ends and tried it out. No dice. Only CCW rotation and it sounds terrible when trying to reverse the switch (which still spins the motor CCW)

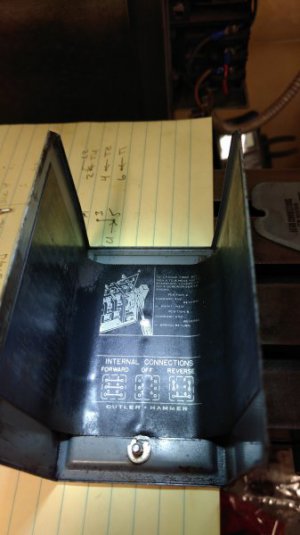
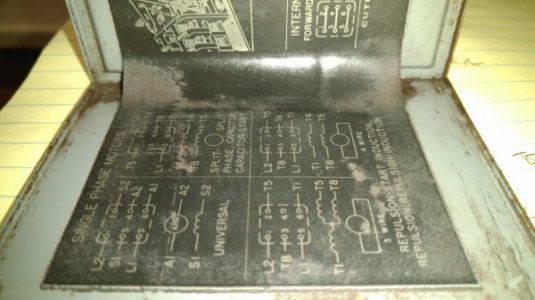
I am able to wire the switch to start the motor without issue. I can also get the motor to reverse direction by switching the black and red wires inside the motor itself.

How do I wire the switch to enable either direction?

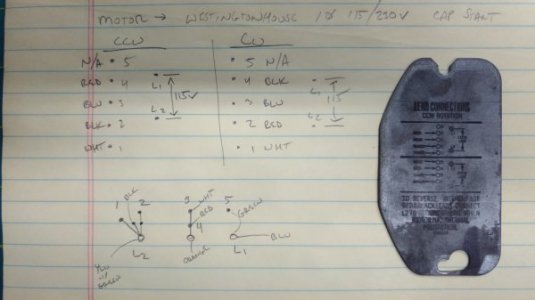
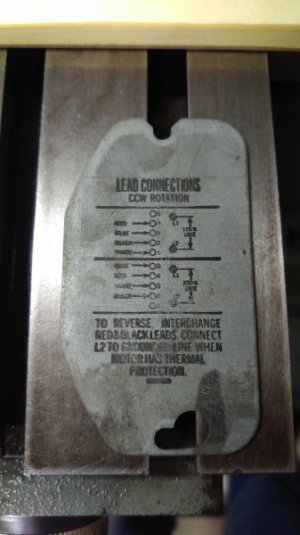
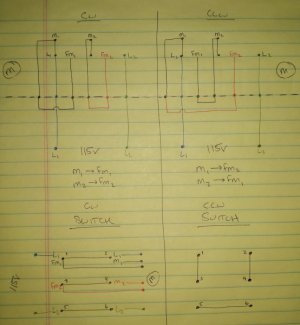
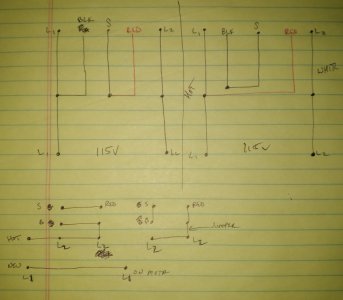
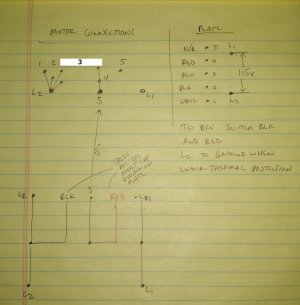
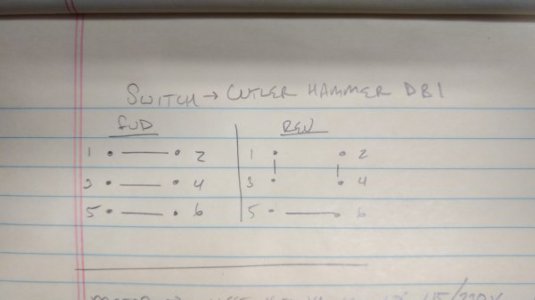
Here are the wiring diagrams
IMG_20170107_014128.jpg
IMG_20170107_014107.jpg
IMG_20170107_002007.jpg IMG_20170107_012050.jpg
IMG_20170106_235146.jpg

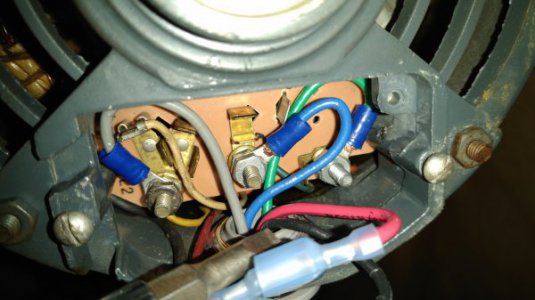
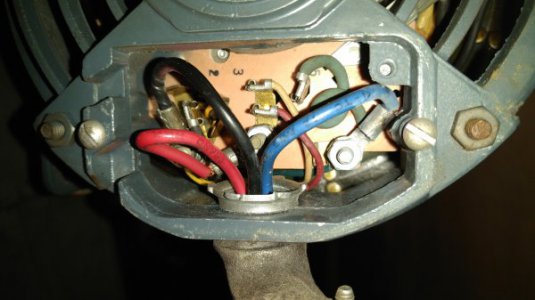
Here is the original motor wiring. To reverse direction I swap the small red wire with the small black wire.
IMG_20170107_012156.jpg

Thanks in advance! If anyone needs better pictures or clarification I will do my best to provide it.
 
Last edited:
Looks like you should hook the black wire to the drum switch terminal 1 and the red to terminal 4. Then run a jumper from the motor connections that the red/black wires are hooked to to terminals 2 and 3 of the drum switch.

We'll call the current terminal on the motor with the red wire "A" and the one the black wire is tied to "B". Tie "A" with a jumper to terminal 2 of the drum switch, tie "B" to terminal 3 of the drum switch.

With that set up in Forward terminals 1 & 2 are tied together along with terminals 3 & 4. That'll tie the black wire on terminal 1 to the jumper running to motor terminal "A" and the red wire on terminal 4 to motor terminal "B".

When in Reverse, terminals 1 (black lead) and terminals 3 (terminal "B") are tied together. Terminals 2 (motor terminal "A") is tied to terminal 4 (motor red lead).

I'm having trouble reading the motor plate photo, but if you are wiring it for 110V, you'll want to tie the black lead (hot lead) from the wall to terminal 5 or 6 of the drum switch and the opposite lead to where ever the motor "wants" to have the 110V feed wire running to it. That way you're switching the hot feed ON/OFF and not leaving the motor live. No problem leaving the ground lead hooked to the motor at all times.

Well, that's my read on it but I'm no electrician! Good luck, looking forward to seeing the finished mill!

Bruce
 
Here's a little clarification on the wiring diagram and the CW side of the switch.
IMG_20170107_173136.jpg

Here's a better picture of the switch wiring
drum.s7.gif
 
Last edited:
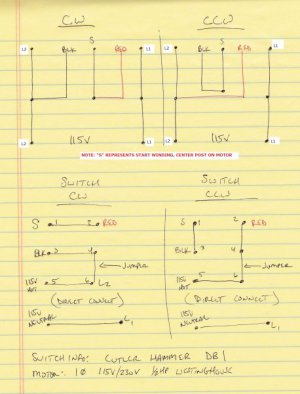
Breakthrough! So I was able to simplify the diagram and figure out the wiring. Now it spins in both directions perfectly! Do not reference this diagram, L2 and L1 are backwards, see the corrected diagram below.
IMG_20170107_201052.jpg

Here is a cleaned up diagram for reference. (This is the revised diagram. There were errors on the previous version)
wiring v2.jpg
 
Last edited:
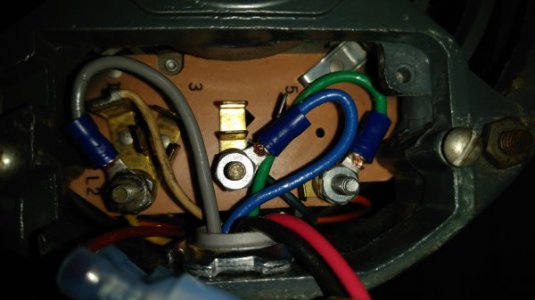
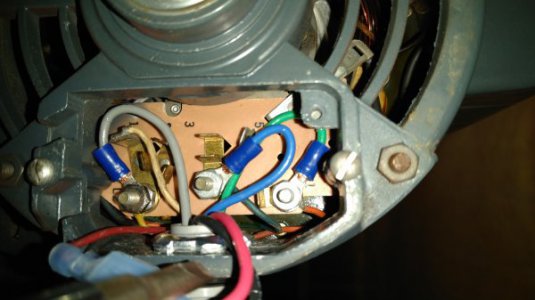
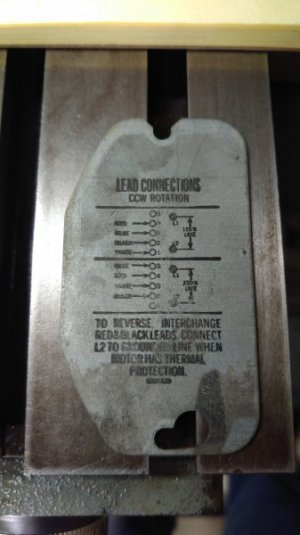
Alright well I'm almost there. After getting everything all wired up and spinning in both directions I decided to test it spinning the spindle. On the smaller motor side pulleys it could spin the spindle, but on the larger ones it would turn very slowly or stall. After taking another look at the motor wiring, it looks as though the motor was previously wired for 230v. Using the plate as reference I swapped the wires to the 115v positions. Only issue is there are a few extra wires not listed. And leaving them in their original spots wont allow the motor to start after moving the other wires.

Here is the wiring as of now
IMG_20170108_014746.jpg
IMG_20170108_014903.jpg
IMG_20170108_014941.jpg

Wires in question at the yellow wire on L1 and the orange wire on L1 (I had moved it from the center tap to L2. This allows the motor to start, but it heats up very fast so I stopped running it immediately)

Also not in the picture, there was a jumper from L1 to 5. I removed it, as I think it was for 230v operation.

Referencing the plate: 1 should be white, 2 black, 3 blue, 4 red, 5 not used. To reverse directions switch black and red which I have wired in the switch.
IMG_20170107_014107.jpg
IMG_20170107_002007.jpg
 
I'm studying your diagrams but I'm having trouble visualizing which terminals the run windings are. Obviously the red and black are the start leg.
What is that wire marked "S" on your sketch? It looks also that that model of drum switch isn't the optimum type to be using here, but I think it can be made to work.
You say you can connect the motor without the drum switch and get proper operation both forward and reverse?
Mark S.

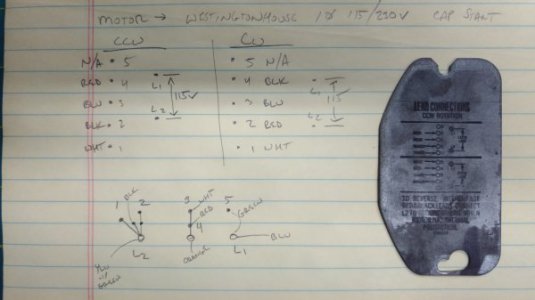
I was looking at my drawings and I had a couple of errors on them that might have been causing some confusion. Here are the corrected drawings. I also sketched an easier to read version of the motor plate and connections. "S" represents the starting circuit. The black and red leads are from the motor and are used to reverse the direction. Power to the motor is through terminals L2 and L1. The one thing that has me confused is whether 3 is associated to the L2 terminal branch or the center post which I'm calling "S". They print it on the board in the middle of the two.
wiring v2.jpgplate v2.jpg
 
Last edited:
I'm not sure if we are on the same page- the black and red leads are the starting leg, I thought. Maybe I'm wrong. What I am not getting is what are the run windings?
There are two of them and they want to be in phase and in parallel. Start leg across the whole thing. I don't suppose you have a VOM with a low ohms range?
Mark S.
I should add that if there's a thermal protector it gets even more complicated
 
Last edited:
I think you are right, the black and red leads are the starting legs. That would make sense that if you reverse them you can change the current flow through the starting winding, changing the direction of the rotation. I think the main run windings are L2 and L1.

So if I am understanding correctly. the start winding (red and black) should be connected to L2 and L1 (possible run windings)? I do have a meter, and I will measure the resistance across the different legs to try to identify which are which.
 
I'm looking for a diagram I just saw that makes all this much clearer- I'll post it or re-draw it, I don't have a great schematic drawing program so bear with me..
Mark S.
PS the start winding and the start leg are two different animals; I THOUGHT that the red and black were the start leg proper which is start winding, capacitor and centrifugal switch all in series. Which would go across the line L1 and L2, and be swapped to reverse rotation.
Mark S.
 
Back
Top